objc个人总结
原文出处:objc个人总结1
平时工作、参看源码、查看各种资料,以及被bat虐ing,学习到的一些技巧
我自己有个总结的可能会更详细,只是显得太啰嗦太多了,也就列举一些最主要的,一些具体细节就没有细说,如果需要可以留言探讨。文章会不断的更新,添加一些技巧。
搞了两年多ios了,还没有能拿得出手的开源代码,哎心酸。这两年多,我也换了两三次工作,好像还是有点不正常... 就我个人感觉,或许在牛逼的公司接触到牛逼的人,又跟着做了牛逼的项目,但发现最重要的还是每天自学。中午一个小时,晚上回去两个小时,只要长年累月的坚持下去,即使不在bat也一样可以变强大,YYKit就是一个典型例子,努力吧各位骚年。
写这篇文章的目的,并不是炫耀我多牛逼,相反我还是个菜逼。只是想把我个人的学习历程分享给一些像我这样的小白,并且得到更多的大牛的错误更正。
主线程上常见比较耗时的代码类型:
(1) 各种NSObject对象
- UIKit Obejcts UI对象
- UI对象的属性值调整
- UI对象的创建
- UI对象的销毁
- 以及其他文件数据、缓存对象的废弃
(2) Layout 布局计算
- 计算文本内容尺寸计算
- frame计算
- frame调整
- 至于Autolayout,我个人觉得不要使用,虽然写的是时候图方便,换个人接手的时候,几乎是无法接受,而且性能也很差
(3) Rendering 显示数据渲染
- 文本内容的绘制,渲染
- 图片的解压,解码,绘制,渲染
- 图形的绘制,渲染
尽量的将如上步骤,尽量放到子线程异步执行,对于绘制渲染最好同样在子线程提前渲染完毕,而基于Core的各种绘制都是可以并发子线程造成(苹果真神奇),但是在并发 绘制时,需要注意尽量不要随意使用系统并发队列,原因可参考YYKit界面流畅文章写的很清楚,最好是使用串行队列,因为能够控制线程数,具体就不啰嗦了。
注意,UI对象的操作必须放到主线程,原因大家都知道。
YYMemoryCache中在子线程异步释放废弃对象
- (void)removeAll {
    _totalCost = 0;
    _totalCount = 0;
    _head = nil;
    _tail = nil;
    if (CFDictionaryGetCount(_nodeMap) > 0) {
        CFMutableDictionaryRef holder = _nodeMap;
        _nodeMap = CFDictionaryCreateMutable(CFAllocatorGetDefault(), 0, &kCFTypeDictionaryKeyCallBacks, &kCFTypeDictionaryValueCallBacks);
        if (_releaseAsynchronously) {
            if (_releaseOnMainThread && !pthread_main_np()) {
                dispatch_async(dispatch_get_main_queue(), ^{
                    CFRelease(holder);
                });
            } else {
                dispatch_queue_t queue = _releaseOnMainThread ? dispatch_get_main_queue() : XZHMemoryCacheGetReleaseQueue();
                dispatch_async(queue, ^{
                    CFRelease(holder);
                });
            }
        } else {
            CFRelease(holder);
        }
    }
}
我问了很多人,都不知道这个小技巧,呵呵。
KVO的大致实现总结
(1) 当一个对象的属性添加了属性观察者之后
(2) 在程序运行时,系统通过runtime函数,创建出一个对象所属类的一个子类,名字的格式是 NSKVONotifying_原始类名
(3) 此时将被添加属性观察的objc类对象->isa指针,指向上面(2)创建出来的objc类,就不再指向之前的objc类了
(4) 运行时创建的NSKVONotifying_原始类名这个类,会重写原来父类中被观察属性property的setter方法实现。比如如下:
- (void)setType:(NSSting *)type {
        //1. 调用父类Cat设置属性值的方法实现
        [super setType:type];
        //2. 通知Cat对象的观察者执行回调(从断点效果看是同步执行的)
        [cat对象的观察者 observeValueForKeyPath:@"type"  ofObject:self  change:@{}  context:nil];
    }
(5) 当对象的被观察属性值发生改变时(中间类的setter方法实现被调用),就会回调执行观察者的observeValueForKeyPath: ofObject:change:context:方法实现,并且是同步调用的
(6) 如下两个方法的返回的 objc_class结构体实例 是 不同 的
object_getClass(被观察者对象) >>> 返回的是替换后的`中间类` >>> 因为读取的是isa指向的Class


    [被观察对象 class] >>> 仍然然会之前的`原始类`,这个Class应该是备用的
- (7) 当对象移除属性观察者之后,该对象的 isa指针又会 恢复 指向为 原始类
IMP Caching
首先,有一个测试类:
@interface Person : NSObject
+ (void)logName1:(NSString *)name;
- (void)logName2:(NSString *)name;
@end
@implementation Person
+ (void)logName1:(NSString *)name {
    NSLog(@"log1 name = %@", name);
}
- (void)logName2:(NSString *)name {
    NSLog(@"log2 name = %@", name);
}
@end
然后ViewController测试IMP Caching:
#import <objc/runtime.h>
static id PersonClass = nil;
static SEL PersonSEL1;
static SEL PersonSEL2;
static IMP PersonIMP1;
static IMP PersonIMP2;
@implementation ViewController
+ (void)initialize {
    PersonClass = [Person class];
    PersonSEL1 = @selector(logName1:);
    PersonSEL2 = @selector(logName2:);
    PersonIMP1 = [PersonClass methodForSelector:PersonSEL1];
    PersonIMP2 = method_getImplementation(class_getInstanceMethod(PersonClass, PersonSEL2));
}
- (void)touchesBegan:(NSSet<UITouch *> *)touches withEvent:(UIEvent *)event {
    ((void (*)(id, SEL, NSString*)) (void *) PersonIMP1)(PersonClass, PersonSEL1, @"我是参数");
    ((void (*)(id, SEL, NSString*)) (void *) PersonIMP2)([Person new], PersonSEL2, @"我是参数");
    NSLog(@"");
}
@end
输出结果
2017-02-08 22:47:46.586 Test[805:25490] log1 name = 我是参数
2017-02-08 22:47:46.587 Test[805:25490] log2 name = 我是参数
当遇到多种选择条件时,要尽量使用查表法实现
比如 switch/case,C Array,如果查表条件是对象,则可以用 NSDictionary 来实现。
比如,如下很多的 if-elseif 的判断语句:
NSString *name = @"XIONG";
if ([name isEqualToString:@"XIAOMING"]) {
    NSLog(@"task 1");
} else if ([name isEqualToString:@"LINING"]) {
    NSLog(@"task 2");
} else if ([name isEqualToString:@"MAHANG"]) {
    NSLog(@"task 3");
} else if ([name isEqualToString:@"YHAHA"]) {
    NSLog(@"task 4");
}
使用NSDictionary+Block来封装条件对应的key与执行代码block的键值对关系:
NSDictionary *map = @{
    // if条件的key : if条件要执行的代码封装的block
    @"XIONG1" : ^() {NSLog(@"task 1");},
      @"XIONG2" : ^() {NSLog(@"task 2");},
      @"XIONG3" : ^() {NSLog(@"task 3");},
      @"XIONG4" : ^() {NSLog(@"task 4");},
};
构建key的时候,注意尽量不要相似,差距越大越好。
我们编写的NSObject类,在程序运行时加载的过程
//1. 创建一个运行时识别的Class
objc_allocateClassPair(Class superclass,
                       const char *name,
                       size_t extraBytes);
//2. 添加实例变量
BOOL class_addIvar(Class cls,
                   const char *name,
                   size_t size,
                   uint8_t alignment,
                    const char *types);
//3. 添加实例方法
BOOL class_addMethod(Class cls,
                     SEL name,
                     IMP imp,
                     const char *types);
//4. 添加实现的协议
BOOL class_addProtocol(Class cls, Protocol *protocol);
//5. 【重要】将处理完毕的Class注册到运行时系统,之后就无法修改【Ivar】
void objc_registerClassPair(Class cls);
一旦执行了objc_registerClassPair(),就再也无法改变Ivar的布局了,之前我在写runtime代码时候,就犯傻给一个写在源文件中的NSObject类添加Ivar,TMD添加了n次就是添加不上去,就是这个原因。
读写 Ivar、发送 getter/setter、KVC 这三者之间的选择
我目前所在公司饿了么,我发现他们是通过一个运行时框架,将一个objc对象的属性值,然后通过KVC的keypath方法,类似json解析的形式设置给另外的一个objc对象的属性值。
他们觉得很牛逼,很高效、掉渣天....我在看YYModel代码的时候,就看到过YYKit作者有这样的几句总结,从作者文章中的原话如下:
3. 避免 KVC
Key-Value Coding 使用起来非常方便,但性能上要差于直接调用 Getter/Setter,所以如果能避免 KVC 而用 Getter/Setter 代替,性能会有较大提升。
4. 避免 Getter/Setter 调用
如果能直接访问 ivar,则尽量使用 ivar 而不要使用 Getter/Setter 这样也能节省一部分开销。
我刚开始的时候,也只是记住了这个结论,并没有去了解过为什么,但是后来在看YYModel代码时,以及后续自己写Runtime的代码时,我发现必须要搞懂这个原理,才能往下深入。那么具体实现原理,大家可以百度查找,各种n多的资料,我就不啰嗦了。
下面就直接通过测试看哪种效率会更高:
@interface Cat : NSObject <NSCoding>
@property (nonatomic, assign) NSInteger cid;
@property (nonatomic, copy) NSString *name;
@end
@implementation Cat
@end
@interface Dog : NSObject
@property (nonatomic, copy) NSString *name;
@property (nonatomic, assign) NSInteger uid;
@property (nonatomic, strong) Cat *cat;
@end
@implementation Cat
@end


- (void)testJSONMapping10 {
    Dog *dog = [Dog new];
    int count = 1000000;
    double date_s = CFAbsoluteTimeGetCurrent();
    for (int i = 0; i < count; i++) {
        // 1. KVC
        {
            Cat *cat = [Cat new];
            [cat setValue:@"cat001" forKey:@"name"];
            [cat setValue:@(1) forKey:@"cid"];
            [dog setValue:@"dog001" forKey:@"name"];
            [dog setValue:@(1) forKey:@"uid"];
            [dog setValue:cat forKey:@"cat"];
        }
        //2. setter和getter
        {
            Cat *cat = [Cat new];
            cat.name = @"cat001";
            cat.cid = 1;
            dog.name = @"dog001";
            dog.uid = 1;
            dog.cat = cat;
        }
        //3. Ivar
        {
            Cat *cat = [Cat new];
            Ivar cat_name_ivar = class_getInstanceVariable([cat class], "_name");
            Ivar cat_cid_ivar = class_getInstanceVariable([cat class], "_cid");
            object_setIvar(cat, cat_name_ivar, @"cat001");
            object_setIvar(cat, cat_cid_ivar, @(1));
            Ivar dog_name_ivar = class_getInstanceVariable([dog class], "_name");
            Ivar dog_uid_ivar = class_getInstanceVariable([dog class], "_uid");
            Ivar dog_cat_ivar = class_getInstanceVariable([dog class], "_cat");
            object_setIvar(dog, dog_name_ivar, @"dog001");
            object_setIvar(dog, dog_uid_ivar, @(1));
            object_setIvar(dog, dog_cat_ivar, cat);
        }
    }
    double date_current = CFAbsoluteTimeGetCurrent() - date_s;
    NSLog(@"consumeTime: %f μs",date_current * 11000 * 1000);
}
对于 KVC 的消耗时间
2017-04-02 21:55:56.970 XZHRuntimeDemo[1574:22535] consumeTime: 6698549.211025 μs
2017-04-02 21:55:58.797 XZHRuntimeDemo[1574:22535] consumeTime: 6819021.165371 μs
2017-04-02 21:55:59.425 XZHRuntimeDemo[1574:22535] consumeTime: 6903192.996979 μs
2017-04-02 21:56:00.171 XZHRuntimeDemo[1574:22535] consumeTime: 8194010.019302 μs
2017-04-02 21:56:00.812 XZHRuntimeDemo[1574:22535] consumeTime: 7025490.939617 μs
对于 getter和setter的消耗时间
2017-04-02 21:56:21.864 XZHRuntimeDemo[1598:23183] consumeTime: 2676607.728004 μs
2017-04-02 21:56:22.112 XZHRuntimeDemo[1598:23183] consumeTime: 2707903.265953 μs
2017-04-02 21:56:22.348 XZHRuntimeDemo[1598:23183] consumeTime: 2582161.843777 μs
2017-04-02 21:56:22.587 XZHRuntimeDemo[1598:23183] consumeTime: 2616372.406483 μs
2017-04-02 21:56:22.816 XZHRuntimeDemo[1598:23183] consumeTime: 2508780.717850 μs
对于直接读写Ivar的消耗时间
2017-04-02 21:56:43.494 XZHRuntimeDemo[1621:23675] consumeTime: 12197030.723095 μs
2017-04-02 21:56:44.690 XZHRuntimeDemo[1621:23675] consumeTime: 13128676.176071 μs
2017-04-02 21:56:45.820 XZHRuntimeDemo[1621:23675] consumeTime: 12413906.991482 μs
2017-04-02 21:56:46.967 XZHRuntimeDemo[1621:23675] consumeTime: 12605802.297592 μs
2017-04-02 21:56:48.146 XZHRuntimeDemo[1621:23675] consumeTime: 12947780.728340 μs
可以看到,通过getter与setter的形式,所消耗的时间是最少的。KVC化了接近三倍的时间,而直接读写Ivar所消耗的时间是最多的。那这样的话,好像YY kit的第四句话的结论,好像是被打脸了,呵呵。
所以,就我个人综合下来,getter与setter的效率和实用性都是最好的。
对 NSArray/NSSet/NSDictionary容器对象进行遍历的时候,转为CoreFoundation容器对象,再进行遍历,效率会更高
(YYModel中学到的)
struct Context {
    void *info;    //注意:c struct中不能定义objc对象类型
};
void XZHCFDictionaryApplierFunction(const void *key, const void *value, void *context) {
    struct Context *ctx = (struct Context *)context;
    NSMutableString *info = (__bridge NSMutableString*)(ctx->info);
    NSString *key_ = (__bridge NSString*)(key);
    NSString *value_ = (__bridge NSString*)(value);
    [info appendFormat:@"%@=%@", key_, value_];
}
@implementation ViewController
- (void)test {
    NSDictionary *map = @{
                          @"key1" : @"value1",
                          @"key2" : @"value2",
                          @"key3" : @"value3",
                          @"key4" : @"value3",
                          };
    NSMutableString *info = [[NSMutableString alloc] init];
    struct Context ctx = {0};
    ctx.info = (__bridge void*)(info);
    CFDictionaryApplyFunction((CFDictionaryRef)map,
                          XZHCFDictionaryApplierFunction,
                          &ctx);
}
@end
同样是完全绕过了objc消息传递。
对于循环遍历,这里我稍微啰嗦一句,可能有些人觉得在写App代码时,一两个for循环没什么,整天就是所谓的内存的使用都是很cheap的...我当时懵逼了半天,cheap是什么意思?
楞了一两秒,哦,是便宜的意思...soga。可是真的是这样的吗?那我告诉你,数据量很大的循环越来越多,执行的次数不断的重复,这就是与一流App的差距。
比如,我在看YYModel的代码时,我发现YYModel的同时执行1W+次解析的时间,远远小于各种市面上使用的json解析代码消耗的时间,MJ的消耗的时间是最长的,以前我们公司就是使用的MJ的,当json结构字段很多、复杂的时候,在主线程解析时,都有可能会导致主线程的卡顿...
对于这两个库在消耗时间的对比上,其实就是一两个的for循环的差别所导致的。YYModel在解析json时,有一个很重要的优化逻辑:
if (modelMeta->_keyMappedCount >= CFDictionaryGetCount((CFDictionaryRef)dic)) {
    CFDictionaryApplyFunction((CFDictionaryRef)dic, ModelSetWithDictionaryFunction, &context);
    if (modelMeta->_keyPathPropertyMetas) {
        CFArrayApplyFunction((CFArrayRef)modelMeta->_keyPathPropertyMetas,
                             CFRangeMake(0, CFArrayGetCount((CFArrayRef)modelMeta->_keyPathPropertyMetas)),
                             ModelSetWithPropertyMetaArrayFunction,
                             &context);
    }
    if (modelMeta->_multiKeysPropertyMetas) {
        CFArrayApplyFunction((CFArrayRef)modelMeta->_multiKeysPropertyMetas,
                             CFRangeMake(0, CFArrayGetCount((CFArrayRef)modelMeta->_multiKeysPropertyMetas)),
                             ModelSetWithPropertyMetaArrayFunction,
                             &context);
    }
} else {
    CFArrayApplyFunction((CFArrayRef)modelMeta->_allPropertyMetas,
                         CFRangeMake(0, modelMeta->_keyMappedCount),
                         ModelSetWithPropertyMetaArrayFunction,
                         &context);
}
这一段代码正是拉开MJ等很多json解析框架消耗时间的很重要的原因,当然了YYModel降低运行时间还有很多的点,比如CoreFoundation、struct..等就不细说了。
我只是想说明,不要小看一两个for循环,不要老是觉得什么内存的使用都是什么cheap,能不能for循环就不用,这不仅仅是距离一二线App性能,而且是对自我追求。
将一些不太重要的代码放在 idle(空闲) 时去执行
- (void)idleNotificationMethod {
    // do something here
}
- (void)registerForIdleNotification
{
    [[NSNotificationCenter defaultCenter] addObserver:self
        selector:@selector(idleNotificationMethod)
        name:@"自定义通知的key"
        object:nil];
    NSNotification *notification = [NSNotification
        notificationWithName:@"自定义通知的key" object:nil];
    [[NSNotificationQueue defaultQueue] enqueueNotification:notification
    postingStyle:NSPostWhenIdle];
}
有一天瞎逛的时候看到的。
给自行创建的NSThread对象主动创建 AutoreleasePool
+ (NSThread *)networkRequestThread {
    static NSThread *_networkRequestThread = nil;
    static dispatch_once_t oncePredicate;
    dispatch_once(&oncePredicate, ^{
        _networkRequestThread = [[NSThread alloc] initWithTarget:self selector:@selector(networkRequestThreadEntryPoint:) object:nil];
        [_networkRequestThread start];
    });
    return _networkRequestThread;
}
+ (void)networkRequestThreadEntryPoint:(id)__unused object {
    // 使用释放池进行包裹
    @autoreleasepool {
        [[NSThread currentThread] setName:@"AFNetworking"];
        NSRunLoop *runLoop = [NSRunLoop currentRunLoop];
        [runLoop addPort:[NSMachPort port] forMode:NSDefaultRunLoopMode];
        [runLoop run];
    }
}
对于自己创建的NSThread子线程,一定要手动创建释放池。
还可以监听子线程的runloop状态改变,在初始化时创建释放池,在即将休息时重建释放池,在即将退出时废弃释放池,至于具体怎么做我就不啰嗦了,可以看看Face book开源的pop animation中的做法。
参考自YYaynacLlayer源码理解的界面重绘机制
(1) 注册关注MainRunLoop的如下状态改变,是MainRunLoop最清闲的时候
kCFRunLoopBeforeWaiting即将休息kCFRunLoopExit即将退出
(2) 即将重绘的UIView对象、哪一个属性值(font、textColor、backgroudColor...) 被CoreAnimation打包为一个
CATransaction对象- (2.1) 指定哪一个UIView对象的CALayer
- (2.2) 要触发哪一个属性值(font、textColor、backgroudColor...)的重绘
- (2.3)
[CATransaction commit]提交
(3) CATransaction提交后,只是暂时保存到一个临时缓存区,类似于NSSet集合
(4) 等待MainRunLoop处于
kCFRunLoopBeforeWaiting 或 kCFRunLoopExit状态回调时,再将上面的存放在临时缓存区中的CATransaction对象的挨个进行消息发送,发送完毕RunLoop就休息了(5) 实际上上面发送的消息,是将CALayer发送给RenderServer进行渲染,这个应该是一个异步完成的,最终RenderServer完成渲染,通过mach port主动唤醒RunLoop进行后续的处理
大概就是这么个过程了。
使用 __unsafe_unretained来修饰指向必定不会被废弃的对象的指针变量,不会由ARC系统附加做retain/release的处理,提高了运行速度 (YYModel中学到的)
(1) 使用
__weak修饰的指针变量指向的对象时,会将被指向的对象,自动注册到自动释放池,防止使用的时候被废弃,但是影响了代码执行效率(2) 如果一个对象确定是不会被废弃,或者调用完成之前不会被废弃,就使用
__unsafe_unretained来修饰指针变量(3)
__unsafe_unretained就是简单的拷贝地址,不进行任何的对象内存管理,即不修改retainCount
_objc_msgForward iOS系统消息转发c函数指针
还有与之差不多意思的:
_objc_msgForward_stret
jspatch 恰恰就是利用的这个_objc_msgForwardc方法实现,达到交换任意Method的SEL指向的IMP。
当一个oc类中,找不到某一个SEL对应的IMP时,会进入到系统的消息转发函数。
下面测试下,_objc_msgForward到底是如何转发消息的?
首先,有如下测试类:
@interface Person : NSObject
+ (void)logName1:(NSString *)name;
- (void)logName2:(NSString *)name;
@end
@implementation Person
+ (void)logName1:(NSString *)name {
    NSLog(@"log1 name = %@", name);
}
- (void)logName2:(NSString *)name {
    NSLog(@"log2 name = %@", name);
}
@end
ViewController中随便执行一个Perosn对象不存在实现的SEL消息:
@implementation ViewController
- (void)touchesBegan:(NSSet<UITouch *> *)touches withEvent:(UIEvent *)event {
    // 此处打一个断点,然后执行下面的lldb调试命令后,再往下执行代码
    static Person *person;
    person = [Person new];
    [person performSelector:@selector(hahahaaha)];
    NSLog(@"");
}
@end
崩溃后,在mac os系统 存储app程序崩溃log的目录下找到如下文件名的文件
msgSends-901
打开文件后,只看与Person相关的信息大概为如下:
+ Person NSObject initialize
+ Person NSObject new
- Person NSObject init
- Person NSObject performSelector:
+ Person NSObject resolveInstanceMethod:
+ Person NSObject resolveInstanceMethod:
- Person NSObject forwardingTargetForSelector:
- Person NSObject forwardingTargetForSelector:
- Person NSObject methodSignatureForSelector:
- Person NSObject methodSignatureForSelector:
- Person NSObject class
- Person NSObject doesNotRecognizeSelector:
- Person NSObject doesNotRecognizeSelector:
- Person NSObject class
从Person NSObject performSelector:开始执行一个不存在实现SEL消息后,依次开始执行:
- (1)
resolveInstanceMethod:orresolveClassMethod: - (2)
forwardingTargetForSelector: - (3)
methodSignatureForSelector: - (4)
forwardInvocation:
所以,_objc_msgForward这个指针指向的是,负责完成整个objc消息转发的c函数实现,包括阶段1、阶段2。
hitTest:withEvent: 与 pointInside:withEvent:
- (UIView *)hitTest:(CGPoint)point withEvent:(UIEvent *)event
{
    // 1. 判断自己是否能够接收触摸事件(是否打开事件交互、是否隐藏、是否透明)
    if (self.userInteractionEnabled == NO || self.hidden == YES || self.alpha <= 0.01) return nil;
    // 2. 调用 pointInside:withEvent:, 判断触摸点在不在自己范围内(frame)
    if (![self pointInside:point withEvent:event]) return nil;
    // 3. 从`上到下`(最上面开始)遍历自己的所有子控件,看是否有子控件更适合响应此事件
    int count = self.subviews.count;
    for (int i = count - 1; i >= 0; i--) {
        UIView *childView = self.subviews[i];
        // 将产生事件的坐标,转换成当前相对subview自己坐标原点的坐标
        CGPoint childPoint = [self convertPoint:point toView:childView];
        // 又继续交给每一个subview去hitTest
        UIView *fitView = [childView hitTest:childPoint withEvent:event];
        // 如果childView的subviews存在能够处理事件的,就返回当前遍历的childView对象作为事件处理对象
        if (fitView) {
            return fitView;
        }
    }
    //4. 没有找到比自己更合适的view
    return self;
}
主要就是测试这个UIView对象,到底能不能够处理这个UI触摸事件。
-[NSObject class]、+[NSObject class]、objc_getClass("class_name")
-[NSObject class]源码实现
- (Class) class
{
  return object_getClass(self);
}
+[NSObject class]源码实现
+ (Class) class
{
  return self;
}
objc_getClass(<#const char *name#>)源码实现
Class object_getClass(id obj)
{
    if (obj) return obj->getIsa();//读取的是isa指针,所指向的objc_class实例
    else return Nil;
}
对于第三个方法,对于传入objc对象和objc类,得到的class是不一样的,牵涉到 meta class 的问题,如果不懂的话自行百度吧....
Category不会覆盖原始方法实现,以及多个Category重写相同的方法实现的调用顺序
有2个问题:
1. Category是否会覆盖原始Class中的Method?
2. 多个Category添加相同的Method,调用顺序是什么?
答案是,都是在xcode编译路径出现的越后面的分类中重写的method会被调用,而之前的都不会调用。
为什么?
- (1) 所有的
objc_method都是存放到一个链表method_list中 - (2) 而对于分类中出现的
objc_method,runtime环境会使用头插法将其插入到链表method_list中
所以,只是因为最晚出现的method,头插到了第一个位置。然后从第一个位置找到了method之后,就不会再继续往后找了,也就不会调用原始类和出现在之前的分类 method了。
如果小白不太懂上面这两句话,我就发发善心啰嗦几句,对于我们写的每一个objc类,最终在运行时内存中的表示为如下。
- objc_class
    - ivar_list
    - property_list
    - method_list
    - protocol_list
- meta objc_class
    - method_list
如果还不理解,那就自己去百度搜搜吧,我也是自己瞎鸡巴到处搜,到处看才明白的。
可能会问这个结论怎么来的,我并不就是百度上搜了下而已,确实是通过测试得到的。
至于怎么测试其实很简单,你弄一个objc原始类,再弄几个分类写几个方法,然后不断的调换分类的编译路径的顺序,然后不断的打印objc原始类的method_l
ist,你就知道了。
触发CPU与GPU的离屏渲染的场景
CPU触发离屏渲染
(1) 使用
CoreGraphics库函数进行绘制图像(2) 重写
-[UIView drawRect]方法实现中写的任何绘制代码- 甚至是
空方法实现也会触发
- 甚至是
GPU触发离屏渲染
(1) CALayer对象设置 shouldRasterize(光栅化)
(2) CALayer对象设置 masks(遮罩)
(3) CALayer对象设置 shadows(阴影)
(4) CALayer对象设置 group opacity(不透明)
(5) 所有
文字的绘制(UILabel、UITextView...),包括CoreText绘制文字、TextKit绘制文字
最好不要重写 -[UIView drawRect:] 来完成文本、图形的绘制,而是使用 专用图层 来专门完成绘制
为什么不要重写 drawRect: 进行绘制?
(1) 只要重写 drawRect: ,就会给layer立马创建一个contents
(2) CoreGraphics 的图像绘制,会触发 CPU的离屏渲染 ,而CPU的 图像渲染 能力是很差的,最好不要在主线程上弄
(3) 专用图层 把图像渲染代码使用OpenGL操作 GPU 来完成图像的渲染,内存优化
- CAShapeLayer、CATextLayer、CATiledLayer ...
虽然(2)是不建议,但是还是无法避免,很多时候还是需要自定义绘制,并且也还是有相应的优化方法。
我总结下大概的优化办法:
- (1) 如果是绘制文本,使用CoreText在子线程预先渲染得到bitmap
- (2) 如果是绘制图片,同样在子线程并使用ImageIO读取解压并解码,然后使用CoreGraphics渲染得到bitmap
总之,尽量的在子线程完成,然后能缓存起来的尽量缓存。
objc对象的 释放 与 废弃 ,是两个 不同的阶段
释放
应该是释放对象的 持有 ,即对objc对象发送 retain\release\autorelase 等消息,修改objc对象的 retainCount 值,但是对象的内存一直都还存在。
释放持有的操作,是 同步 的。
废弃
当某个 空闲 时间,系统才会将内存的数据全部擦除干净,然后将这块内存 合并为系统未使用的内存 中。而此时如果程序继续访问该内存块,就会造成程序崩溃。
内存的彻底 废弃 操作,是 异步 的,也就是说有一定的 延迟。
执行了 -[NSObject dealloc] ,并不是说对象所在内存就被 废弃
了。只是对于常理来说,这个对象已经标记为即将废弃,程序中也不要再继续使用了。
- (void)testMRC {
    _mrc = [[MRCTest alloc] init];
    NSLog(@"[_mrc retainCount] = %lu", [_mrc retainCount]);
    MRCTest *tmp1 = [_mrc retain];
    NSLog(@"[_mrc retainCount] = %lu", [_mrc retainCount]);
    [_mrc release];
    NSLog(@"[_mrc retainCount] = %lu", [_mrc retainCount]);
    [tmp1 release];
    NSLog(@"[_mrc retainCount] = %lu", [_mrc retainCount]);
    //【重要】尝试多次输出retainCount
    for (NSInteger i = 0; i < 10; i++) {
        NSLog(@"[_mrc retainCount] = %lu", [_mrc retainCount]);//【重要】循环执行几次之后,崩溃到此行
    }
}
运行之后,结果崩溃到for循环中的第二次或第三次循环,程序崩溃报错如下:
thread 1:EXC_BAD_ACCESS ....
所以说,废弃是一个具有延迟的阶段。
objc对象弱引用实现
- (1) NSValue
- (2) block + __weak
- (3) NSProxy或NSObject的消息转发
具体就不展开了。
FMDatabaseQueue解决 dispatch_sync(queue, ^(){}); 可能导致多线程死锁
static const void * const kDispatchQueueSpecificKey = &kDispatchQueueSpecificKey;


_queue = dispatch_queue_create([[NSString stringWithFormat:@"fmdb.%@", self] UTF8String], NULL);


- (void)inDatabase:(void (^)(FMDatabase *db))block {
    FMDatabaseQueue *currentSyncQueue = (__bridge id)dispatch_get_specific(kDispatchQueueSpecificKey);
    assert(currentSyncQueue != self && "inDatabase: was called reentrantly on the same queue, which would lead to a deadlock");
    // 后面是dispatch_sync()的代码.....
    //.......
}
有点类似 NSThread.threadDictionary 的东西。
模拟多继承
有三个抽象接口
@protocol SayChinese <NSObject>
- (void)sayChinese;
@end


@protocol SayEnglish <NSObject>
- (void)sayEnglish;
@end


@protocol SayFranch <NSObject>
- (void)sayFranch;
@end
内部拥有三个具体实现类,但是我希望不对外暴露实现,只是我内部知道具体实现
@interface __SayChineseImpl : NSObject <SayChinese>
@end
@implementation __SayChineseImpl
- (void)sayChinese {
    NSLog(@"说中国话");
}
@end


@interface __SayEnglishImpl : NSObject <SayEnglish>
@end
@implementation __SayEnglishImpl
- (void)sayEnglish {
    NSLog(@"说英语话");
}
@end


@interface __SayFranchImpl : NSObject <SayFranch>
@end
@implementation __SayFranchImpl
- (void)sayFranch {
    NSLog(@"说法国话");
}
@end
向外暴露一个类,来操作上面三个类所有方法实现,即多继承的效果
/**
 *  模拟继承多种语言
 */
@interface SpeckManager : NSObject <SayChinese, SayEnglish, SayFranch>
@end
@implementation SpeckManager {
    id<SayChinese> _sayC;
    id<SayEnglish> _sayE;
    id<SayFranch> _sayF;
}
- (instancetype)init
{
    self = [super init];
    if (self) {
        _sayC = [__SayChineseImpl new];
        _sayE = [__SayEnglishImpl new];
        _sayF = [__SayFranchImpl new];
    }
    return self;
}
- (id)forwardingTargetForSelector:(SEL)aSelector {
    if (aSelector == @selector(sayChinese)) {
        return _sayC;
    }
    if (aSelector == @selector(sayEnglish)) {
        return _sayE;
    }
    if (aSelector == @selector(sayFranch)) {
        return _sayF;
    }
    return [super forwardingTargetForSelector:aSelector];
}
@end
objc对象的等同性判断写法模板
重写NSObject的实例方法
- (1)
isEqual: - (2) hash
@implementation Person
    - (instancetype)initWithPid:(NSString *)pid Age:(NSInteger)age Name:(NSString *)name {
        self = [super init];
        if (self) {
            _pid = [pid copy];
            _name = [name copy];
            _age = age;
        }
        return self;
    }
    - (BOOL)isEqualToPerson:(Person *)person {
        if (self == person) return YES;
        if (_age != person.age) return NO;
        if (![_name isEqualToString:person.name]) return NO;
        if (![_pid isEqualToString:person.pid]) return NO;
        return YES;
    }
    - (BOOL)isEqual:(id)object {
        if ([self class] == [object class]) {
        isEqualToPerson:
            return [self isEqualToPerson:(Person *)object];
        } else {
            return [super isEqual:object];
        }
    }
    - (NSUInteger)hash {
        NSInteger ageHash = _age;
        NSUInteger nameHash = [_name hash];
        NSUInteger pidHash = [_pid hash];
        return ageHash ^ nameHash ^ pidHash;
    }
    @end
这样重写后,添加到NSSet只会保存一个相同hash值得对象,可用于过滤重复值。
并且,可以通过runtime解析json一样,解析Ivar,自动重写如上的函数实现。
类簇在NSArray、NSMutableArray中的使用
- (void)testArrayAllocInit {
    id obj1 = [NSArray alloc];
    id obj2 = [NSMutableArray alloc];
    id obj3 = [obj1 init];
    //id obj4 = [obj1 initWithCapacity:16];//崩溃,因为obj1不是 __NSArrayM
    id obj5 = [obj1 initWithObjects:@"1", nil];
    id obj6 = [obj2 init];
    id obj7 = [obj2 initWithCapacity:16];
    id obj8 = [obj2 initWithObjects:@"1", nil];
    NSLog(@"");
}
输出如下
(__NSPlaceholderArray *) obj1 = 0x00007ff79bc04b20
(__NSPlaceholderArray *) obj2 = 0x00007ff79bc06d00
(__NSArray0 *) obj3 = 0x00007ff79bc02eb0
(__NSArrayI *) obj5 = 0x00007ff79be0fb60 @"1 object"
(__NSArrayM *) obj6 = 0x00007ff79be1e350 @"0 objects"
(__NSArrayM *) obj7 = 0x00007ff79be1e380 @"0 objects"
(__NSArrayM *) obj8 = 0x00007ff79be22db0 @"1 object"
可以看到,最终打印出来的Class,并不是NSArray、NSMutableArray,这个就是类簇模式。
但是一个明显的特点:[NSArray alloc] 与 [NSMuatbleArray alloc] 得到都是
__NSPlaceholderArray类型的对象
看了下《iOS高级内存管理编程指南》中关于类对象类簇的部分内容,得到如下的伪代码实现:
static __NSPlacehodlerArray *GetPlaceholderForNSArray() {
    static __NSPlacehodlerArray *instanceForNSArray;
    if (!instanceForNSArray) {
        instanceForNSArray = [__NSPlacehodlerArray alloc];
    }
    return instanceForNSArray;
}


static __NSPlacehodlerArray *GetPlaceholderForNSMutableArray() {
    static __NSPlacehodlerArray *instanceForNSMutableArray;
    if (!instanceForNSMutableArray) {
        instanceForNSMutableArray = [__NSPlacehodlerArray alloc];
    }
    return instanceForNSMutableArray;
}


@implementation NSArray
+ (id)alloc
{
    if (self == [NSArray class]) {
        return GetPlaceholderForNSArray();
    }
}
@end


@implementation NSMutableArray
+ (id)alloc
{
    if (self == [NSMutableArray class]) {
        return GetPlaceholderForNSMutableArray();
    }
}
@end


@implementation __NSPlacehodlerArray
- (id)init
{
    if (self == GetPlaceholderForNSArray()) {
        self = [[__NSArrayI alloc] init];
    }
    else if (self == GetPlaceholderForNSMutableArray()) {
        self = [[__NSArrayM alloc] init];
    }
    return self;
}
@end
应该明白了吧。再看下这些array的继承结构:
- NSArray
    - NSMutableArray
        - __NSPlaceholderArray
        - __NSArrayM
    - __NSArrayI
    - __NSArray0
所以,类簇模式的一个核心,就是基于 继承 重写子类来完成不同的具体实现。再将不同的具体实现,注册到最外面的类簇类。
在for/whil 等循环中加锁时,需要使用tryLock,不能直接使用lock,否则可能会出现线程死锁
while (!finish) {
    if (pthread_mutex_trylock(&_lock) == 0) {
        // 缓存数据读写
        //.....
        pthread_mutex_unlock(&_lock);
    } else {
        usleep(10 * 1000);
    }
    pthread_mutex_unlock(&_lock);
}
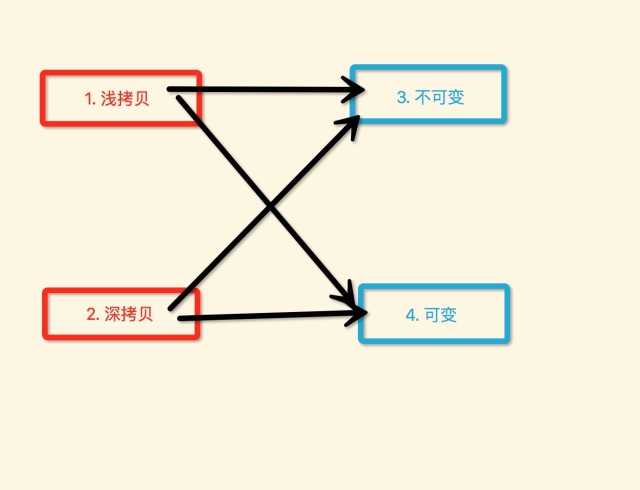
深拷贝、浅拷贝、可变、不可变
具体我就不啰嗦了,之前我也写过一篇具体分析的,后来删掉了,就发一个最终我总结的这4者之间的关系图示吧
获取block的类簇类
static Class GetNSBlock() {
    static Class _cls = Nil;
    static dispatch_once_t onceToken;
    dispatch_once(&onceToken, ^{
        id block = ^() {};
        _cls = [block class];
        while (_cls && (class_getSuperclass(_cls) != [NSObject class])) {
            _cls = class_getSuperclass(_cls);
        }
    });
    return _cls;
}
也可以用于获取其他类型的类簇类。
block 循环引用解决之、不使用 __weak
测试实体类
@interface MyDog : NSObject
@property (nonatomic, strong) NSString *name;
@end
@implementation MyDog
- (void)dealloc {
    NSLog(@"%@ - %@ dealloc", self, _name);
}
@end
第一种,会自动释放废弃掉的block,捕获外部的对象。
@implementation BlockViewController
- (void)test9 {
    //1.
    MyDog *dog = [MyDog new];
    dog.name = @"ahahha";
    //2.
    void (^block)(void) = ^() {
        NSLog(@"name = %@", dog.name);
    };
    //3.
    block();
}
@end
运行后输出
2017-03-22 13:33:42.665 Demos[8797:111915] name = ahahha
2017-03-22 13:33:42.665 Demos[8797:111915] <MyDog: 0x600000007ca0> - ahahha dealloc
是可以正常废弃掉外部被持有的对象的。
第二种,block被另外的对象持有时,再捕获外部的对象。
@implementation BlockViewController {
    void (^_ivar_block)();
}
- (void)test10 {
    //1.
    MyDog *dog = [MyDog new];
    dog.name = @"ahahha";
    //2.
    _ivar_block = ^() {
        NSLog(@"name = %@", dog.name);
    };
    //3.
    _ivar_block();
}
@end
运行后输出
2017-03-22 13:37:55.803 Demos[8844:114742] name = ahahha
并没输出MyDog对象的dealloc信息。
不使用 __weak 修饰外部对象的指针,来解决MyDog对象没有被废弃的问题:
@implementation BlockViewController {
    void (^_ivar_block)();
}
- (void)test11 {
    //1.
    MyDog *dog = [MyDog new];
    dog.name = @"ahahha";
    //2.
    _ivar_block = ^() {
        NSLog(@"name = %@", dog.name);
    };
    //3.
    _ivar_block();
    //4. 一定要在最后执行
    _ivar_block = nil;
}
@end
先看运行输出
2017-03-22 13:39:21.803 Demos[8877:116163] name = ahahha
2017-03-22 13:39:21.803 Demos[8877:116163] <MyDog: 0x600000203480> - ahahha dealloc
基本上就可以明白不使用 __weak 来解决block强引用外部对象,导致不释放的问题了。
三种定时器:1)NSTimer 2)CADisplayLink 3)dispatch_source_t
简单的列举下,具体的可以自己搜索。
1)与2)都是必须手动注册到某一个RunLoop的某一个mode下,受RunLoop状态改变、轮回影响。而他们两最大的区别是,NSTimer是手动指定一个间隔时间,并且受RunLoop的影响,并不是一定很精准的。CADisplayLink是一个可以与屏幕绘制频率同步执行一些任务的定时器。
而 3) 至少在我们写代码期间,并没有操作任何的RunLoop,直接就dispatch_resume(source)了,并且该source可以很精准的间隔时间回调,不受主线程RunLoop的影响。(这句话,我是从网上摘抄的)
但是我觉得很神奇,还有脱离runloop控制的东西,我猜测是不是仍然使用了runloop,只是order级别较高了,下面是测试的步骤:
1. log current runloop
2. create 并 resume dispatch_source_t
3. log current runloop
我发现,两次对 current runloop 的log信息中,runloop 的 common mode items 中的总source个数没有发生变化,好像真的并不受runloop的影响哦。
原文出处:objc个人总结2
不断的添加总结,发现超过简书的最大文章长度了,只能再开一片新的文章了...
在子线程提前对PNG等压缩图片进行解压缩、解码,以及圆角等特效预处理,并且可以缓存处理后的图像
@implementation UIImageHelper
- (void)decompressImageNamed2:(NSString *)name ofType:(NSString *)type completion:(void (^)(UIImage *image))block {
    XZHDispatchQueueAsyncBlockWithQOSBackgroud(^{
        NSDictionary *dict = @{
                               (id)kCGImageSourceShouldCache : @(YES)
                               };
        NSString *filepath = [[NSBundle mainBundle] pathForResource:name ofType:type];
        NSURL *url = [NSURL fileURLWithPath:filepath];
        CGImageSourceRef source = CGImageSourceCreateWithURL((CFURLRef)url, NULL);
        CGImageRef cgImage = CGImageSourceCreateImageAtIndex(source, 0, (CFDictionaryRef)dict);
        size_t width = CGImageGetWidth(cgImage);
        size_t height = CGImageGetHeight(cgImage);
        size_t bytesPerRow = roundUp(width * 4, 16);
        size_t byteCount = roundUp(height * bytesPerRow, 16);
        if (width == 0 || height == 0) {
            CGImageRelease(cgImage);
            dispatch_async(dispatch_get_main_queue(), ^{
                block(nil);
            });
            return;
        }
        void *imageBuffer = malloc(byteCount);
        CGColorSpaceRef colourSpace = CGColorSpaceCreateDeviceRGB();
        CGContextRef imageContext = CGBitmapContextCreate(imageBuffer, width, height, 8, bytesPerRow, colourSpace, kCGImageAlphaPremultipliedLast);
        CGColorSpaceRelease(colourSpace);
        CGContextDrawImage(imageContext, CGRectMake(0, 0, width, height), cgImage);
        CGImageRelease(cgImage);
        CGImageRef outputImage = CGBitmapContextCreateImage(imageContext);
        CGContextRelease(imageContext);
        free(imageBuffer);
        dispatch_async(dispatch_get_main_queue(), ^{
            UIImage *image = [UIImage imageWithCGImage:outputImage];
            block(image);
            CGImageRelease(outputImage);
        });
    });
}
@end
对于用户交互比较少,排版不复杂的UI,直接使用CALayer+CoreText+CoreGrapgics+子线程的形式完成
CALayer、可以考虑使用YYAsyncLayer
YYAsyncLayer基于RunLoop轮回进行切割分成多次的屏幕重绘,并且内部已经创建好一个CGContext回传出来,我们可以在这个CGContext里面进行任意的绘制(文字、图像、自定义路径、图像...),这一切绘制的过程包括最后渲染成CGImageRef的过程,都是在子线程上异步完成的,完全与主线程没任何的关系。
CoreText完成图文的混排
主要就是针对NSAttributedString进行各种计算,涉及如下几个主要的api
- (1) CTFrameSetterRef
- (2) CTFrameRef
- (3) CTLineRef
- (4) CTRunRef
- (5) CTRunDelegate
- (6) CTParagraphStyle
- (7) CTFont
具体就不说了,百度一搜很多介绍的资料。总之,我们可以通过使用CoreText对一段文本、图文、任意格式、任意排版、段落样式...进行随心的绘制。
并且CoreText、CoreGraphics的绘制函数,都是可以在子线程进行的。
CoreGrapgics
主要完成一些自定义图像、自定义路径的绘制。注意,最好不要重写UIView的drawRect:来实现绘制,具体为啥可以百度。
最终绘制完毕之后进行渲染得到CGImageRef用于CALayer直接显示
dispatch_async(dispatch_get_global_queue(0, 0), ^{
    UIGraphicsBeginImageContextWithOptions(imageV.frame.size, NO, 0);
    CGContextRef context = UIGraphicsGetCurrentContext();
    // 开始在context中进行任意的绘制
    //............
    UIImage* image = UIGraphicsGetImageFromCurrentImageContext();
    dispatch_async(dispatch_get_main_queue(), ^{
        xxxLayer.contents = image.CGImage;
    });
    UIGraphicsEndImageContext();
});
网络超大高清图像的加载优化
方案一、分多次从web拉取不同规格的图像进行覆盖显示
- (1) 依次从web上加载不同尺寸的图片,从小到大
- (2) 最开始先拉取一个小尺寸的缩略图做拉伸显示
- (3) 然后拉取中等规格的图,拉取完毕直接覆盖显示
- (4) 最后拉取原图,拉取完成后显示原图
缺点、需要分很多次的网络请求。
方案二、直接从web拉取原始图像,以渐进式的方式一点一点的加载
- (1) 直接从web拉取原始的比较大、高清的图像,一次性肯定拉取不完
- (2) 没当接收到web传递过来的一部分图像数据,就显示一部分
- (3) 一个很大、很高清的图像文件,就是一点一点的加载出来
缺点、只有一次请求,但是需要等待很长时间,才能完整的加载出一个图像。
方法三、结合使用方案一与方案二
- (1) 先拉取一个小尺寸缩略图做拉伸显示(第一次请求)
- (2) 然后采用方案二,直接拉取原始大图、高清图(第二次请求),并使用渐进式的方式加载部分图像
这种方案结合了前面两种方案各自的优势,既减少了方案一的请求数,又利用了方案二的渐进式图像文件数据的加载。比如:
渐进式的图像文件数据加载的主要步骤:
- (1) 创建一个空的渐进式ImageSource >>>
CGImageSourceCreateIncremental(NULL); - (2) 不断的拼接部分图片数据NSData
- (3) 使用当前得到的部分数据NSData,更新渐进式ImageSource
- (4) 从渐进式ImageSource中获取渲染得到CGImageRef,即可用于显示
- (5) 加载完毕,释放废弃掉渐进式ImageSource
让一套UI代码通用
公司搞的模块化开发,但是然并卵。每一个子模块需要的UI,可能与主App或其他模块的UI基本大体一致,但是不能直接拿出来复用。跳槽了几个公司,我发现都是直接耦 合的,一些效果很炫的UI几乎不能重用,硬生生的拿过来修修补补,改名字、改前缀....
因为他们的UI代码中有如下的一些硬依赖:
(1) 耦合可能过多的业务逻辑处理,不是一个纯粹的用来效果展示的UI
(2) 内部耦合的一些跟网络请求response数据相关的实体类,而这些实体类又耦合了其他的业务代码
那么,想让一套UI通用,随便将几个.h与.m拖到某个工程,就可以立刻编译通过,运行,设置样式,进行效果展示,就必须解决上面的几个耦合问题。
第一个问题、UI耦合业务代码、网络请求处理...
我们应该仅仅让UI只是负责接收数据,进行显示,然后当触发触摸事件,简单的通知外界(delegate或block),只是告诉外界发生事件的位置(NSIndexpath、CGPoint..),而不应该将UI显示的数据回传给外界,而是让外界自行对触发事件的位置,计算得到真实数据,自己进行处理。
第二个问题、耦合了一些具体的response data 实体类
虽然UI是必须对一个model进行数据显示,但是一旦耦合某一个具体类,那么这个UI就只能够为这一个实体类进行数据显示了,那么就是下面这种情况了:
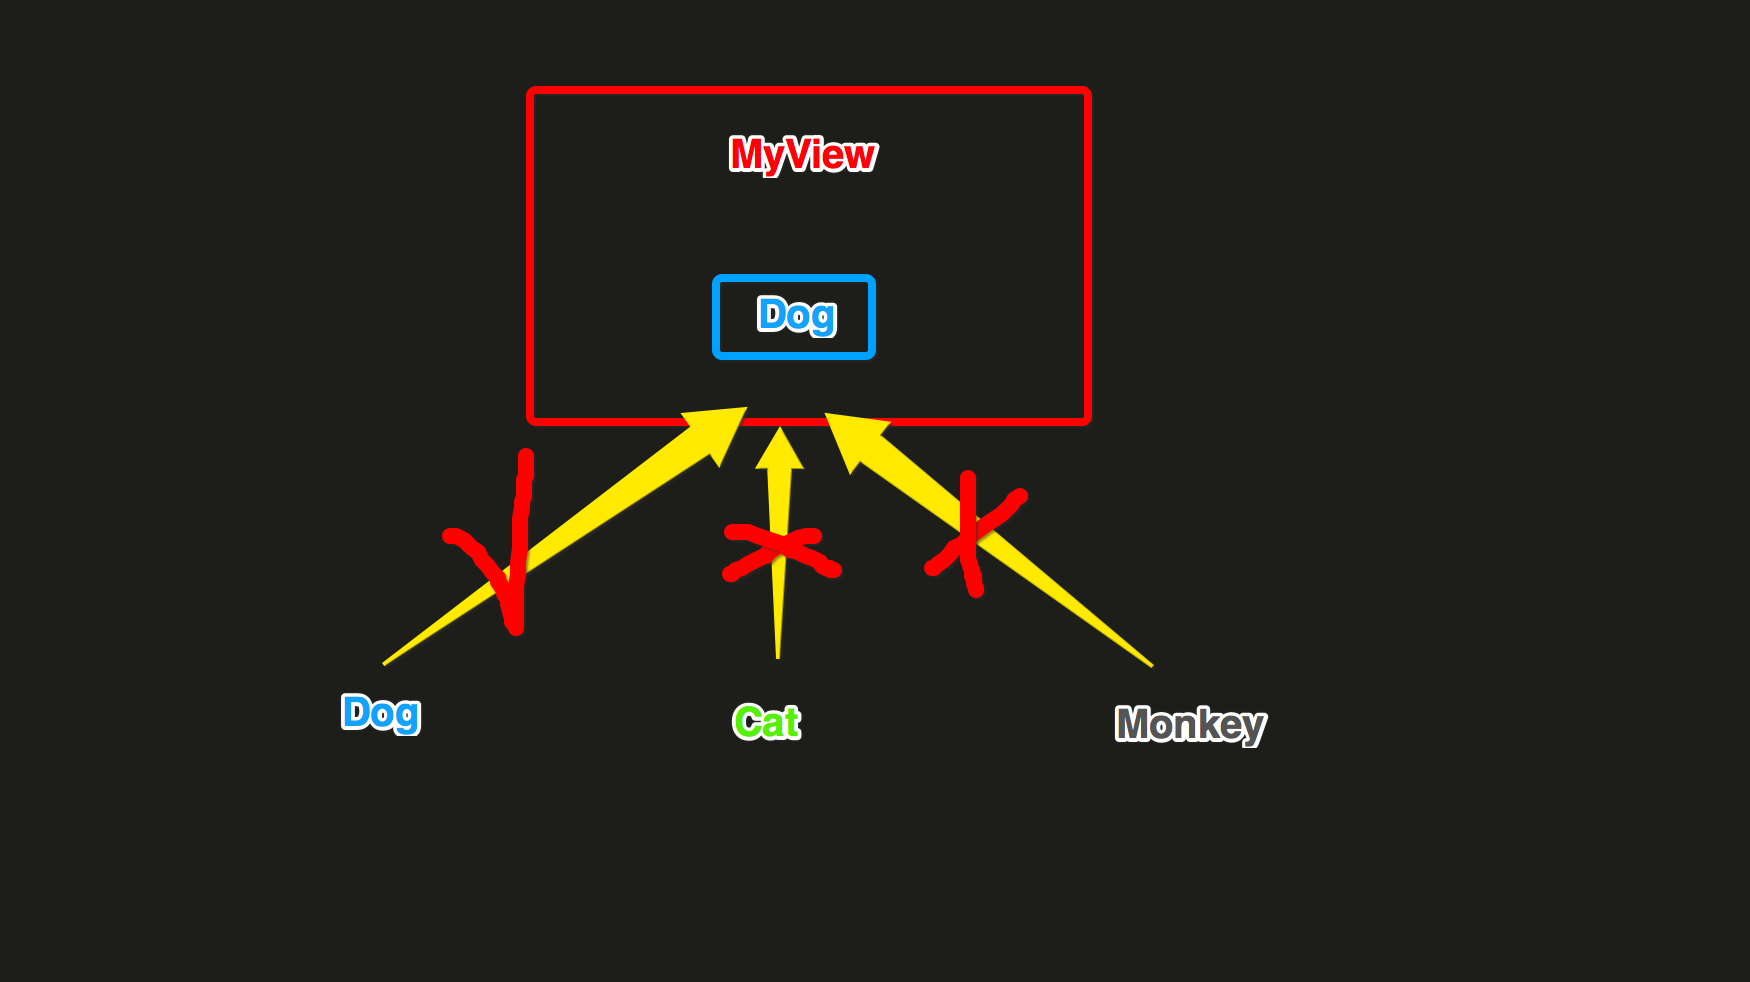
对于其他的具体类Cat、Monkey的对象,几乎不能用了。
有两种改进的方法:
- (1) 通过抽象协议隔离
- (2) 通过一个UIView内部依赖的具体类隔离
个人觉得吧,(1)的方案是最好的,完全隔离开了,但是有点麻烦,需要让其他类型去实现这个协议里面的所有的数据转换方法。这种情况下的结构是这样的:

我是觉得(2)比较简单实用,尤其在后台接口没有定的情况下,直接通过定好UIView内部自己依赖的具体类,进行数据的显示效果调试、编码。这种情况下的结构是这样的:

我觉得(2)比较实用,尤其是没有response数据结构的时候,我就根据UI原型设计构造View内部依赖的Mode即可开始写UI了。
等到response结构出来了,我就只是需要将response结构转换成View内部依赖的Model即可,UI内部的显示逻辑不需要做任何的修改。
下面是在写功能模块时候的一些片段代码示例
首先是View的定义、View的数据源、View产生时间的回调delegate、模仿UITableView。
@protocol NVMRetailSpecificationViewDataSource <NSObject>
@optional
- (NVMRetailSpecificationModel*)specificationModel;
@end
@protocol NVMRetailSpecificationViewDelegate <NSObject>
@optional
- (NSAttributedString *)specificationValueForSelectedIndexPaths:(NSArray *)indexpaths;
- (NSAttributedString *)specificationDidClickDoneForSelectedIndexPaths:(NSArray *)indexpaths;
@end
@interface NVMRetailSpecificationsView : UIView
//1.
- (instancetype)initWithFrame:(CGRect)frame
                    datSource:(id<NVMRetailSpecificationViewDataSource>)dataSource
                     delegate:(id<NVMRetailSpecificationViewDelegate>)delegate;
//2.
- (void)reloadData;
@end
View内部只是依赖自定义的Model进行数据显示
@implementation NVMRetailSpecificationsView
......
- (void)reloadData {
    if (_dataSource && [_dataSource respondsToSelector:@selector(specificationModel)]) {
        // 获取数据源
        _model = [_dataSource specificationModel];
        // 设置顶部标题
        self.topTitleLabel.text = _model.topTitle;
        // 找出每一个row中默认选中的item
        for (int i = 0; i < _model.sections.count; i++) {
            NVMRetailSpecificationSectionModel *section = [_model.sections objectAtIndex:i];
            NVMRetailSpecificationRowModel *row = section.row;
            for (int k = 0; k < row.items.count; k++) {
                NVMRetailSpecificationRowItemModel *item = [row.items objectAtIndex:k];
                if (item.selected) {
                    NVMRetailSpecificationRowItemCellIndexPathModel *idx = [NVMRetailSpecificationRowItemCellIndexPathModel new];
                    idx.section = i;
                    idx.row = 0;
                    idx.itemIndex = k;
                    [_curIndexPaths addObject:idx];
                }
            }
        }
        // 设置底部左侧价格
        if ((_curIndexPaths.count > 0) && [_delegate respondsToSelector:@selector(specificationValueForSelectedIndexPaths:)]) {
            self.bottomLeftPriceLabel.attributedText = [_delegate specificationValueForSelectedIndexPaths:_curIndexPaths];
        }
        // 刷新中间列表
        NVMRetailSpecificationModel *model = _model;
        dispatch_async(dispatch_get_global_queue(0, 0), ^() {
            [[NVMRetailSpecificationsItemCellFrameManager sharedInstance] computeFramesWithSpecificationModel:model];
            dispatch_async(dispatch_get_main_queue(), ^() {
                [self.middleTableView reloadData];
                [self setNeedsLayout];
            });
        });
    }
}
.....
@end
外界创建View的地方,构造View内部依赖数据源类型,以及完成一些View的回调函数实现
@implementation NVMRetailHomeViewController {
    NVMRetailSpecificationModel *model;
}
- (void)touchesBegan:(NSSet<UITouch *> *)touches withEvent:(UIEvent *)event {
    //1. 数据构造
    model = [NVMRetailSpecificationModel new];
    model.topTitle = @"坚果咳咳奶盖";
    model.bottomDonenButtonTitle = @"选好了";
    NSMutableArray *sections = [NSMutableArray new];
    for (int i = 0; i < 3; i++) {
        //sections
        NVMRetailSpecificationSectionModel *section = [NVMRetailSpecificationSectionModel new];
        section.title = [NSString stringWithFormat:@"规格%d", i + 1];
        //row
        NVMRetailSpecificationRowModel *row = [NVMRetailSpecificationRowModel new];
        int rowItemCount = rand()%20;
        rowItemCount = (rowItemCount > 0) ? rowItemCount : 1;
        //row[0].items
        NSMutableArray *rowItems = [NSMutableArray new];
        for (int k = 0; k < rowItemCount; k++) {
            NVMRetailSpecificationRowItemModel *item = [NVMRetailSpecificationRowItemModel new];
            if (k == 0) {item.selected = YES;}
            else {item.selected = NO;}
            item.text = [NSString stringWithFormat:@"子规格%d", k + 1];
            [rowItems addObject:item];
        }
        row.items = rowItems;
        NSLog(@"section: %d, row: %d, itemCount: %d", i, 1, rowItemCount);
        section.row = row;
        [sections addObject:section];
    }
    model.sections = sections;
    //2. VC创建、delegate设置
    NVMRetailSpecificationsViewController *vc = [[NVMRetailSpecificationsViewController alloc] initWithViewDatSource:self Viewdelegate:self ViewControllerDelegate:self];
    //3. 展示,在回调block中,返回一个最后执行确定按钮执行路径动画的CGPath
    [vc presentInNavigationController:self.navigationController
                     dissMissCallback:^CGPathRef(CGPoint doneButtonCenter) {
                         return nil;
                     }];
}
#pragma mark - NVMRetailSpecificationDataSource
- (NVMRetailSpecificationModel*)specificationModel {
    return model;
}
#pragma mark - NVMRetailSpecificationDelegate
- (NSAttributedString *)specificationValueForSelectedIndexPaths:(NSArray *)indexpaths {
    return 计算后的真实数据;
}
- (void)specificationViewDidClickDoneWithSelectedIndexPaths:(NSArray *)indexpaths {
}
- (void)specificationViewDidClickClsoe {
}
- (void)specificationViewDidClickBackgroud {
}
@end
这样后的UI这套代码,就是一套通用的,随便拖到哪里,只要完成数据转换部分就可以了。
这么写之后,不仅仅只是UI代码通用,而且是你写的这个模块,当别人来接手的时候,并不需要从像很多的 UI+业务逻辑+后台请求这样的代码中,寻找一点点需要改动的地方而苦恼。
__bridge、__bridge_retained、__bridge_transfer
在参看YYkit代码时,发现很多的数据结构都是用struct去实现的,相比使用NSObject则肯定消耗小一些,能省则省嘛...
下面是一个struct持有NSObject对象,最终让NSObject对象释放废弃的例子。
@interface Dog : NSObject
@property (nonatomic, copy) NSString *name;
@end
@implementation Dog
- (void)dealloc {
    NSLog(@"废弃Dog对象,name = %@ on thread = %@", _name, [NSThread currentThread]);
}
@end


typedef struct DogsContext {
    void    *dogs;
}DogsContext;


static DogsContext *_dogsCtx = NULL;
@implementation ViewController
- (void)testARCBridge1 {
    _dogsCtx = malloc(sizeof(DogsContext));
    _dogsCtx->dogs = NULL;
    NSMutableArray *dogs = [NSMutableArray new];
    for (int i = 0; i < 3; i++) {
        Dog *dog = [Dog new];
        dog.name = [NSString stringWithFormat:@"name_%d", (i + 1)];
        [dogs addObject:dog];
    }
    _dogsCtx->dogs = (__bridge_retained void*)dogs;
}
- (void)testARCBridge2 {
    NSMutableArray *array1 = (__bridge NSMutableArray*)_dogsCtx->dogs;
    for (Dog *dog in array1) {
        NSLog(@"使用Dog对象,name = %@", dog.name);
    }
    NSMutableArray *holder = (__bridge_transfer NSMutableArray*)_dogsCtx->dogs;
    _dogsCtx->dogs = NULL;
    free(_dogsCtx);
    _dogsCtx = NULL;
    dispatch_async(dispatch_get_global_queue(0, 0), ^{
        [holder class];
    });
}
- (void)touchesBegan:(NSSet<UITouch *> *)touches withEvent:(UIEvent *)event {
    [self testARCBridge1];
    [self testARCBridge2];
}
@end
输出信息
2017-02-08 23:54:34.433 Test[1262:71331] 创建Dog对象,name = name_1
2017-02-08 23:54:34.434 Test[1262:71331] 创建Dog对象,name = name_2
2017-02-08 23:54:34.434 Test[1262:71331] 创建Dog对象,name = name_3
2017-02-08 23:54:34.434 Test[1262:71331] 使用Dog对象,name = name_1
2017-02-08 23:54:34.434 Test[1262:71331] 使用Dog对象,name = name_2
2017-02-08 23:54:34.434 Test[1262:71331] 使用Dog对象,name = name_3
2017-02-08 23:54:34.435 Test[1262:71700] 废弃Dog对象,name = name_1 on thread = <NSThread: 0x7ff0c8e68a50>{number = 2, name = (null)}
2017-02-08 23:54:34.435 Test[1262:71700] 废弃Dog对象,name = name_2 on thread = <NSThread: 0x7ff0c8e68a50>{number = 2, name = (null)}
2017-02-08 23:54:34.435 Test[1262:71700] 废弃Dog对象,name = name_3 on thread = <NSThread: 0x7ff0c8e68a50>{number = 2, name = (null)}
看输出基本就明白了,我就不啰嗦了...
读取对于模块化的独立工程运行时所在包下的boundle文件夹
首先,每一个模块工程都有一个入口类
@interface NVMRetailModuleManager : NSObject <NVMModuleManager>
@end
@implementation NVMRetailModuleManager
+ (void)load {
  NVMRegisterModule(self);
}
- (void)registerServices {
    [NVMExternalRouter() registerRoute:@"eleme://retail.shop" forBlock:^(NVMRouteURL * _Nonnull routeURL) {
        NVMRetailHomeViewController *vc = [[NVMRetailHomeViewController alloc] init];
        [NVMUIKit showViewController:vc animationType:NVMAnimationTypePush];
    }];
}
.......
@end
然后写一个UIImage分类来做几件事:1)找到上面的入口类所在的boundle 2)从找到的boundle中查找资源文件
@interface UIImage (NVMRetailModule)
+ (UIImage *)nvm_imageNamedInNVMRetail:(NSString *)imageName;
@end
@implementation UIImage (NVMRetailModule)
+ (UIImage *)nvm_imageNamedInNVMRetail:(NSString *)imageName {
    static NSBundle *NVMRetailModuleBundle = nil;
    static dispatch_once_t onceToken;
    dispatch_once(&onceToken, ^{
        NSBundle *bundle = [NSBundle bundleForClass:[NVMRetailModuleManager class]];
        NSString *bundlePath = [[bundle bundlePath] stringByAppendingPathComponent:@"/NVMRetailModule.bundle"];
        NVMRetailModuleBundle = [NSBundle bundleWithPath:bundlePath];
    });
    return  [UIImage imageNamed:imageName inBundle:NVMRetailModuleBundle compatibleWithTraitCollection:nil];
}
@end
RunLoop、RunLoop的基本组成结构
有时候看打印RunLoop的信息一大堆的时候,有点脑壳疼...整理了下RunLoop的基本组成结构,以后可以对着这个结构去看。
CFRunLoop {
    //1. 当前 runloop mode
    current mode = UIInitializationRunLoopMode,//私有的runloop mode
    //2. commom runloop modes 默认包含的两种mode
    common modes = [
        UITrackingRunLoopMode,
        kCFRunLoopDefaultMode,
    ],
    //3. 所有的 runloop mode下的 source0/source1/timers/observers
    common mode items = {
        //3.1 所有的 source0 (manual) 事件
        CFRunLoopSource {order =-1, {callout = _UIApplicationHandleEventQueue}},
        CFRunLoopSource {order =-1, {callout = PurpleEventSignalCallback }},
        CFRunLoopSource {order = 0, {callout = FBSSerialQueueRunLoopSourceHandler}},
        //3.2 所有的 source1 (mach port) 事件
        CFRunLoopSource {order = 0,  {port = 17923}},
        CFRunLoopSource {order = 0,  {port = 12039}},
        CFRunLoopSource {order = 0,  {port = 16647}},
        CFRunLoopSource {order =-1, { callout = PurpleEventCallback}},
        CFRunLoopSource {order = 0, {port = 2407, callout = _ZL20notify_port_callbackP12__CFMachPortPvlS1_}},
        CFRunLoopSource {order = 0, {port = 1c03, callout = __IOHIDEventSystemClientAvailabilityCallback}},
        CFRunLoopSource {order = 0, {port = 1b03, callout = __IOHIDEventSystemClientQueueCallback}},
        CFRunLoopSource {order = 1, {port = 1903, callout = __IOMIGMachPortPortCallback}},
        //3.3 所有的 runloop Ovserver
        CFRunLoopObserver {order = -2147483647, activities = 0x1, callout = _wrapRunLoopWithAutoreleasePoolHandler}// Entry
        CFRunLoopObserver {order = 0, activities = 0x20, callout = _UIGestureRecognizerUpdateObserver}// BeforeWaiting
        CFRunLoopObserver {order = 1999000, activities = 0xa0, callout = _afterCACommitHandler}// BeforeWaiting | Exit
        CFRunLoopObserver {order = 2000000, activities = 0xa0, callout = _ZN2CA11Transaction17observer_callbackEP19__CFRunLoopObservermPv}// BeforeWaiting | Exit
        CFRunLoopObserver {order = 2147483647, activities = 0xa0, callout = _wrapRunLoopWithAutoreleasePoolHandler}// BeforeWaiting | Exit
        //3.4 所有的 Timer 事件
        CFRunLoopTimer {firing = No, interval = 3.1536e+09, tolerance = 0, next fire date = 453098071 (-4421.76019 @ 96223387169499), callout = _ZN2CAL14timer_callbackEP16__CFRunLoopTimerPv (QuartzCore.framework)}
     },
    //4. 所有的运行模式modes
    modes = {
        // 4.1 UITrackingRunLoopMode
        CFRunLoopMode  {
            name = UITrackingRunLoopMode,
            sources0 =  [/* same as 'common mode items' */],
            sources1 =  [/* same as 'common mode items' */],
            observers = [/* same as 'common mode items' */],
            timers =    [/* same as 'common mode items' */],
        },
        // 4.2 GSEventReceiveRunLoopMode
        CFRunLoopMode  {
            name = GSEventReceiveRunLoopMode,
            sources0 =  [/* same as 'common mode items' */],
            sources1 =  [/* same as 'common mode items' */],
            observers = [/* same as 'common mode items' */],
            timers =    [/* same as 'common mode items' */],
        },
        // 4.3 kCFRunLoopDefaultMode
        CFRunLoopMode  {
            name = kCFRunLoopDefaultMode,
            sources0 = [
                    CFRunLoopSource {order = 0, {callout = FBSSerialQueueRunLoopSourceHandler}},
                ],
            sources1 = (null),
            observers = [
                CFRunLoopObserver {activities = 0xa0, order = 2000000,callout = _ZN2CA11Transaction17observer_callbackEP19__CFRunLoopObservermPv}},
                ],
            timers = (null),
        },
        // 4.4 UIInitializationRunLoopMode
        CFRunLoopMode  {
            name = UIInitializationRunLoopMode,
            sources0 = [
                CFRunLoopSource {order = -1, {callout = PurpleEventSignalCallback}}
            ],
            sources1 = [
                CFRunLoopSource {order = -1, callout = PurpleEventCallback}}
            ],
            observers = (null),
            timers = (null),
        },
        //4.5 kCFRunLoopCommonModes
        CFRunLoopMode  {
            name = kCFRunLoopCommonModes,
            sources0 = (null),
            sources1 = (null),
            observers = (null),
            timers = (null),
        },
    }
}