Masonry源码分析
原文出处:Masonry 源码分析
一. Masonry 整体结构
1. 最上层暴露接口
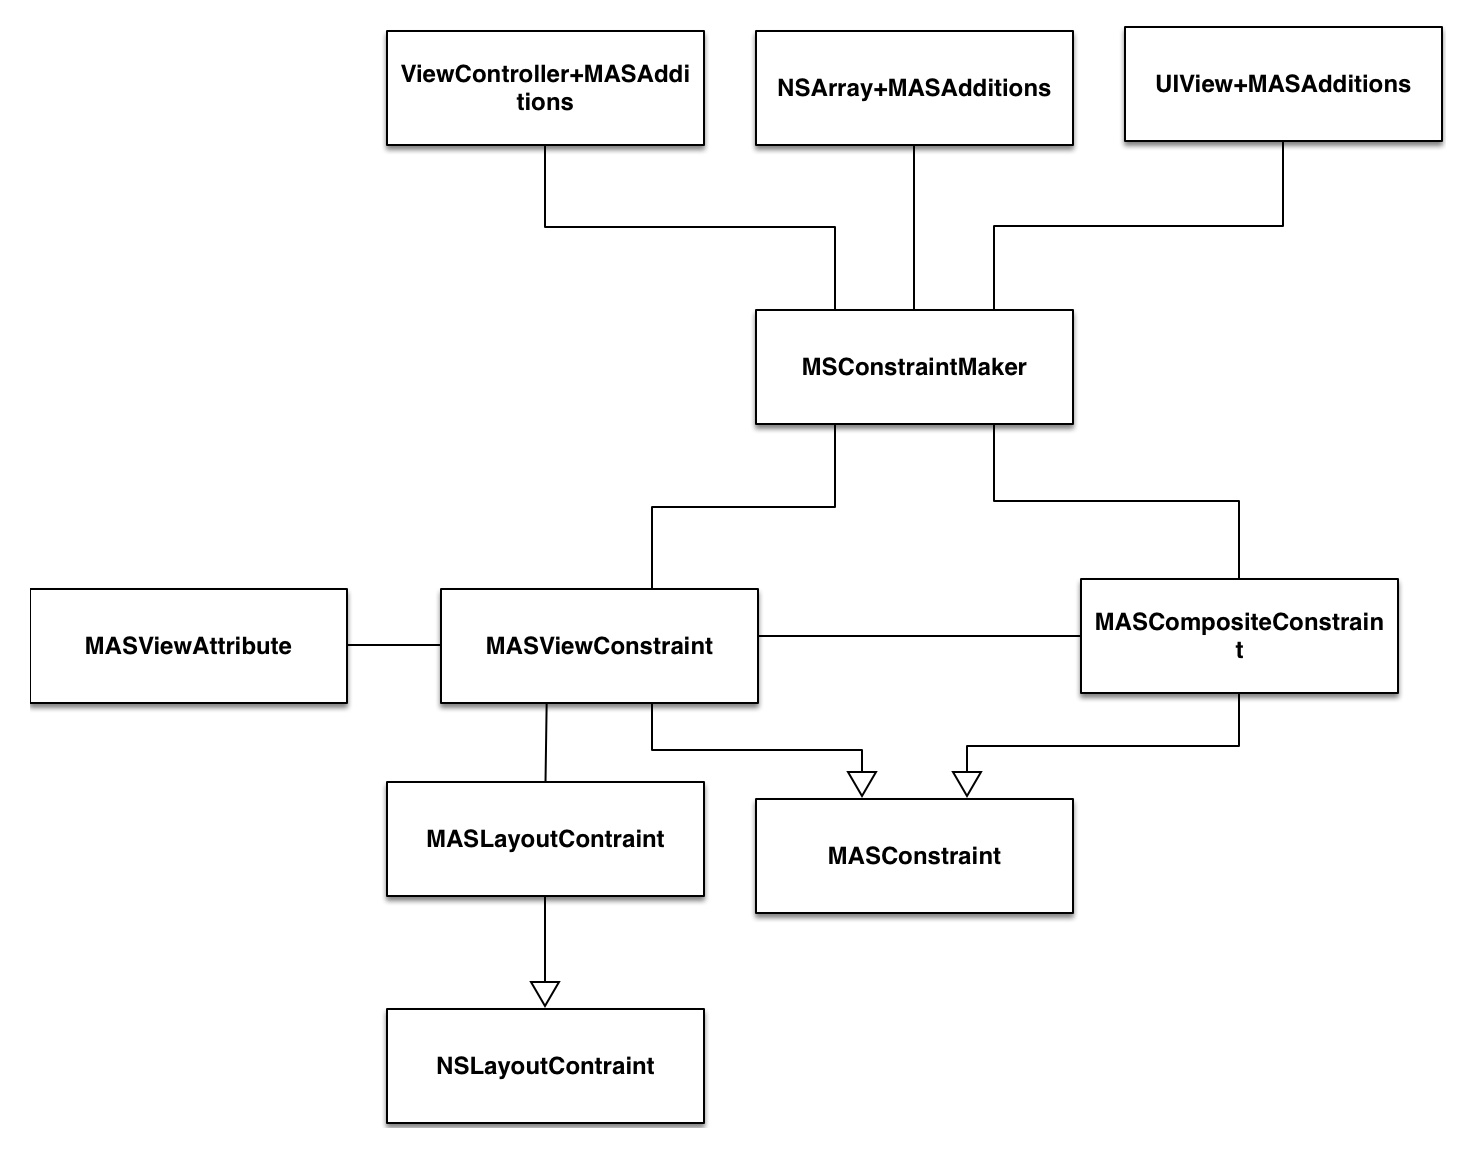
Masonry 的整个结构大致是上面这个样子。最上面是 Masonry 暴露出来的接口,采用 category 的形式为 UIView \
NSArray \ UIViewController 添加了一些方法。用的最多的是 UIView+MASAdditions ,里面有两个部分的方法:
- 为 UIView 添加/更新/重置约束的方法,这是我们用的最多的东西也就是
mas_makeConstraints:\mas_updateConstraints:\mas_remakeConstraints:三个方法。 - 获取 UIView 的一些属性的方法,用来添加约束,例如
View1.height = View2.height * X + Y中,这些方法提供的是View2.height这个功能。
2. MASConstraintMaker
MASConstrainrMaker 是一个创建约束的工厂,提供了一些让我们用起来很有快感的方法创建约束,而不像AutoLayout 原生 Api那么蛋疼。其中最有快感🤤的就是链式调用了,语义化相当好,当然实现链式调用不光光靠 MASConstraintMaker ,可以说MASConstrainMaker 只是带你进入链式的第一步,绝大多数的工作由下面的 MASViewConstraint 和 MASCompositeConstraint 来实现。我觉得Masonry源码中最值得学习的便是对链式调用的实现,下面会着重讲这个方面的东西。
3. MASConstraints 与 MASViewConstraints / MASCompositeConstraints
MASSConstraints 是后面两个类的基类,一句话来来概括这个类的作用:
一个 MASViewContraints代表一个约束 View1.attribute = View2.attribute * multiply + constant, 一个MASViewCompositeConstraints 则是代表
View1.attribute1/attribute2/... = View2.attribute * mutiply + constant 。
这几个类便是实现链式调用的关键,特别是 MASCompositeConstraints ,专门用来处理类似
make.height.width.equalTo(self) 的约束。
在 MASConstraints 中有一个个人感觉蛮有意思的地方,因为Objective-C本身不支持虚函数这种东西,那么基类中定义的一些没有实现的接口应该怎么来处理呢,需要防止使用者直接调用了这些接口。在 MASConstraints是这样处理的,它定义了这么一个宏:
#define MASMethodNotImplemented() \

    @throw [NSException exceptionWithName:NSInternalInconsistencyException \

                                   reason:[NSString stringWithFormat:@"You must override %@ in a subclass.", NSStringFromSelector(_cmd)] \

                                 userInfo:nil]


- (void)uninstall { MASMethodNotImplemented(); }
宏其实很简单,就是抛了一个异常,然后在强制子类去实现的方法中插入这个宏,这样直接用这个方法的话就会抛异常,就达到了警告调用者的目的。虽然实现很简单,因为以前没有见过,还是觉得很新奇。😊
4. MASViewAttribute
/**

 *  An immutable tuple which stores the view and the related NSLayoutAttribute.

 *  Describes part of either the left or right hand side of a constraint equation

 */
头文件里这么描述这个类,翻译一下:这是一个用来存储视图和视图的NSLayoutAttribute的不可变元组,它是 AutoLayout公式的左边或右边的一部分。还是有点难懂😨,其实结合 UIView+MASAdditions 里的代码看一下就很清晰了,如下:
- (MASViewAttribute *)mas_left {

    return [[MASViewAttribute alloc] initWithView:self layoutAttribute:NSLayoutAttributeLeft];

}
这是上面说的 Masonry 为 UIView 添加的功能的第二部分,也就是获取视图某个 AutoLayout属性,这样代码就很清晰了,这个类其实提供的是对类似View1.height的封装,这样类里面的属性也很好理解了。
5. MASLayoutConstraint
这个其实就是NSLayoutConstraint,毕竟Masonry不是提供了一个新的布局方案,而是对AutoLayout的封装,所以最底层还是用AutoLayout实现的,而我们写的约束也最终被翻译成 NSLayoutConstraint。
MASLayoutConstraint添加了一个一个属性mas_key,暂时不知道什么用😰。
二. Masonry 是如何实现链式调用的
1. 实现点语法
[view1 mas_makeConstraints:^(MASConstraintMaker *make) {

    make.top.equalTo(superview.mas_top).with.offset(padding.top); //with is an optional semantic filler

    make.left.equalTo(superview.mas_left).with.offset(padding.left);

    make.bottom.equalTo(superview.mas_bottom).with.offset(-padding.bottom);

    make.right.equalTo(superview.mas_right).with.offset(-padding.right);

}];
我们来分析一下一条最简单的添加约束的命令make.height.equalTo(@(10))。
首先大家都知道,Objective-c的方法调用(发送消息)是这样的[Object message]。但是Masonry中充满了make.height这样的点语法,这是怎么回事。通过查看代码可以知道,实现也比较简单🤔。
分为两种情况:
make.height这个其实就是访问属性,因为 OC 中调用属性的set和get方法是支持点语法的。下面是maker中的属性定义。
/**

 *  The following properties return a new MASViewConstraint

 *  with the first item set to the makers associated view and the appropriate MASViewAttribute

 */

@property (nonatomic, strong, readonly) MASConstraint *left;

@property (nonatomic, strong, readonly) MASConstraint *top;

@property (nonatomic, strong, readonly) MASConstraint *right;

@property (nonatomic, strong, readonly) MASConstraint *bottom;

@property (nonatomic, strong, readonly) MASConstraint *leading;

@property (nonatomic, strong, readonly) MASConstraint *trailing;

@property (nonatomic, strong, readonly) MASConstraint *width;

@property (nonatomic, strong, readonly) MASConstraint *height;

@property (nonatomic, strong, readonly) MASConstraint *centerX;

@property (nonatomic, strong, readonly) MASConstraint *centerY;

@property (nonatomic, strong, readonly) MASConstraint *baseline;
- 其次是类似
make.height.equalTo(self)中的equalTo(self),这是怎么回事,尼玛还能传个参数进去?这里 equalTo 也是一个属性的 get 方法,至少说编译器认为它是一个get方法。这个get方法返回的是一个带参数的 Block ,这样你就可以在Block中接收这个参数,实现一些你的逻辑。为什么说编译器认为它是个get方法呢,因为代码中根本没有对equalTo这个属性的定义啊,或者说相关的成员变量的定义,equalTo这个方法和普通的方法一模一样。这里可以探索一下,什么样的方法,编译器会认为它是一个 get 方法,根据我的尝试,只用满足一个条件,就是没有参数,是的,只要没有参数就是,即使这个方法的返回值 void 都没有问题。可以通过下面这段代码验证。
@interface DotTest : NSObject

- (void)firstName;

- (NSString*)lastName;

@end

@implementation DotTest

- (void)name{

    NSLog(@"hello world");

}

- (NSString*)lastName {

    return @"sheng";

}

@end

int main(int argc, const char *argv[]) {


    DotTest *test = [DotTest new];

    test.firstName; // 编译器会给一个警告 但是可以编译运行 输出 hello world

    NSLog(@"%@", test.lastName); // 输出 sheng

    return 0;

}
2. 实现链式调用
以make.width.height.mas_equalTo(self).mutiplyBy(1).offset(0)为例,我们自己翻一下一下句代码对应
的约束
View1.width = View2.width * 1 + 0

View1.height = View2.height * 1 + 0
我们一段一段来分析。
首先是make.width,前面提到width是maker的一个属性,它会将View1.with这段信息封装到MASViewAttribute当中,也就是这个属性是什么,这个属性属于谁。然后把MASViewAttribute放入MASViewConstraints当中。需要说明的是,上述的工作时属于maker的职责,通过给MASViewConstraints设置代理的方法,MASViewConstraints会把这个工作委托给maker。也就是说到这里,我
们得到了一个MASViewConstraints实例。
然后是.height,这个.height是MASViewConstraints的get方法了,这个工作其实是和上面.width一样的,这里MASViewConstaints通过代理,把这个封装的活再丢给 Maker ,代码如下。不同的是,这里Maker发现前面已经有一个constraints,它会把这两个MASViewConstraints封装起来,变成一个MASCompositeConstraints。
#pragma mark - attribute chaining

- (MASConstraint *)addConstraintWithLayoutAttribute:(NSLayoutAttribute)layoutAttribute {

    NSAssert(!self.hasLayoutRelation, @"Attributes should be chained before defining the constraint relation");

    return [self.delegate constraint:self addConstraintWithLayoutAttribute:layoutAttribute];

}
然后,是equalTo / offset这一类,调用的原理和上面一样,不再赘述。
最后,mas_makeConstaints这个Block执行完之后,就收集了约束的信息,遍历一下所有的约束信息,用AutoLayout的官方Api表达出
来就可以了,也就是install阶段。