基于CocoaPods进行iOS开发
post_install do |installer|
    installer.pods_project.targets.each do |target|
        target.build_configurations.each do |config|
            config.build_settings['GCC_WARN_INHIBIT_ALL_WARNINGS'] = "YES"
            # JSONKit使用了isa
            if target.name == "JSONKit"
                config.build_settings['CLANG_WARN_DIRECT_OBJC_ISA_USAGE'] = "NO"
            end
        end

        if target.name.include? 'XXXXLib'
            curPhases = target.build_phases
            project = installer.pods_project
            shellPhases = project.new(Xcodeproj::Project::Object::PBXShellScriptBuildPhase)
            shellPhases.name = "Run Script"
            shellPhases.shell_script = "python ../run.py"
            curPhases.insert(1, shellPhases)
            project.save()
        end

    end
end
原文出处:基于CocoaPods进行 iOS开发
基于 CocoaPods 进行 iOS 开发
在阅读本文前,请谨记 Podfile 是一段 Ruby 代码(如果您对 Ruby 有一点语法上的了解,这将会非常有帮主,笔者有着一年前的看了 2 小时的 Ruby 基础还是够的),这对于我们定制以下的需求将非常有帮助。
本文有三个部分:
- 创建 module.modulemap ,介绍了如何友好地在 Swift 项目中使用 Umeng 的 SDK
- 使用环境变量,介绍了如何利用 ENV 配置更灵活的场景
- CocoaPods Plugin,标题虽说是 Plugin ,但主要介绍了如何基于 CocoaPods 进行 iOS 开发,特别是将依赖进行 Framework 化,特定第三方库进行 Framework。
您可以先来体验一下 repo 中的 demo 。
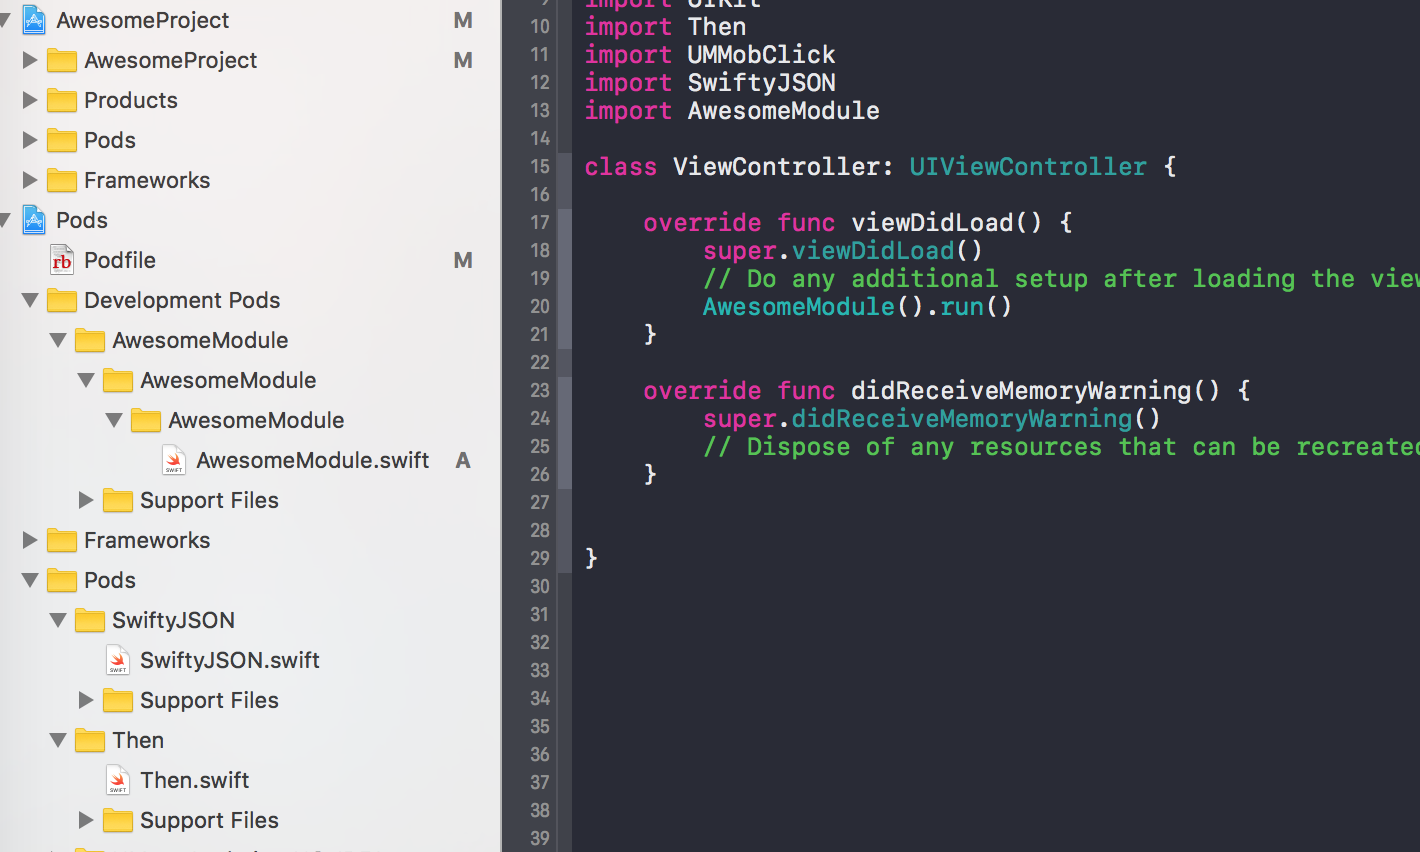
执行 fastlane pod_generate_frameworks ,将所有第三方库 Framework 化并引用。
项目截图如下:
此时这个项目引用的第三方库都是 Framework 化的了。
接下来执行 fastlane pod_frameworks frameworks:Then,您可以看到项目中仅有 Then 是引用了 Framework :

再执行 fastlane pod_source,你可以看到项目中所有 pod 都引用了源码(原工程):
创建 module.modulemap
在项目集成 Umeng 或者 Bugtags 时,按照文档的指示,在 Swift 工程中我们需要创建桥接文件。事实上这不是必须的。我们完全可以创建对应的 module.modulemap ,采用 import UMMobClick 的方式使用。而 Umeng 或者 Bugtags 不像 Fabric 可以直接在 Swift 工程中使用的原因也是如此。
那么如何在 Pods 中增加 module 文件就成了一个问题,总不能手动创建一个,直接移进去。这样会导致 pod install 时可能丢失该文件。
从 Umeng 的 podspec 中可以知道,Umeng 的库是直接 http 形式下载的。
s.source = { :http => "http://dev.umeng.com/system/resources/W1siZiIsIjIwMTcvMDEvMjIvMTFfMDNfMjRfNzM0X3Vtc2RrX0lPU19hbmFseWljc19ub19pZGZhX3Y0LjIuNS56aXAiXV0/umsdk_IOS_analyics_no-idfa_v4.2.5.zip" }
我们创建一个新的 podspec ,并修改这个 zip 中的文件,但这又带来一个问题。如何维护 podspec 和 zip 文件。
podspec 是提供了一个 prepare_command ,我们可以在下载库文件完成时,执行一个脚本。这样就好办了很多:
Pod::Spec.new do |s|
  s.name                = "UMengAnalytics-NO-IDFA"
  s.version             = "4.2.5"
  s.summary             = "UMeng's unofficial Analytics SDK for iOS"
  s.homepage            = "http://dev.umeng.com/analytics/ios/quick-start"
  s.author              = { "DianQK" => "dianqk@icloud.com" }
  s.platform            = :ios, "8.0"
  s.source              = { :http => "http://dev.umeng.com/system/resources/W1siZiIsIjIwMTcvMDEvMjIvMTFfMDNfMjRfNzM0X3Vtc2RrX0lPU19hbmFseWljc19ub19pZGZhX3Y0LjIuNS56aXAiXV0/umsdk_IOS_analyics_no-idfa_v4.2.5.zip" }
  s.vendored_frameworks = "*/UMMobClick.framework"
  s.framework           = "CoreTelephony"
  s.libraries           = "sqlite3", "z"
  s.requires_arc        = false
  s.xcconfig            = { "LIBRARY_SEARCH_PATHS" => "\"$(PODS_ROOT)/UMengAnalytics-NO-IDFA/**\"" }
  s.prepare_command     = <<-EOF
  mkdir umsdk_IOS_analyics_no-idfa_v4.2.5/UMMobClick.framework/Modules
  touch umsdk_IOS_analyics_no-idfa_v4.2.5/UMMobClick.framework/Modules/module.modulemap
  cat <<-EOF > umsdk_IOS_analyics_no-idfa_v4.2.5/UMMobClick.framework/Modules/module.modulemap
  framework module UMMobClick {
      header "MobClick.h"
      header "MobClickGameAnalytics.h"
      header "MobClickSocialAnalytics.h"
      export *
      link "z"
      link "sqlite3"
  }
  \EOF
  EOF
end
在使用时,我们需要引用对应的 podspec (使用 git path 可能无法达到预期效果)。
platform :ios, '9.0'

target 'Demo' do
  pod 'UMengAnalytics-NO-IDFA', :podspec => "https://raw.githubusercontent.com/DianQK/UMengAnalytics-NO-IDFA-Module/master/UMengAnalytics-NO-IDFA.podspec"
end
这样一来我们就可以愉快滴在 Swift 工程中调用 import UMMobClick 了。
使用环境变量
既然 Podfile 是一段 Ruby 代码,那么我们就可以在 Podfile 中使用 ENV 环境变量,这将对我们的开发体验有极大改善。比如,对同一个 Target 使用不同的 pod :
target 'AwesomeProject' do
  use_frameworks!
  case ENV['PODFILE_TYPE']
  when 'development'
    pod 'Then'
  else
    pod 'Then', :path => './'
  end
end
执行 pod install 将使用 CocoaPods 上的 Then ,执行 env PODFILE_TYPE=development pod install 将使用本地的 Then 。
CocoaPods Plugin
标准的 CocoaPods 有时不能完全满足我们需求,这时候我们可能要考虑加一些插件了。而这些插件的类型主要有两种:
- Hook
pre_install和post_install,然后搞事情 - 添加一些额外的命令,如
pod try Alamofire
先来看一下 pod install 都做了什么,以 AwesomeProject 为例,我在 Podfile 加入了 Then 这个第三方库:
##Uncomment the next line to define a global platform for your project
platform :ios, '9.0'

target 'AwesomeProject' do
  ##Comment the next line if you're not using Swift and don't want to use dynamic frameworks
  use_frameworks!

  ##Pods for AwesomeProject
  pod 'Then', '~> 2.1'

end
执行 pod install --verbose 得到如下输出:
Preparing
    - Running pre install hooks

Analyzing dependencies

Inspecting targets to integrate
  Using `ARCHS` setting to build architectures of target `Pods-AwesomeProject`: (``)

Finding Podfile changes
  - Then

Resolving dependencies of `Podfile`

Comparing resolved specification to the sandbox manifest
  - Then

Downloading dependencies

-> Using Then (2.1.0)
  - Running pre install hooks

Generating Pods project
  - Creating Pods project
  - Adding source files to Pods project
  - Adding frameworks to Pods project
  - Adding libraries to Pods project
  - Adding resources to Pods project
  - Linking headers
  - Installing targets
    - Installing target `Then` iOS 8.0
      - Generating Info.plist file at `Pods/Target Support Files/Then/Info.plist`
      - Generating module map file at `Pods/Target Support Files/Then/Then.modulemap`
      - Generating umbrella header at `Pods/Target Support Files/Then/Then-umbrella.h`
    - Installing target `Pods-AwesomeProject` iOS 9.0
      - Generating Info.plist file at `Pods/Target Support Files/Pods-AwesomeProject/Info.plist`
      - Generating module map file at `Pods/Target Support Files/Pods-AwesomeProject/Pods-AwesomeProject.modulemap`
      - Generating umbrella header at `Pods/Target Support Files/Pods-AwesomeProject/Pods-AwesomeProject-umbrella.h`
  - Running post install hooks
  - Writing Xcode project file to `Pods/Pods.xcodeproj`
    - Generating deterministic UUIDs
  - Writing Lockfile in `Podfile.lock`
  - Writing Manifest in `Pods/Manifest.lock`

Integrating client project

Integrating target `Pods-AwesomeProject` (`AwesomeProject.xcodeproj` project)
  - Running post install hooks
    - cocoapods-stats from `/usr/local/lib/ruby/gems/2.4.0/gems/cocoapods-stats-1.0.0/lib/cocoapods_plugin.rb`

Sending stats
      - Then, 2.1.0

-> Pod installation complete! There is 1 dependency from the Podfile and 1 total pod installed.
整个流程大概如下:
- Preparing 做一些准备工作,主要是下载第三方库的代码
- Running pre install hooks 执行
pre_install - Generating Pods project 创建 Pods 工程
- 处理所有 Pod 需要做的事情,比如添加 frameworks 、资源文件
- Running post install hooks 执行
post_install - Integrating client project 集成到主工程中
pre_install 和 post_install 都可以写到我们的 Podfile 中。
其中的各种参数和属性您可以从 http://www.rubydoc.info/gems/cocoapods/ 中找到,需要注意的是 pre_install 中可能获取不到 pod_project 等信息,第一次 pod 时是没有 Pods 工程的。
那么我们可以在这里做些什么呢,有一个最常见的是设置 Swift 版本:
post_install do |installer|
  installer.pods_project.targets.each do |target|
    target.build_configurations.each do |config|
      config.build_settings['SWIFT_VERSION'] = '3.0'
    end
  end
end
在这里我们遍历了 Pods 工程中的所有 Target ,设置 Swift 版本为 3.0 。需要注意的是,CocoaPods 是执行完 post_install 才生成 Project ,在这一步可能获取不到 Pods 工程的文件。
打 Log
在 CocoaPods 中输出一些内容有两种方式,直接调用 puts ,这只会在 --verbose 下看到输出结果。
调用 Pod::UI.puts 则会在所有场景下有输出结果。
Hook post_install 拷贝 module.modulemap
那么我们是不是也可以在这里进行一些文件操作呢?当然可以,我们可以在 Umeng 的 modulemap 文件。
以下代码供参考:
post_install do |installer|
  sandbox_root = Pathname(installer.sandbox.root)
  sandbox = Pod::Sandbox.new(sandbox_root)
  module_workaround_root = sandbox_root + 'ModuleWorkaround'
  frameworks = []
  installer.pod_targets.each do |umbrella|
    umbrella.specs.each do |spec|
      consumer = spec.consumer(umbrella.platform.name)
      file_accessor = Pod::Sandbox::FileAccessor.new(sandbox.pod_dir(spec.root.name), consumer)
      frameworks += file_accessor.vendored_frameworks
    end
  end
  frameworks.each do |framework|
    destination = framework
    root = module_workaround_root + framework.basename + 'Modules'
    Pod::UI.puts "Copying #{root} to #{destination}"
    FileUtils.cp_r root, destination, :remove_destination => true
  end
end
上述是将 Pods/ModuleWorkaround 的 module.modulemap 拷贝到对应的 framework 中。这样一来每当 Umeng 更新了 SDK 后,我们都不需要再修改一份 Podspec 了。此外我们还可以将这个封装成一个 Plugin 使用。这就是 Plugin 的一种类型,Hook 安装前和安装后实际做一些额外的操作。
CocoaPods 中已有的一些插件就是采用 Hook 的方法:
- Rome 不对主工程进行修改,创建 Pods 工程,并生成所有 framworks 到 Rome 目录。
- cocoapods-keys 为工程添加安全设置各种 Key 的支持,当接入一些服务时,我们需要使用对应的 AppKey 之类的东西,cocoapods-keys 会将这些 key 保存到 Keychain 中。这个插件属于比较实用的了,此外您可以阅读一下源码,这个的实现方式非常有趣,它通过 Hook
pre_install,在这里增加一个新的 PodKeys,这个Keys中保存了所有的 AppKey 。
另外一种添加 Pod 命令的也有一些实用的插件:
- cocoapods-deintegrate 移除 Pod
- cocoapods-deploy 加快
pod install
基于 CocoaPods 开发,生成 Framework
随着工程变得越来越大,或者是您选择了 Swift ,都会遇到编译时间较长的问题,特别是在选择 Swift 后。
像美团这样大的工程,基本就是采用这个方案,但作为一个小团队,又选择了 Swift ,那就没有时间去构建一套完整的二进制化代码流程了。
笔者在这里找到了还算好用的解决方案。先来谈一下思路:
笔者原本是打算在 pre_install 中搞事情的,将所有的源码形式的 Swift 第三方库全部编译成 framework ,并设置好对应的 vendored_frameworks 。然而笔者依靠着 2 小时的 Ruby 水平,翻看了部分源码和 RubyDoc 对应一些 API 文档,还带着看了一些插件的源码,基本是一无所获。
但也不完全是一无所有,事实上,在 project 引入一个 framework ,主要是配置一下 Build Setting 的 Framework Search Paths ,把对应的 framework 拷贝到运行的 App 中。您可以尝试沿着这个思路完成二进制化的需求。按照这个方案完成的话,我们应当是不需要任何额外的 podspec 了。
那我们退而求其次,创建本地的 podspec ,并引用对应的 framework 。
那么现在的首要解决的问题是,如何创建 framework 。我们可以使用 xcodebuild ,类似 Rome 的方案。直接使用 xcodebuild 需要写各种各样的参数,我们可以考虑使用 Carthage 或者 Fastlane 的 GYM 。
这里我们使用 Carthage 完成这个需求,用 Carthage 可以直接生成 framework 和 dSYM。(当然我们不能去写一个 Cartfile 去拉代码了,我们可以直接 build Pods project)。使用 carthage build --no-skip-current 即可。
那么此时遇到了一个问题,share scheme 。原本这应该是一个很简单的事情,直接将 xcuserdata 中的 scheme 移到 xcshareddata 即可,但 post_install 这里可能还没有生成 scheme 。
CocoaPods 提供了 Xcodeproj 工具,我们可以使用它来修改 project 。在 pre_install 中我们可以直接获取到 Pods 工程 installer.pods_project 。
def generate_frameworks (installer)
  project = installer.pods_project ##Project.new(installer.sandbox.project_path)
  project.recreate_user_schemes(:visible => true)
  project.save
  project.targets.each do |target|
    Xcodeproj::XCScheme.share_scheme(installer.sandbox.project_path, target)
  end
  carthage_build_log = `carthage build --no-skip-current --configuration Release --platform iOS --project-directory #{installer.sandbox.root}`
  Pod::UI.puts carthage_build_log
end
为了方便后面的使用,我在这里创建了一个方法。
创建 scheme ,share scheme ,最后 build 一下。调用了 generate_frameworks 后,Pods 目录下就会增加对应的 Carthage 文件夹。打包出 framework 到这里就完成了。
接下来再去创建一个本地的 Then.podspec 即可。podspec 貌似只能读取当前目录,所以我将它放到了 Pods/Carthage 目录下:
Pod::Spec.new do |s|
  s.name             = "Then"
  s.version          = "2.1.0"
  s.summary          = "Super sweet syntactic sugar for Swift initializers."
  s.homepage         = "https://github.com/devxoul/Then"
  ##s.license          = { :type => "MIT", :file => "LICENSE" }
  s.author           = { "Suyeol Jeon" => "devxoul@gmail.com" }
  s.source           = { :git => "https://github.com/devxoul/Then.git",
                         :tag => s.version.to_s }
  ##s.source_files     = "Sources/*.swift"
  ##s.requires_arc     = true
  s.vendored_frameworks = "Build/iOS/#{s.name}.framework"

  s.ios.deployment_target = "8.0"
  s.osx.deployment_target = "10.9"
  s.tvos.deployment_target = "9.0"
end
虽然我们创建了本地的 podspec ,但当我们更新了某个依赖的版本时,一版我们也无需修改对应的 podspec 。因为这里选择的 framework 是我们使用原 podspec build 出来的 framework 。
最终我们的 Podfile 大概长这个样子:
platform :ios, '9.0'

target 'AwesomeProject' do
  use_frameworks!
  pod 'UMengAnalytics-NO-IDFA', '~> 4.2'
  case ENV['PODFILE_TYPE']
  when 'development'
    pod 'Then', :path => "./Pods/Carthage"
  else
    pod 'Then', '~> 2.1'
  end
end

post_install do |installer|
  generate_frameworks installer if ENV['PODFILE_TYPE'] == 'generate_frameworks'
  generate_module installer
end
当选择不加任何环境参数时,第三方库使用的是源码,当使用参数 generate_frameworks 则 build 出对应的 framework 。当使用参数 development 时,则直接使用之前打包的 framework 。
这样一来我们就没有 clean 2 分钟,扯淡(编译)2 小时的事情了。但在开发时,我们可能又需要调试的需求,好在 CocoaPods 即将支持 dSYM 的设置。您可以在 Issues 1698 中了解更多。
本文大部分的内容都已经完成,最后我们还可以做一些额外的事情再改进一下这个流程,以及一些额外的 Tip。
当基于上述情况开发时,我们的 Podfile.lock 会频繁地变动,我们可以考虑在 Podfile 做好版本控制,或者使用 Danger 监管 PR 中 Podfile.lock 的变动。关于 Danger 相关内容您可以从 使用 Danger 提高 Code Review 体验 了解到基本内容。
上述方案中,可能有一些地方比较尴尬,我们将一些需要保留到 Git 中的文件放到了 Pods 中,写好 .gitignore 可以解决这个问题,但执行个 rm -rf Pods,顺便还 merge 到了主分支,这还是略尴尬了。
我们还可以考虑把这些移出来,放到项目的根目录中。但这样可能会在根目录有一堆的 podspec ,这有些不友好。但 podspec 中 vendored_frameworks 可以放数组啊。大致如下,这个 podspec 放到根目录即可。
Pod::Spec.new do |s|
  s.name             = "AwesomeProject"
  s.version          = "1"
  s.summary          = "Use Pods Demo"
  s.homepage         = "https://github.com/DianQK/DevOnPods"
  s.license          = { :type => "MIT", :file => "LICENSE" }
  s.author           = { "DianQK" => "dianqk@icloud.com" }
  s.source           = { :git => "https://github.com/DianQK/DevOnPods.git",
                         :tag => s.version.to_s }
  s.ios.deployment_target = "8.0"
  s.vendored_frameworks = ["Pods/Carthage/Build/iOS/Then.framework", "Pods/Carthage/Build/iOS/SwiftyJSON.framework"]
end
拆分 spec
我们还可以再多做一些,使用 Subspecs :
Pod::Spec.new do |s|
  s.name             = "AwesomeProject"
  s.version          = "1"
  s.summary          = "Use Pods Demo"
  s.homepage         = "https://github.com/DianQK/DevOnPods"
  s.license          = { :type => "MIT", :file => "LICENSE" }
  s.author           = { "DianQK" => "dianqk@icloud.com" }
  s.source           = { :git => "https://github.com/DianQK/DevOnPods.git",
                         :tag => s.version.to_s }
  s.ios.deployment_target = "8.0"
  ['Then', 'SwiftyJSON'].each do |name|
    s.subspec name do |sp|
      sp.vendored_frameworks = "Pods/Carthage/Build/iOS/#{name}.framework"
    end
  end
end
这样一来使用的时候就变成了:
target 'AwesomeProject' do
  use_frameworks!
  pod 'UMengAnalytics-NO-IDFA', '~> 4.2'
  case ENV['PODFILE_TYPE']
  when 'development'
    pod 'AwesomeProject/Then', :path => "./"
    pod 'AwesomeProject/SwiftyJSON', :path => "./"
  else
    pod 'Then', '~> 2.1'
    pod 'SwiftyJSON', '~> 3.1'
  end
end
虽然多了几行,但感觉似乎更清晰一些了。这也更方便我们管理各种库的依赖,特别是当项目的代码也放到 Pods 中时,这样管理会显得特别有力。
指定使用 Framework
比如,我们可以指定哪些库用源码,那些库直接用 framework 。
target 'AwesomeProject' do
  use_frameworks!
  pod 'UMengAnalytics-NO-IDFA', '~> 4.2'
  framework_pods = []
  framework_pods = ENV['FRAMEWORK_PODS'].split(",") if ENV['FRAMEWORK_PODS']
  development = false
  development = ENV['PODFILE_TYPE'] == 'development' if ENV['PODFILE_TYPE']
  if development || framework_pods.include?('Then')
    pod 'AwesomeProject/Then', :path => "./"
  else
    pod 'Then', '~> 2.1'
  end
  if development || framework_pods.include?('SwiftyJSON')
    pod 'AwesomeProject/SwiftyJSON', :path => "./"
  else
    pod 'SwiftyJSON', '~> 3.1'
  end
end
当我们想使用 Then 的 framework 时,只需要执行 env FRAMEWORK_PODS=Then pod install 。
build 指定 Framework
我们已经完成了几乎所有的事情,但还差一个,build 指定 Framework 。毕竟一次 build 全部依赖是一件非常痛苦的事情。
Carthage 在使用了参数 --no-skip-current 后,似乎只能 build 全部 share scheme ,既然这样我们可以简单地将不需要 build 的库不 share 。
这里有两种比较合适的做法,在 generate_module 方法中进行过滤,或者对不想 build 的库,直接使用本地的 spec ,这样就不会在 Pods 中生成对应的 Target 了,自然也不会去 build 这个库。
我们采取第二种方案,第一种需要额外做一些事情,删除 share scheme ,CocoaPods 不会主动删除 share scheme 。
target 'AwesomeProject' do
  use_frameworks!
  pod 'UMengAnalytics-NO-IDFA', '~> 4.2'
  framework_pods = []
  framework_pods = ENV['FRAMEWORK_PODS'].split(",") if ENV['FRAMEWORK_PODS']
  development = false
  development = ENV['PODFILE_TYPE'] == 'development' if ENV['PODFILE_TYPE']
  build_pods = []
  build_pods = ENV['BUILD_PODS'].split(",") if ENV['BUILD_PODS']
  build_all = true ##dev 下忽略 build all 参数
  if ENV['PODFILE_TYPE'] == 'generate_frameworks'
    build_all = build_pods.length == 0 ##等于 0 则 build all
    Pod::UI.puts "Build all" if build_all
    Pod::UI.puts "Build include #{build_pods}" if !build_all
  end
  if (development || framework_pods.include?('Then')) || !(build_pods.include?('Then') || build_all)
    pod 'AwesomeProject/Then', :path => "./"
  else
    pod 'Then', '~> 2.1'
  end
  if (development || framework_pods.include?('SwiftyJSON')) || !(build_pods.include?('SwiftyJSON') || build_all)
    pod 'AwesomeProject/SwiftyJSON', :path => "./"
  else
    pod 'SwiftyJSON', '~> 3.1'
  end
end
添加一个 BUILD_PODS 环境变量,当处于 generate_frameworks 的时候,build 对应的库。
以上方案还有一个小的缺陷,pod install 被用来 build framework 了。也就是说当 pod install 后可能还要再一次的 pod install。
比如我们想使用 Then 的 framework ,就需要先 env PODFILE_TYPE=generate_frameworks BUILD_PODS=Then pod install,再执行 env FRAMEWORK_PODS=Then pod install。
这个问题,结合 Fastlane 是个不错的选择,还免去了每次都要敲一下 env 。
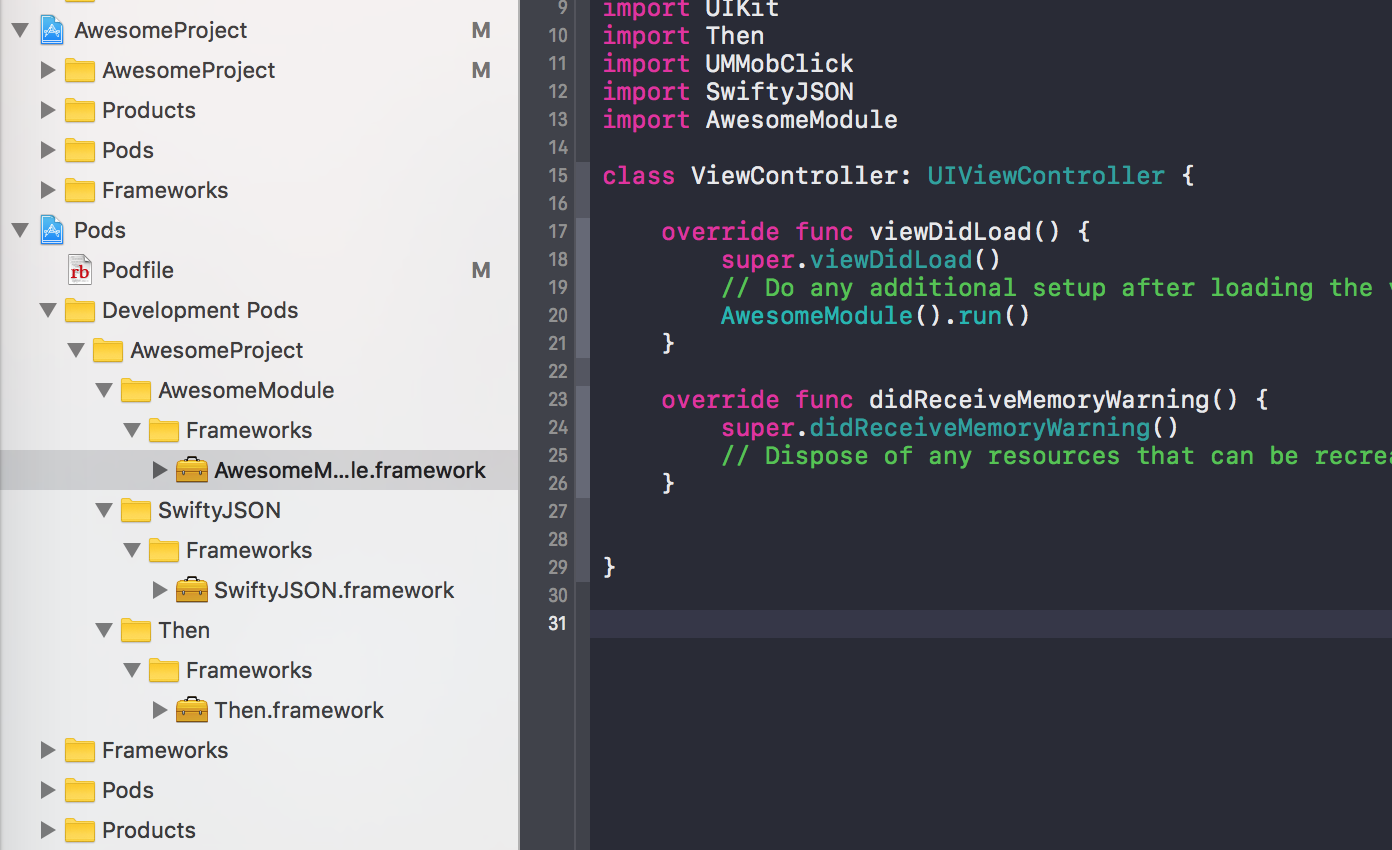
以上都只提到了引用第三方库,其实我们的代码也是类似的道理,创建好对应模块的工程,采用 CocoaPods 管理。示例项目中的 AwesomeModule 就是这样做的。
写到最后我们似乎漏了一件事情,pod update,在 update 时,build 新的 framework ,甚至是对于 pod install 中对 framework 进行 cache 。结合 CocoaPods 的文档和 Ruby 大法,这应该也不是一件非常复杂的事情。
总结
我们通过对修改 podspec 和 Podfile 达到了很多我们需要的功能,增加 modulemap 、通过 ENV 配置不同依赖、通过 Hook 配置项目引用源码还是 Framework 。
事实上,在 http://www.rubydoc.info/gems/cocoapods 和 https://guides.cocoapods.org 中还有很多内容值得去看, 比如 https://guides.cocoapods.org/using/the-podfile.html 、https://github.com/artsy/eigen/blob/master/Podfile 、https://github.com/CocoaPods/CocoaPods/tree/master/examples ,这些通常能解决您在使用 CocoaPods 遇到的绝大多数问题。
原文出处:编译时自动Pod Install的实现
测试环境:
- Cocoapods 1.3.1
- Xcode8.3.3
实现说明:
使用过Cocoapods的人都会遇到过这种报错:’error: The sandbox is not in sync with the Podfile.lock. Run ‘pod install’ or update your CocoaPods installation.’, 然后我们到podfile所在目录下执行pod install一下就行了。但是今天我突发奇想,想要Cocoapods检测到需要未同步问题后自动pod install一下。
刚开始以为很简单:只需要在[CP] Check Pods Manifest.lock
的脚本前插入一段脚本,该脚本用于对项目中的依赖变更进行一个预检测,也就是和[CP] Check Pods Manifest.lock的一样,只是检测到未后不是报错而是直接执行pod install。(注:不能直接修改[CP] Check Pods
Manifest.lock脚本,因为每次pod install都会重置这个脚本的内容)。
按照上面的想法,便试着在[CP] Check Pods Manifest.lock之前添加了一段脚本(Run Script Phase),但是发现一个问题,执行完pod install后,Cocoapods会自动将自己的[CP] Check Pods
Manifest.lock 脚本置于所有`Run Script Phase中的第一个位置。
所以这种办法就行不通了。
之后又想到官方不是提供了pod hook吗,示例代码:
post_install do |installer|
  #自定义逻辑
end
可以hook的点就这一个,那就得想办法通过installer这个对象找到操作宿主项目配置的方法。然后给宿主项目相应的target
添加一个Run Script Phase。可是打印了installer的所有方法,并没有发现看起来像能够编辑宿主项目配置的(就算能找到这也不算个简单的方法),所有方法如下:
[:update, :sandbox, :podfile, :lockfile, :repo_update?, :repo_updat
e, :repo_update=, :update=, :install!, :use_default_plugins, :use_d
efault_plugins?, :prepare, :resolve_dependencies, :download_depende
ncies, :installation_options, :aggregate_targets, :pod_targets, :an
alysis_result, :pods_project, :names_of_pods_to_install, :installe
d_specs, :development_pod_targets, :use_default_plugins=, :installe
d_specs=, :installation_options=, :config, :to_yaml, :to_yaml_prope
rties, :try, :try!, :blank?, :present?, :presence, :to_param, :to_q
uery, :psych_to_yaml, :to_json, :instance_of?, :kind_of?, :is_a?,
:tap, :public_send, :suppress, :class_eval, :remove_instance_variab
le, :singleton_method, :quietly, :suppress_warnings, :instance_vari
able_set, :define_singleton_method, :method, :public_method, :silen
ce_stream, :extend, :with_warnings, :silence_stderr, :capture, :t
o_enum, :enum_for, :enable_warnings, :silence, :<=>, :===, :=~,
:!~, :eql?, :respond_to?, :freeze, :inspect, :object_id, :send, :di
splay, :to_s, :silence_warnings, :nil?, :hash, :class, :singleton_c
lass, :clone, :dup, :itself, :taint, :tainted?, :untaint, :untrust,
:untrusted?, :trust, :frozen?, :methods, :singleton_methods, :prote
cted_methods, :private_methods, :public_methods, :instance_variabl
e_get, :instance_variables, :instance_variable_defined?, :!, :==,
:!=, :__send__, :equal?, :instance_eval, :instance_exec, :__id__]
既然通过installer不行,那我们直接编辑项目配置文件,不通过Cocoapods提供的上下文对象,只使用Cocoapods提供的hook点,编辑项目配置文件使用Xcodeproj 这个库(Cocoapods内部用于编辑项目配置文件的库),但是这样可能会有个问题:我们是在pod hook是pod install过程中被执行的,那我们对项目的配置文件的修改可能会和Cocoapods的修改冲突,虽然个人感觉这种方式可能不行,但是还是尝试了下,上代码:
require 'xcodeproj'
path_to_project = "xxxxxxxx/xxxx/MainPrj.xcodeproj"
project = Xcodeproj::Project.open(path_to_project)
main_target = project.targets.first
curPhases = main_target.build_phases
checkPhasesName = "checkAndAutoPodInstall"
checkPhasesIndex = -1
curPhases.each_index { |index|
    item = curPhases[index]
    if item.instance_of? Xcodeproj::Project::Object::PBXShellScriptBuildPhase and item.name == checkPhasesName
        checkPhasesIndex = index
        break
    end
}
if checkPhasesIndex == -1
  puts "\033[32m CheckPhasesInject-add \033[0m\n"
  shellPhases = Xcodeproj::Project::Object::PBXShellScriptBuildPhase.new(project,project.generate_uuid())
  shellPhases.name = checkPhasesName
  shellPhases.shell_script = "echo 111"
  shellPhases.shell_path = "/bin/sh"
  curPhases.insert(0,shellPhases)
  project.save()
elsif checkPhasesIndex != 0
  puts "\033[32m CheckPhasesInject-switch \033[0m\n"
  checkPhases = curPhases.delete_at(checkPhasesIndex)
  curPhases.insert(0,checkPhases)
  project.save()
else puts "\033[32m CheckPhasesInject-do noting \033[0m\n"
end
大致说明一下这段代码:
这段脚本是在pod hook中执行的。
MainPrj 是宿主项目。
checkAndAutoPodInstall 则是需要优先于[CP] Check Pods Manifest.lock执行的Run Script Phase的名称。
pod hook执行时判断宿主项目的主Target的Build Phases中是否有checkAndAutoPodInstall脚本,没有则
添加一个并设置到所有Run Script Phase中的第一个。但是后面测试发现,在位置上还是会有问题:
如果已经添加过checkAndAutoPodInstall,那么pod hook就不会修改项目配置,此时Cocoapods会把[CP] Check Pods Manifest.lock置为第一个位置。但是如果checkAndAutoPodInstall没有添加过,而是在pod hook中添加的就不会有这个问题。基于此,那么可以得到这样一个方案: pod hook中每次都先把checkAndAutoPodInstall删除,然后再新增。
这个方案虽然能解决目前讨论的自动Pod Install的问题,但是会出现项目代码版本管理问题:即使项目未做任何改动,每次pod Install后项目配置文件都会改变,这是不可接受的,所以最终此方案只能放弃。
接着再想其他办法,注意到Target Dependencies,这个每次编译过程中都是第一个处理的,既然如此,那就可以新建一个target,然后在新建的target中添加Cocoapods检测脚本,最终,通过这种形式实现了Pod Install的自动执行。