Android三种屏幕适配方案
原文出处:Android 屏幕适配方案
1、概述
大家在Android开发时,肯定会觉得屏幕适配是个尤其痛苦的事,各种屏幕尺寸适配起来蛋疼无比。如果我们换个角度我们看下这个问题,不知道大家有没有了解过web前端开发,或者说大家对于网页都不陌生吧,其实适配的问题在web页面的设计中理论上也存在,为什么这么说呢?电脑的显示器的分辨率、包括手机分辨率,我敢说分辨率的种类远超过Android设备的分辨率,那么有一个很奇怪的现象:
为什么Web页面设计人员从来没有说过,尼玛适配好麻烦?
那么,到底是什么原因,让网页的设计可以在千差万别的分辨率的分辨率中依旧能给用户一个优质的体验呢?带着这个疑惑,我问了下媳妇(前端人员),媳妇睁大眼睛问我:什么叫适配?fc,尼玛,看来的确没有这类问题。后来再我仔细的追问后,她告诉我,噢,这个尺寸呀,我都是设置为20%的~~追根到底,其实就是一个原因,网页提供了百分比计算大小。
同样的,大家拿到UI给的设计图以后,是不是抱怨过尼玛你标识的都是px,我项目里面用dp,这什么玩意,和UI人员解释,UI妹妹也不理解。那么本例同样可以解决Android工程师和UI妹妹间的矛盾~UI给出一个固定尺寸的设计稿,然后你在编写布局的时候不用思考,无脑照抄上面标识的像素值,就能达到完美适配,理想丰不丰满~~。
然而,Android对于不同的屏幕给出的适配方案是dp,那么dp与百分比的差距到底在哪里?
2、dp vs 百分比
- dp
我们首先看下dp的定义:
Density-independent pixel (dp)独立像素密度。标准是160dip.即1dp对应1个pixel,计算公式如:px = dp * (dpi / 160),屏幕密度越大,1dp对应 的像素点越多。
上面的公式中有个dpi,dpi为DPI是Dots Per Inch(每英寸所打印的点数),也就是当设备的dpi为160的时候1px=1dp;
好了,上述这些概念记不记得住没关系,只要记住一点dp是与像素无关的,在实际使用中1dp大约等于1/160inch。
那么dp究竟解决了适配上的什么问题?可以看出1dp = 1/160inch;那么它至少能解决一个问题,就是你在布局文件写某个View的宽和高为160dp160dp,这个View在任何分辨率的屏幕中,显示的尺寸大小是大约是一致的(可能不精确),大概是 1 inch 1 inch。
但是,这样并不能够解决所有的适配问题:
- 呈现效果仍旧会有差异,仅仅是相近而已
- 当设备的物理尺寸存在差异的时候,dp就显得无能为力了。为4.3寸屏幕准备的UI,运行在5.0寸的屏幕上,很可能在右侧和下侧存在大量的空白。而5.0寸的UI运行到4.3寸的设备上,很可能显示不下。
以上两点,来自参考链接1
一句话,总结下,dp能够让同一数值在不同的分辨率展示出大致相同的尺寸大小。但是当设备的尺寸差异较大的时候,就无能为力了。适配的问题还需要我们自己去做,于是我们可能会这么做:
<?xml version="1.0" encoding="utf-8"?>
<resources>
    <!-- values-hdpi 480X800 -->
    <dimen name="imagewidth">120dip</dimen>
</resources>
<resources>
    <!-- values-hdpi-1280x800 -->
    <dimen name="imagewidth">220dip</dimen>
</resources>
<?xml version="1.0" encoding="utf-8"?>
<resources>
    <!-- values-hdpi  480X320 -->
    <dimen name="imagewidth">80dip</dimen>
</resources>
上述代码片段来自网络,也就是说,我们为了优质的用户体验,依然需要去针对不同的dpi设置,编写多套数值文件。
可以看出,dp并没有能解决适配问题。下面看百分比。
- 百分比
这个概念不用说了,web中支持控件的宽度可以去参考父控件的宽度去设置百分比,最外层控件的宽度参考屏幕尺寸设置百分比,那么其实中Android设备中,只需要支持控件能够参考屏幕的百分比去计算宽高就足够了。
比如,我现在以下几个需求:
- 对于图片展示的Banner,为了起到该有的效果,我希望在任何手机上显示的高度为屏幕高度的1/4
- 我的首页分上下两栏,我希望每个栏目的屏幕高度为11/24,中间间隔为1/12
- slidingmenu的宽度为屏幕宽度的80%
当然了这仅仅是从一个大的层面上来说,其实小范围布局,可能百分比将会更加有用。
那么现在不支持百分比,实现上述的需求,可能需要1、代码去动态计算(很多人直接pass了,太麻烦);2、利用weight(weight必须依赖Linearlayout,而且并不能适用于任何场景)
再比如:我的某个浮动按钮的高度和宽度希望是屏幕高度的1/12,我的某个Button的宽度希望是屏幕宽度的1/3。
上述的所有的需求,利用dp是无法完成的,我们希望控件的尺寸可以按照下列方式编写:
<Button
        android:text="@string/hello_world"
        android:layout_width="20%w"
        android:layout_height="10%h"/>
利用屏幕的宽和高的比例去定义View的宽和高。
好了,到此我们可以看到dp与百分比的区别,而百分比能够更好的解决我们的适配问题。
- some 适配tips
我们再来看看一些适配的tips
- 多用match_parent
- 多用weight
- 自定义view解决
其实上述3点tip,归根结底还是利用百分比,match_parent相当于100%参考父控件;weight即按比例分配;自定义view无非是因为里面多数尺寸是按照百分比计算的;
通过这些tips,我们更加的看出如果能在Android中引入百分比的机制,将能解决大多数的适配问题,下面我们就来看看如何能够让Android支持百分比的概念。
3、百分比的引入
1、引入
其实我们的解决方案,就是在项目中针对你所需要适配的手机屏幕的分辨率各自简历一个文件夹。
如下图:
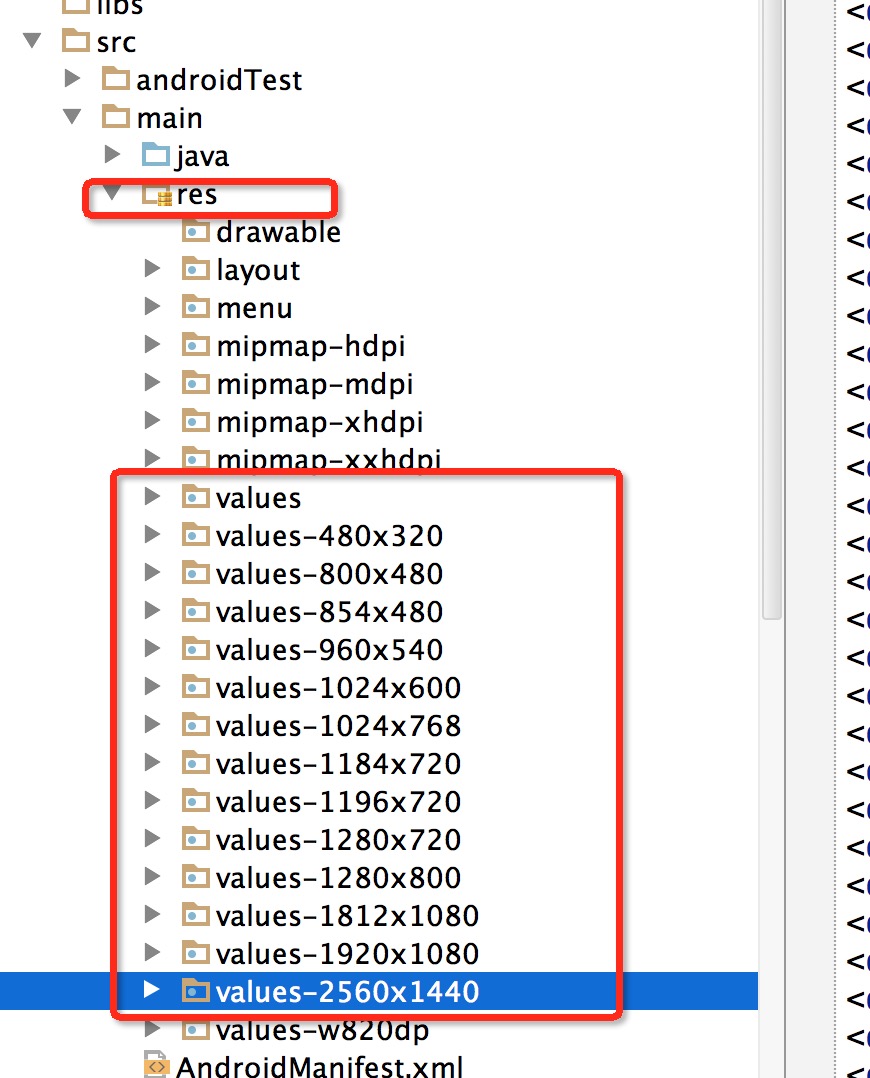
然后我们根据一个基准,为基准的意思就是:
比如480*320的分辨率为基准
- 宽度为320,将任何分辨率的宽度分为320份,取值为x1-x320
- 高度为480,将任何分辨率的高度分为480份,取值为y1-y480
例如对于800*480的宽度480:
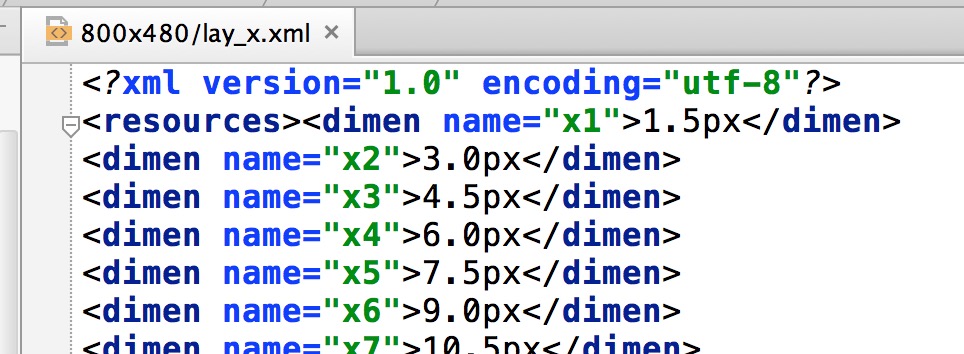
可以看到x1 = 480 / 基准 = 480 / 320 = 1.5 ;
其他分辨率类似~~
你可能会问,这么多文件,难道我们要手算,然后自己编写?不要怕,下文会说。
那么,你可能有个疑问,这么写有什么好处呢?
假设我现在需要在屏幕中心有个按钮,宽度和高度为我们屏幕宽度的1/2,我可以怎么编写布局文件呢?
<FrameLayout >
    <Button
        android:layout_gravity="center"
        android:gravity="center"
        android:text="@string/hello_world"
        android:layout_width="@dimen/x160"
        android:layout_height="@dimen/x160"/>
</FrameLayout>
可以看到我们的宽度和高度定义为x160,其实就是宽度的50%;
那么效果图:
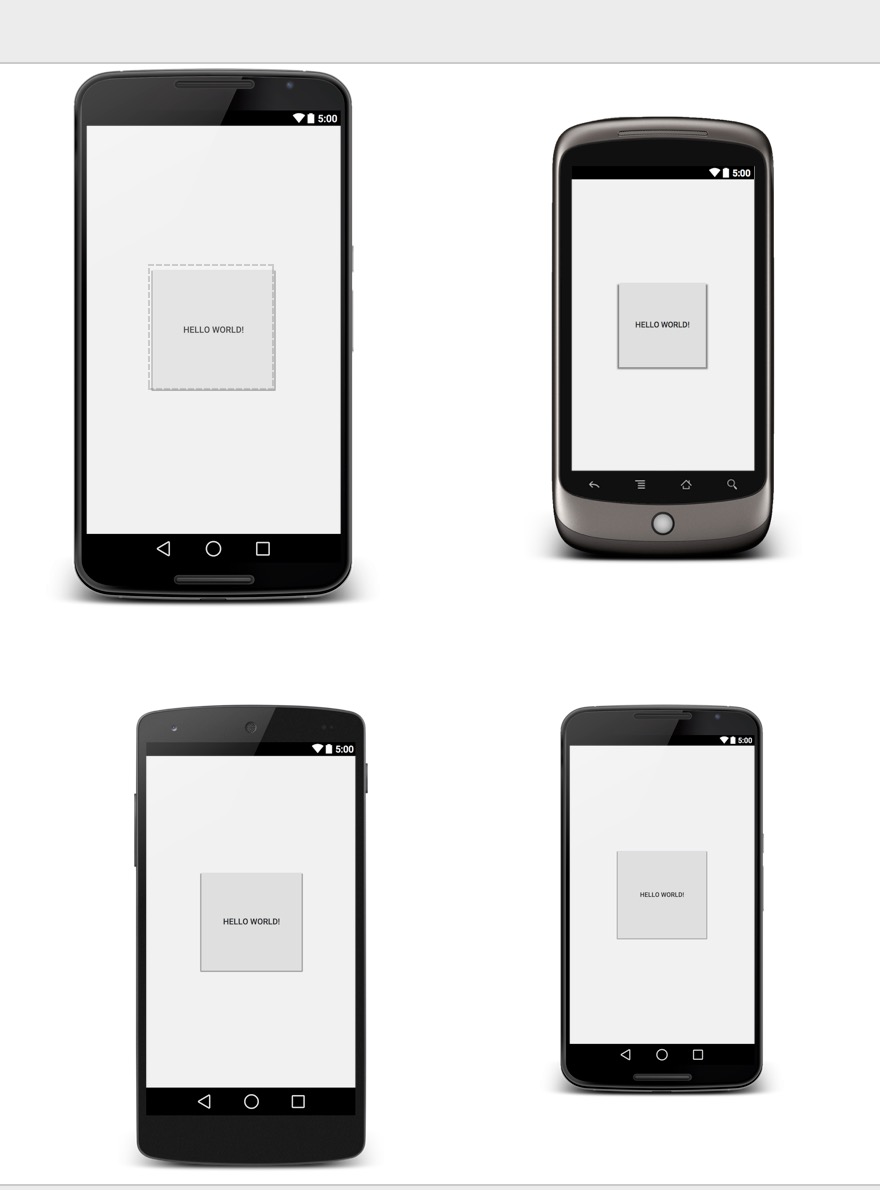
可以看到不论在什么分辨率的机型,我们的按钮的宽和高始终是屏幕宽度的一半。
- 对于设计图
假设现在的UI的设计图是按照480*320设计的,且上面的宽和高的标识都是px的值,你可以直接将px转化为x[1-320],y[1-480],这样写出的布局基本就可以全分辨率适配了。
你可能会问:设计师设计图的分辨率不固定怎么办?下文会说~
- 对于上文提出的几个dp做不到的
你可以通过在引入百分比后,自己试试~~
好了,有个最主要的问题,我们没有说,就是分辨率这么多,尼玛难道我们要自己计算,然后手写?
2、自动生成工具
好了,其实这样的文件夹手写也可以,按照你们需要支持的分辨率,然后编写一套,以后一直使用。
当然了,作为程序员的我们,怎么能做这么low的工作,肯定要程序来实现:
那么实现需要以下步骤:
- 分析需要的支持的分辨率
对于主流的分辨率我已经集成到了我们的程序中,当然对于特殊的,你可以通过参数指定。关于屏幕分辨率信息,可以通过该网站查询:http://screensi z.es/phone
- 编写自动生成文件的程序
代码如下
import java.io.File;
import java.io.FileNotFoundException;
import java.io.FileOutputStream;
import java.io.PrintWriter;
/**
 * Created by zhy on 15/5/3.
 */
public class GenerateValueFiles {
    private int baseW;
    private int baseH;
    private String dirStr = "./res";
    private final static String WTemplate = "<dimen name=\"x{0}\">{1}px</dimen>\n";
    private final static String HTemplate = "<dimen name=\"y{0}\">{1}px</dimen>\n";
    /**
     * {0}-HEIGHT
     */
    private final static String VALUE_TEMPLATE = "values-{0}x{1}";
    private static final String SUPPORT_DIMESION = "320,480;480,800;480,854;540,960;600,1024;720,1184;720,1196;720,1280;768,1024;800,1280;1080,1812;1080,1920;1440,2560;";
    private String supportStr = SUPPORT_DIMESION;
    public GenerateValueFiles(int baseX, int baseY, String supportStr) {
        this.baseW = baseX;
        this.baseH = baseY;
        if (!this.supportStr.contains(baseX + "," + baseY)) {
            this.supportStr += baseX + "," + baseY + ";";
        }
        this.supportStr += validateInput(supportStr);
        System.out.println(supportStr);
        File dir = new File(dirStr);
        if (!dir.exists()) {
            dir.mkdir();
        }
        System.out.println(dir.getAbsoluteFile());
    }
    /**
     * @param supportStr
     *            w,h_...w,h;
     * @return
     */
    private String validateInput(String supportStr) {
        StringBuffer sb = new StringBuffer();
        String[] vals = supportStr.split("_");
        int w = -1;
        int h = -1;
        String[] wh;
        for (String val : vals) {
            try {
                if (val == null || val.trim().length() == 0)
                    continue;
                wh = val.split(",");
                w = Integer.parseInt(wh[0]);
                h = Integer.parseInt(wh[1]);
            } catch (Exception e) {
                System.out.println("skip invalidate params : w,h = " + val);
                continue;
            }
            sb.append(w + "," + h + ";");
        }
        return sb.toString();
    }
    public void generate() {
        String[] vals = supportStr.split(";");
        for (String val : vals) {
            String[] wh = val.split(",");
            generateXmlFile(Integer.parseInt(wh[0]), Integer.parseInt(wh[1]));
        }
    }
    private void generateXmlFile(int w, int h) {
        StringBuffer sbForWidth = new StringBuffer();
        sbForWidth.append("<?xml version=\"1.0\" encoding=\"utf-8\"?>\n");
        sbForWidth.append("<resources>");
        float cellw = w * 1.0f / baseW;
        System.out.println("width : " + w + "," + baseW + "," + cellw);
        for (int i = 1; i < baseW; i++) {
            sbForWidth.append(WTemplate.replace("{0}", i + "").replace("{1}",
                    change(cellw * i) + ""));
        }
        sbForWidth.append(WTemplate.replace("{0}", baseW + "").replace("{1}",
                w + ""));
        sbForWidth.append("</resources>");
        StringBuffer sbForHeight = new StringBuffer();
        sbForHeight.append("<?xml version=\"1.0\" encoding=\"utf-8\"?>\n");
        sbForHeight.append("<resources>");
        float cellh = h *1.0f/ baseH;
        System.out.println("height : "+ h + "," + baseH + "," + cellh);
        for (int i = 1; i < baseH; i++) {
            sbForHeight.append(HTemplate.replace("{0}", i + "").replace("{1}",
                    change(cellh * i) + ""));
        }
        sbForHeight.append(HTemplate.replace("{0}", baseH + "").replace("{1}",
                h + ""));
        sbForHeight.append("</resources>");
        File fileDir = new File(dirStr + File.separator
                + VALUE_TEMPLATE.replace("{0}", h + "")//
                        .replace("{1}", w + ""));
        fileDir.mkdir();
        File layxFile = new File(fileDir.getAbsolutePath(), "lay_x.xml");
        File layyFile = new File(fileDir.getAbsolutePath(), "lay_y.xml");
        try {
            PrintWriter pw = new PrintWriter(new FileOutputStream(layxFile));
            pw.print(sbForWidth.toString());
            pw.close();
            pw = new PrintWriter(new FileOutputStream(layyFile));
            pw.print(sbForHeight.toString());
            pw.close();
        } catch (FileNotFoundException e) {
            e.printStackTrace();
        }
    }
    public static float change(float a) {
        int temp = (int) (a * 100);
        return temp / 100f;
    }
    public static void main(String[] args) {
        int baseW = 320;
        int baseH = 400;
        String addition = "";
        try {
            if (args.length >= 3) {
                baseW = Integer.parseInt(args[0]);
                baseH = Integer.parseInt(args[1]);
                addition = args[2];
            } else if (args.length >= 2) {
                baseW = Integer.parseInt(args[0]);
                baseH = Integer.parseInt(args[1]);
            } else if (args.length >= 1) {
                addition = args[0];
            }
        } catch (NumberFormatException e) {
            System.err
                    .println("right input params : java -jar xxx.jar width height w,h_w,h_..._w,h;");
            e.printStackTrace();
            System.exit(-1);
        }
        new GenerateValueFiles(baseW, baseH, addition).generate();
    }
}
同时我提供了jar包,默认情况下,双击即可生成,使用说明:
下载地址见文末,内置了常用的分辨率,默认基准为480*320,当然对于特殊需求,通过命令行指定即可:
例如:基准 1280 800 ,额外支持尺寸:1152 735;4500 * 3200;
按照
java -jar xx.jar width height width,height_width,height
上述格式即可。
到此,我们通过编写一个工具,根据某基准尺寸,生成所有需要适配分辨率的values文件,做到了编写布局文件时,可以参考屏幕的分辨率;在UI给出的设计图,可以快速的按照其标识的px单位进行编写布局。基本解决了适配的问题。
本方案思想已经有公司投入使用,个人认为还是很不错的,如果大家有更好的方案来解决屏幕适配的问题,欢迎留言探讨或者直接贴出好文链接,大家可以将自己的经验进行分享,这样才能壮大我们的队伍~~。
注:本方案思想来自Android Day Day Up 一群的【blue- 深圳】,经其同意编写此文,上述程序也很大程度上借鉴了其分享的源码。在此标识感谢,预祝其创业成功!
===>后期更新
Google已经添加了百分比支持库,详情请看:Android 百分比布局库(percent-support-lib) 解析与扩展
原文出处:Android 百分比布局库(percent-support-lib) 解析与扩展
一、概述
周末游戏打得过猛,于是周天熬夜码代码,周一早上浑浑噩噩的发现android-percent-support-lib- sample这个项目,Google终于开始支持百分比的方式布局了,瞬间脉动回来,啊咧咧。对于这种历史性的时刻,不出篇博客难以表达我内心的激动。
还记得不久前,发了篇博客:Android 屏幕适配方案,这篇博客以Web页面设计引出一种适配方案,最终的目的就是可以通过百分比控制控件的大小。当然了,存在一些问题,比如:
- 对于没有考虑到屏幕尺寸,可能会出现意外的情况;
- apk的大小会增加;
当然了android-percent-support这个库,基本可以解决上述问题,是不是有点小激动,稍等,我们先描述下这个support-lib。
这个库提供了:
两种布局供大家使用:
PercentRelativeLayout、PercentFrameLayout,通过名字就可以看出,这是继承自FrameLayout和RelativeLayout两个容器类;支持的属性有:
layout_widthPercent、layout_heightPercent、
layout_marginPercent、layout_marginLeftPercent、
layout_marginTopPercent、layout_marginRightPercent、
layout_marginBottomPercent、layout_marginStartPercent、layout_marginEndPercent。
可以看到支持宽高,以及margin。
也就是说,大家只要在开发过程中使用PercentRelativeLayout、PercentFrameLayout替换FrameLayout、RelativeLayout即可。
是不是很简单,不过貌似没有LinearLayout,有人会说LinearLayout有weight属性呀。但是,weight属性只能支持一个方向呀~~哈,没事,刚好给我们一个机会去自定义一个PercentLinearLayout。
好了,本文分为3个部分:
PercentRelativeLayout、PercentFrameLayout的使用- 对上述控件源码分析
- 自定义
PercentLinearLayout
二、使用
关于使用,其实及其简单,并且github上也有例子,android-percent-support-lib-sample。我们就简单过一下:
首先记得在build.gradle添加:
compile 'com.android.support:percent:22.2.0'
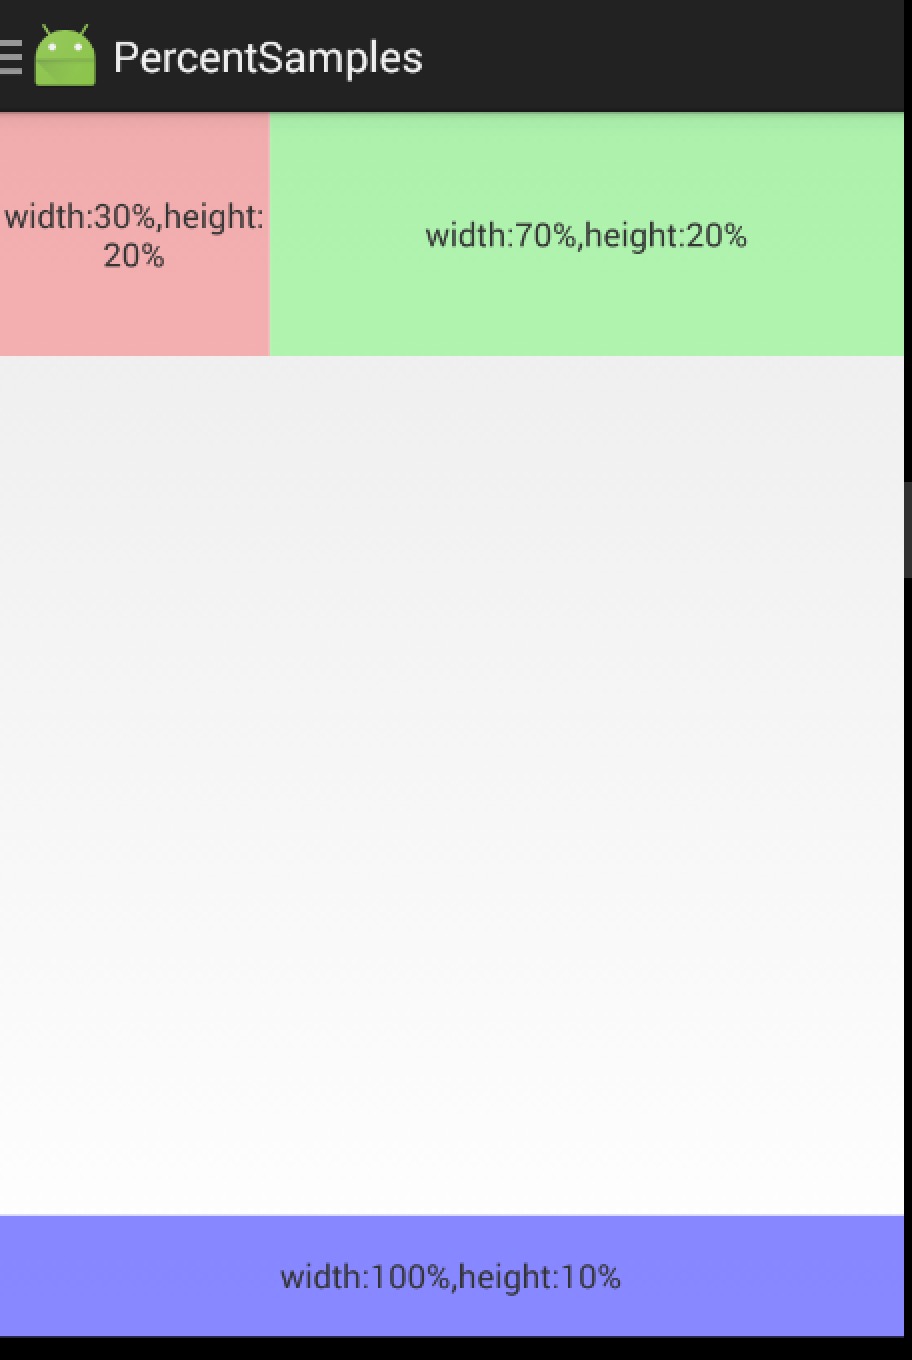
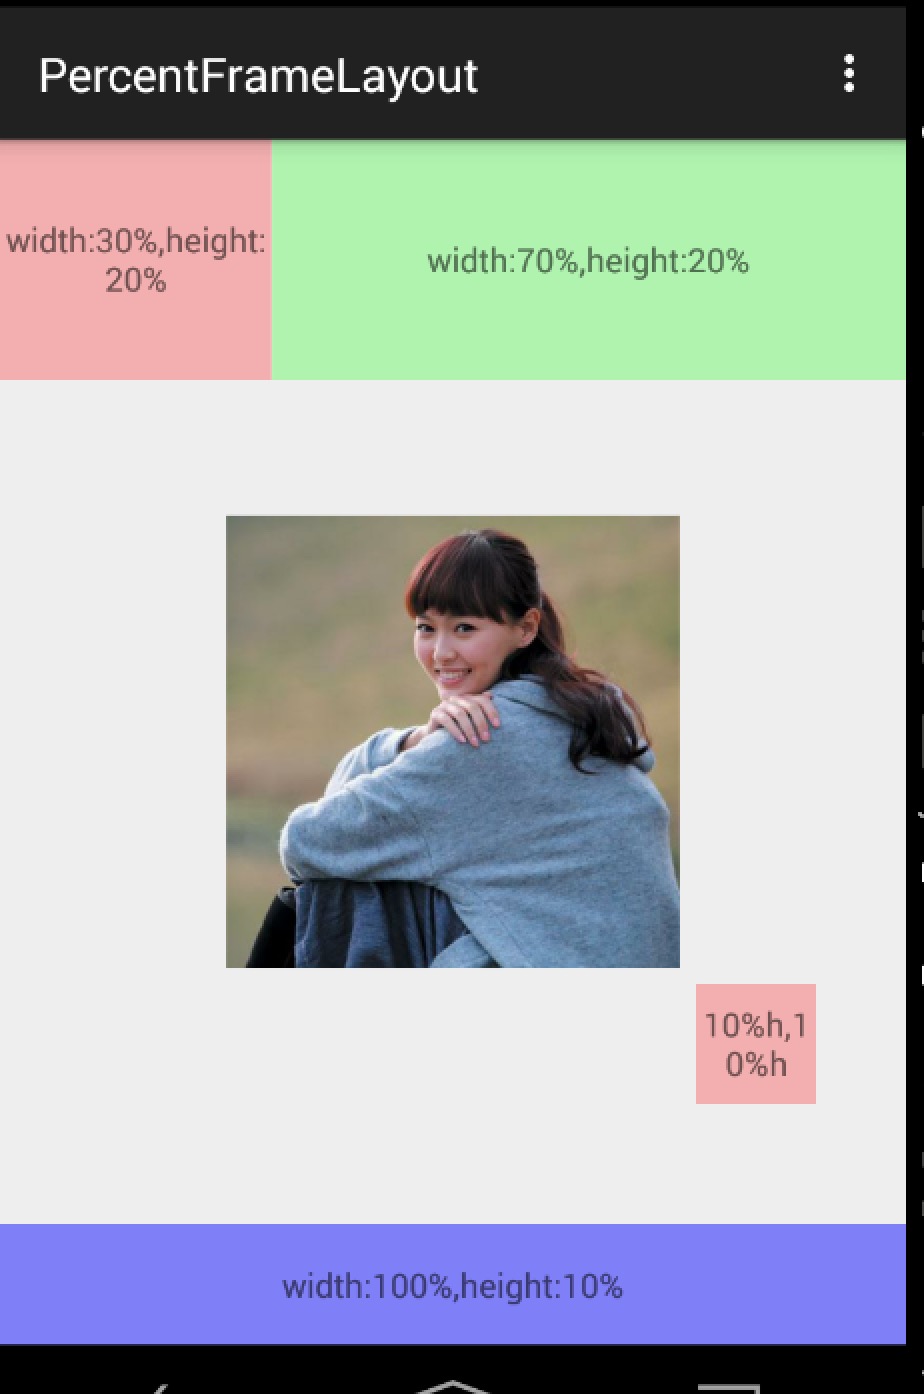
(一)PercentFrameLayout
<?xml version="1.0" encoding="utf-8"?>
<android.support.percent.PercentFrameLayout
    xmlns:android="http://schemas.android.com/apk/res/android"
    xmlns:app="http://schemas.android.com/apk/res-auto"
    android:layout_width="match_parent"
    android:layout_height="match_parent">
    <TextView
        android:layout_width="0dp"
        android:layout_height="0dp"
        android:layout_gravity="left|top"
        android:background="#44ff0000"
        android:text="width:30%,height:20%"
        app:layout_heightPercent="20%"
        android:gravity="center"
        app:layout_widthPercent="30%"/>
    <TextView
        android:layout_width="0dp"
        android:layout_height="0dp"
        android:layout_gravity="right|top"
        android:gravity="center"
        android:background="#4400ff00"
        android:text="width:70%,height:20%"
        app:layout_heightPercent="20%"
        app:layout_widthPercent="70%"/>
    <TextView
        android:layout_width="0dp"
        android:layout_height="0dp"
        android:layout_gravity="bottom"
        android:background="#770000ff"
        android:text="width:100%,height:10%"
        android:gravity="center"
        app:layout_heightPercent="10%"
        app:layout_widthPercent="100%"/>
</android.support.percent.PercentFrameLayout>
3个TextView,很简单,直接看效果图:
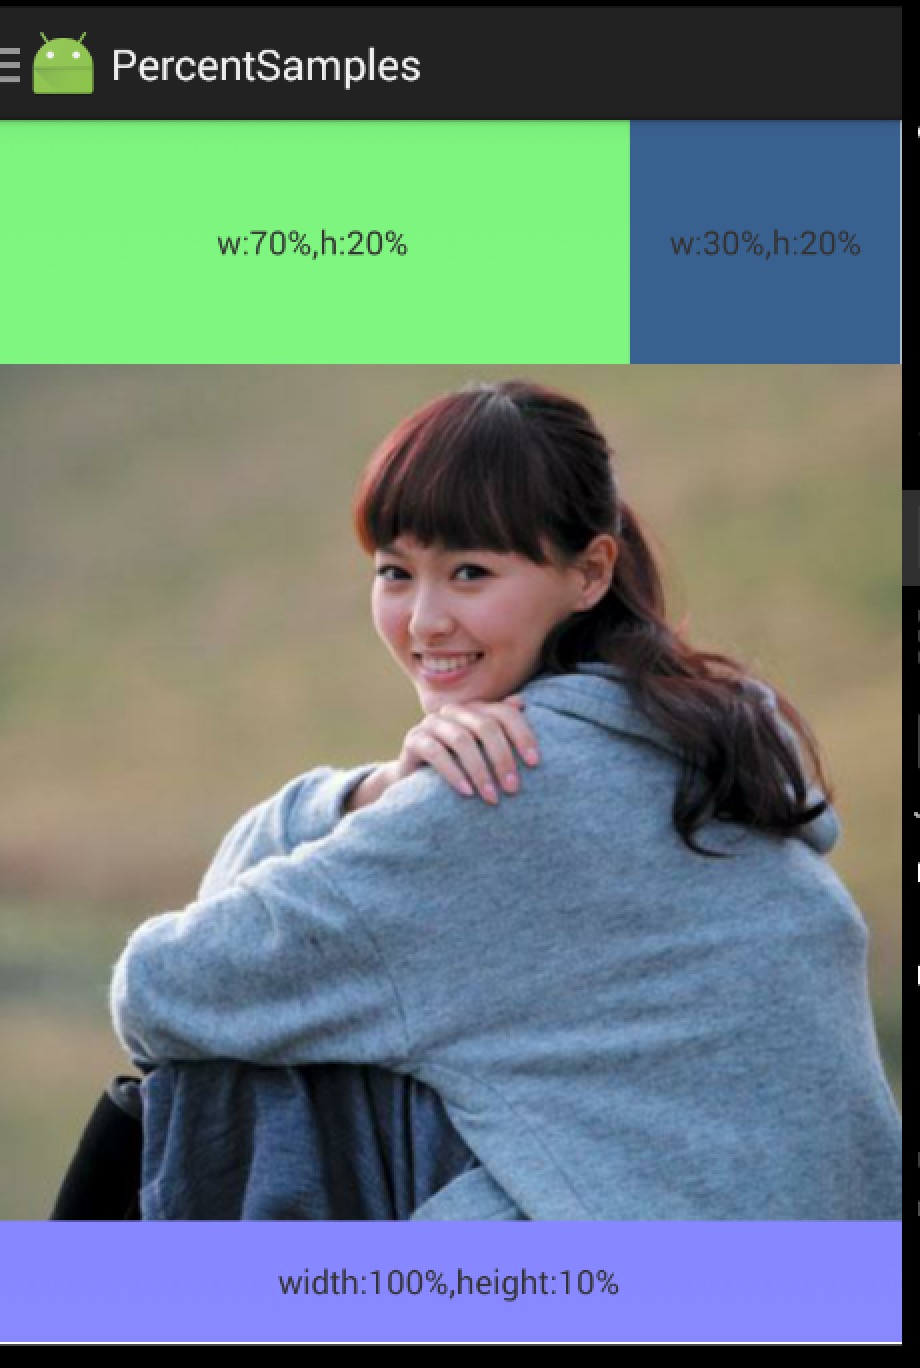
(二) PercentRelativeLayout
<?xml version="1.0" encoding="utf-8"?>
<android.support.percent.PercentRelativeLayout
    xmlns:android="http://schemas.android.com/apk/res/android"
    xmlns:app="http://schemas.android.com/apk/res-auto"
    android:layout_width="match_parent"
    android:layout_height="match_parent"
    android:clickable="true">
    <TextView
        android:id="@+id/row_one_item_one"
        android:layout_width="0dp"
        android:layout_height="0dp"
        android:layout_alignParentTop="true"
        android:background="#7700ff00"
        android:text="w:70%,h:20%"
        android:gravity="center"
        app:layout_heightPercent="20%"
        app:layout_widthPercent="70%"/>
    <TextView
        android:id="@+id/row_one_item_two"
        android:layout_width="0dp"
        android:layout_height="0dp"
        android:layout_toRightOf="@+id/row_one_item_one"
        android:background="#396190"
        android:text="w:30%,h:20%"
        app:layout_heightPercent="20%"
        android:gravity="center"
        app:layout_widthPercent="30%"/>
    <ImageView
        android:id="@+id/row_two_item_one"
        android:layout_width="match_parent"
        android:layout_height="0dp"
        android:src="@drawable/tangyan"
        android:scaleType="centerCrop"
        android:layout_below="@+id/row_one_item_one"
        android:background="#d89695"
        app:layout_heightPercent="70%"/>
    <TextView
        android:layout_width="0dp"
        android:layout_height="0dp"
        android:layout_below="@id/row_two_item_one"
        android:background="#770000ff"
        android:gravity="center"
        android:text="width:100%,height:10%"
        app:layout_heightPercent="10%"
        app:layout_widthPercent="100%"/>
</android.support.percent.PercentRelativeLayout>
ok,依然是直接看效果图:
使用没什么好说的,就是直观的看一下。
三、源码分析
其实细想一下,Google只是对我们原本熟悉的RelativeLayout和FrameLayout进行的功能的扩展,使其支持了percent相关的属性。
那么,我们考虑下,如果是我们添加这种扩展,我们会怎么做:
- 通过LayoutParams获取child设置的percent相关属性的值
- onMeasure的时候,将child的width,height的值,通过获取的自定义属性的值进行计算(eg:容器的宽 * fraction ),计算后传入给child.measure(w,h);
ok,有了上面的猜想,我们直接看PercentFrameLayout的源码。
public class PercentFrameLayout extends FrameLayout {
    private final PercentLayoutHelper mHelper = new PercentLayoutHelper(this);
    //省略了,两个构造方法
    public PercentFrameLayout(Context context, AttributeSet attrs) {
        super(context, attrs);
    }
    @Override
    public LayoutParams generateLayoutParams(AttributeSet attrs) {
        return new LayoutParams(getContext(), attrs);
    }
    @Override
    protected void onMeasure(int widthMeasureSpec, int heightMeasureSpec) {
        mHelper.adjustChildren(widthMeasureSpec, heightMeasureSpec);
        super.onMeasure(widthMeasureSpec, heightMeasureSpec);
        if (mHelper.handleMeasuredStateTooSmall()) {
            super.onMeasure(widthMeasureSpec, heightMeasureSpec);
        }
    }
    @Override
    protected void onLayout(boolean changed, int left, int top, int right, int bottom) {
        super.onLayout(changed, left, top, right, bottom);
        mHelper.restoreOriginalParams();
    }
    public static class LayoutParams extends FrameLayout.LayoutParams
            implements PercentLayoutHelper.PercentLayoutParams {
        private PercentLayoutHelper.PercentLayoutInfo mPercentLayoutInfo;
        public LayoutParams(Context c, AttributeSet attrs) {
            super(c, attrs);
            mPercentLayoutInfo = PercentLayoutHelper.getPercentLayoutInfo(c, attrs);
        }
        //省略了一些代码...
        @Override
        public PercentLayoutHelper.PercentLayoutInfo getPercentLayoutInfo() {
            return mPercentLayoutInfo;
        }
        @Override
        protected void setBaseAttributes(TypedArray a, int widthAttr, int heightAttr) {
            PercentLayoutHelper.fetchWidthAndHeight(this, a, widthAttr, heightAttr);
        }
    }
}
代码是相当的短,可以看到PercentFrameLayout里面首先重写了generateLayoutParams方法,当然了,由于支持了一些新的layout_属性,那么肯定需要定义对应的LayoutParams。
(一)percent相关属性的获取
可以看到PercentFrameLayout.LayoutParams在原有的FrameLayout.LayoutParams基础上,实现了PercentL ayoutHelper.PercentLayoutParams接口。
这个接口很简单,只有一个方法:
public interface PercentLayoutParams {
        PercentLayoutInfo getPercentLayoutInfo();
    }
而,这个方法的实现呢,也只有一行:return mPercentLayoutInfo;,那么这个mPercentLayoutInfo在哪完成赋值呢?
看PercentFrameLayout.LayoutParams的构造方法:
public LayoutParams(Context c, AttributeSet attrs) {
            super(c, attrs);
            mPercentLayoutInfo = PercentLayoutHelper.getPercentLayoutInfo(c, attrs);
        }
可以看到,将attrs传入给getPercentLayoutInfo方法,那么不用说,这个方法的内部,肯定是获取自定义属性的值,然后将其封装到PercentLayoutInfo对象中,最后返回。
代码如下:
public static PercentLayoutInfo getPercentLayoutInfo(Context context,
            AttributeSet attrs) {
        PercentLayoutInfo info = null;
        TypedArray array = context.obtainStyledAttributes(attrs, R.styleable.PercentLayout_Layout);
        float value = array.getFraction(R.styleable.PercentLayout_Layout_layout_widthPercent, 1, 1,
                -1f);
        if (value != -1f) {
            if (Log.isLoggable(TAG, Log.VERBOSE)) {
                Log.v(TAG, "percent width: " + value);
            }
            info = info != null ? info : new PercentLayoutInfo();
            info.widthPercent = value;
        }
        value = array.getFraction(R.styleable.PercentLayout_Layout_layout_heightPercent, 1, 1, -1f);
        if (value != -1f) {
            if (Log.isLoggable(TAG, Log.VERBOSE)) {
                Log.v(TAG, "percent height: " + value);
            }
            info = info != null ? info : new PercentLayoutInfo();
            info.heightPercent = value;
        }
        value = array.getFraction(R.styleable.PercentLayout_Layout_layout_marginPercent, 1, 1, -1f);
        if (value != -1f) {
            if (Log.isLoggable(TAG, Log.VERBOSE)) {
                Log.v(TAG, "percent margin: " + value);
            }
            info = info != null ? info : new PercentLayoutInfo();
            info.leftMarginPercent = value;
            info.topMarginPercent = value;
            info.rightMarginPercent = value;
            info.bottomMarginPercent = value;
        }
        value = array.getFraction(R.styleable.PercentLayout_Layout_layout_marginLeftPercent, 1, 1,
                -1f);
        if (value != -1f) {
            if (Log.isLoggable(TAG, Log.VERBOSE)) {
                Log.v(TAG, "percent left margin: " + value);
            }
            info = info != null ? info : new PercentLayoutInfo();
            info.leftMarginPercent = value;
        }
        value = array.getFraction(R.styleable.PercentLayout_Layout_layout_marginTopPercent, 1, 1,
                -1f);
        if (value != -1f) {
            if (Log.isLoggable(TAG, Log.VERBOSE)) {
                Log.v(TAG, "percent top margin: " + value);
            }
            info = info != null ? info : new PercentLayoutInfo();
            info.topMarginPercent = value;
        }
        value = array.getFraction(R.styleable.PercentLayout_Layout_layout_marginRightPercent, 1, 1,
                -1f);
        if (value != -1f) {
            if (Log.isLoggable(TAG, Log.VERBOSE)) {
                Log.v(TAG, "percent right margin: " + value);
            }
            info = info != null ? info : new PercentLayoutInfo();
            info.rightMarginPercent = value;
        }
        value = array.getFraction(R.styleable.PercentLayout_Layout_layout_marginBottomPercent, 1, 1,
                -1f);
        if (value != -1f) {
            if (Log.isLoggable(TAG, Log.VERBOSE)) {
                Log.v(TAG, "percent bottom margin: " + value);
            }
            info = info != null ? info : new PercentLayoutInfo();
            info.bottomMarginPercent = value;
        }
        value = array.getFraction(R.styleable.PercentLayout_Layout_layout_marginStartPercent, 1, 1,
                -1f);
        if (value != -1f) {
            if (Log.isLoggable(TAG, Log.VERBOSE)) {
                Log.v(TAG, "percent start margin: " + value);
            }
            info = info != null ? info : new PercentLayoutInfo();
            info.startMarginPercent = value;
        }
        value = array.getFraction(R.styleable.PercentLayout_Layout_layout_marginEndPercent, 1, 1,
                -1f);
        if (value != -1f) {
            if (Log.isLoggable(TAG, Log.VERBOSE)) {
                Log.v(TAG, "percent end margin: " + value);
            }
            info = info != null ? info : new PercentLayoutInfo();
            info.endMarginPercent = value;
        }
        array.recycle();
        if (Log.isLoggable(TAG, Log.DEBUG)) {
            Log.d(TAG, "constructed: " + info);
        }
        return info;
    }
是不是和我们平时的取值很类似,所有的值最终封装到PercentLayoutInfo对象中。
ok,到此我们的属性获取就介绍完成,有了这些属性,是不是onMeasure里面要进行使用呢?
(二) onMeasue中重新计算child的尺寸
@Override
    protected void onMeasure(int widthMeasureSpec, int heightMeasureSpec) {
        mHelper.adjustChildren(widthMeasureSpec, heightMeasureSpec);
        super.onMeasure(widthMeasureSpec, heightMeasureSpec);
        if (mHelper.handleMeasuredStateTooSmall()) {
            super.onMeasure(widthMeasureSpec, heightMeasureSpec);
        }
    }
可以看到onMeasure中的代码页很少,看来核心的代码都被封装在mHelper的方法中,我们直接看mHelper.adjustChildren方法。
/**
     * Iterates over children and changes their width and height to one calculated from percentage
     * values.
     * @param widthMeasureSpec Width MeasureSpec of the parent ViewGroup.
     * @param heightMeasureSpec Height MeasureSpec of the parent ViewGroup.
     */
    public void adjustChildren(int widthMeasureSpec, int heightMeasureSpec) {
        //...
        int widthHint = View.MeasureSpec.getSize(widthMeasureSpec);
        int heightHint = View.MeasureSpec.getSize(heightMeasureSpec);
        for (int i = 0, N = mHost.getChildCount(); i < N; i++) {
            View view = mHost.getChildAt(i);
            ViewGroup.LayoutParams params = view.getLayoutParams();
            if (params instanceof PercentLayoutParams) {
                PercentLayoutInfo info =
                        ((PercentLayoutParams) params).getPercentLayoutInfo();
                if (Log.isLoggable(TAG, Log.DEBUG)) {
                    Log.d(TAG, "using " + info);
                }
                if (info != null) {
                    if (params instanceof ViewGroup.MarginLayoutParams) {
                        info.fillMarginLayoutParams((ViewGroup.MarginLayoutParams) params,
                                widthHint, heightHint);
                    } else {
                        info.fillLayoutParams(params, widthHint, heightHint);
                    }
                }
            }
        }
    }
通过注释也能看出,此方法中遍历所有的孩子,通过百分比的属性重新设置其宽度和高度。
首先在widthHint、heightHint保存容器的宽、高,然后遍历所有的孩子,判断其LayoutParams是否是PercentLayoutParams类型,如果是,通过params.getPercentLayoutInfo拿出info对象。
是否还记得,上面的分析中,PercentLayoutInfo保存了percent相关属性的值。
如果info不为null,则判断是否需要处理margin;我们直接看fillLayoutParams方法(处理margin也是类似的)。
/**
         * Fills {@code ViewGroup.LayoutParams} dimensions based on percentage values.
         */
        public void fillLayoutParams(ViewGroup.LayoutParams params, int widthHint,
                int heightHint) {
            // Preserve the original layout params, so we can restore them after the measure step.
            mPreservedParams.width = params.width;
            mPreservedParams.height = params.height;
            if (widthPercent >= 0) {
                params.width = (int) (widthHint * widthPercent);
            }
            if (heightPercent >= 0) {
                params.height = (int) (heightHint * heightPercent);
            }
            if (Log.isLoggable(TAG, Log.DEBUG)) {
                Log.d(TAG, "after fillLayoutParams: (" + params.width + ", " + params.height + ")");
            }
        }
首先保存原本的width和height,然后重置params的width和height为(int) (widthHint *widthPercent)和(int) (heightHint *heightPercent);。
到此,其实我们的百分比转换就结束了,理论上就已经实现了对于百分比的支持,不过Google还考虑了一些细节。
我们回到onMeasure方法:
@Override
    protected void onMeasure(int widthMeasureSpec, int heightMeasureSpec) {
        mHelper.adjustChildren(widthMeasureSpec, heightMeasureSpec);
        super.onMeasure(widthMeasureSpec, heightMeasureSpec);
        if (mHelper.handleMeasuredStateTooSmall()) {
            super.onMeasure(widthMeasureSpec, heightMeasureSpec);
        }
    }
下面还有个mHelper.handleMeasuredStateTooSmall的判断,也就是说,如果你设置的百分比,最终计算出来的MeasuredSize过小的话,会进行一些操作。
代码如下:
public boolean handleMeasuredStateTooSmall() {
        boolean needsSecondMeasure = false;
        for (int i = 0, N = mHost.getChildCount(); i < N; i++) {
            View view = mHost.getChildAt(i);
            ViewGroup.LayoutParams params = view.getLayoutParams();
            if (Log.isLoggable(TAG, Log.DEBUG)) {
                Log.d(TAG, "should handle measured state too small " + view + " " + params);
            }
            if (params instanceof PercentLayoutParams) {
                PercentLayoutInfo info =
                        ((PercentLayoutParams) params).getPercentLayoutInfo();
                if (info != null) {
                    if (shouldHandleMeasuredWidthTooSmall(view, info)) {
                        needsSecondMeasure = true;
                        params.width = ViewGroup.LayoutParams.WRAP_CONTENT;
                    }
                    if (shouldHandleMeasuredHeightTooSmall(view, info)) {
                        needsSecondMeasure = true;
                        params.height = ViewGroup.LayoutParams.WRAP_CONTENT;
                    }
                }
            }
        }
        if (Log.isLoggable(TAG, Log.DEBUG)) {
            Log.d(TAG, "should trigger second measure pass: " + needsSecondMeasure);
        }
        return needsSecondMeasure;
    }
首先遍历所有的孩子,拿出孩子的layoutparams,如果是PercentLayoutParams实例,则取出info。如果info不为null,调用shouldHandleMeasuredWidthTooSmall判断:
private static boolean shouldHandleMeasuredWidthTooSmall(View view, PercentLayoutInfo info) {
        int state = ViewCompat.getMeasuredWidthAndState(view) & ViewCompat.MEASURED_STATE_MASK;
        return state == ViewCompat.MEASURED_STATE_TOO_SMALL && info.widthPercent >= 0 &&
                info.mPreservedParams.width == ViewGroup.LayoutParams.WRAP_CONTENT;
    }
这里就是判断,如果你设置的measuredWidth或者measureHeight过小的话,并且你在布局文件中layout_w/h设置的是WRAP_CONTENT的话,将params.width / height=ViewGroup.LayoutParams.WRAP_CONTENT,然后重新测量。
哈,onMeasure终于结束了~~~现在我觉得应该代码结束了吧,尺寸都设置好了,还需要干嘛么,but,你会发现onLayout也重写了,我们又不改变layout规则,在onLayout里面干什么毛线:
@Override
    protected void onLayout(boolean changed, int left, int top, int right, int bottom) {
        super.onLayout(changed, left, top, right, bottom);
        mHelper.restoreOriginalParams();
    }
继续看mHelper.restoreOriginalParams
/**
     * Iterates over children and restores their original dimensions that were changed for
     * percentage values. Calling this method only makes sense if you previously called
     * {@link PercentLayoutHelper#adjustChildren(int, int)}.
     */
    public void restoreOriginalParams() {
        for (int i = 0, N = mHost.getChildCount(); i < N; i++) {
            View view = mHost.getChildAt(i);
            ViewGroup.LayoutParams params = view.getLayoutParams();
            if (Log.isLoggable(TAG, Log.DEBUG)) {
                Log.d(TAG, "should restore " + view + " " + params);
            }
            if (params instanceof PercentLayoutParams) {
                PercentLayoutInfo info =
                        ((PercentLayoutParams) params).getPercentLayoutInfo();
                if (Log.isLoggable(TAG, Log.DEBUG)) {
                    Log.d(TAG, "using " + info);
                }
                if (info != null) {
                    if (params instanceof ViewGroup.MarginLayoutParams) {
                        info.restoreMarginLayoutParams((ViewGroup.MarginLayoutParams) params);
                    } else {
                        info.restoreLayoutParams(params);
                    }
                }
            }
        }
    }
噗,原来是重新恢复原本的尺寸值,也就是说onMeasure里面的对值进行了改变,测量完成后。在这个地方,将值又恢复成如果布局文件中的值,上面写的都是0。恢复很简单:
public void restoreLayoutParams(ViewGroup.LayoutParams params) {
            params.width = mPreservedParams.width;
            params.height = mPreservedParams.height;
        }
你应该没有忘在哪存的把~忘了的话,麻烦Ctrl+F ‘mPreservedParams.width’ 。
也就是说,你去打印上面写法,布局文件中view的v.getLayoutParams().width,这个值应该是0。
这里感觉略微不爽~这个0没撒用处呀,还不如不重置~~
好了,到此就分析完了,其实主要就几个步骤:
- LayoutParams中属性的获取
- onMeasure中,改变params.width为百分比计算结果,测量
- 如果测量值过小且设置的w/h是wrap_content,重新测量
- onLayout中,重置params.w/h为布局文件中编写的值
可以看到,有了RelativeLayout、FrameLayout的扩展,竟然没有LinearLayout几个意思。好在,我们的核心代码都由Percent
LayoutHelper封装了,自己扩展下LinearLayout也不复杂。
三、实现PercentLinearlayout
可能有人会说,有了weight呀,但是weight能做到宽、高同时百分比赋值嘛?
好了,代码很简单,如下:
(一)PercentLinearLayout
package com.juliengenoud.percentsamples;
import android.content.Context;
import android.content.res.TypedArray;
import android.support.percent.PercentLayoutHelper;
import android.util.AttributeSet;
import android.view.ViewGroup;
import android.widget.LinearLayout;
/**
 * Created by zhy on 15/6/30.
 */
public class PercentLinearLayout extends LinearLayout
{
    private PercentLayoutHelper mPercentLayoutHelper;
    public PercentLinearLayout(Context context, AttributeSet attrs)
    {
        super(context, attrs);
        mPercentLayoutHelper = new PercentLayoutHelper(this);
    }
    @Override
    protected void onMeasure(int widthMeasureSpec, int heightMeasureSpec)
    {
        mPercentLayoutHelper.adjustChildren(widthMeasureSpec, heightMeasureSpec);
        super.onMeasure(widthMeasureSpec, heightMeasureSpec);
        if (mPercentLayoutHelper.handleMeasuredStateTooSmall())
        {
            super.onMeasure(widthMeasureSpec, heightMeasureSpec);
        }
    }
    @Override
    protected void onLayout(boolean changed, int l, int t, int r, int b)
    {
        super.onLayout(changed, l, t, r, b);
        mPercentLayoutHelper.restoreOriginalParams();
    }
    @Override
    public LayoutParams generateLayoutParams(AttributeSet attrs)
    {
        return new LayoutParams(getContext(), attrs);
    }
    public static class LayoutParams extends LinearLayout.LayoutParams
            implements PercentLayoutHelper.PercentLayoutParams
    {
        private PercentLayoutHelper.PercentLayoutInfo mPercentLayoutInfo;
        public LayoutParams(Context c, AttributeSet attrs)
        {
            super(c, attrs);
            mPercentLayoutInfo = PercentLayoutHelper.getPercentLayoutInfo(c, attrs);
        }
        @Override
        public PercentLayoutHelper.PercentLayoutInfo getPercentLayoutInfo()
        {
            return mPercentLayoutInfo;
        }
        @Override
        protected void setBaseAttributes(TypedArray a, int widthAttr, int heightAttr)
        {
            PercentLayoutHelper.fetchWidthAndHeight(this, a, widthAttr, heightAttr);
        }
        public LayoutParams(int width, int height) {
            super(width, height);
        }
        public LayoutParams(ViewGroup.LayoutParams source) {
            super(source);
        }
        public LayoutParams(MarginLayoutParams source) {
            super(source);
        }
    }
}
如果你详细看了上面的源码分析,这个代码是不是没撒解释的了~
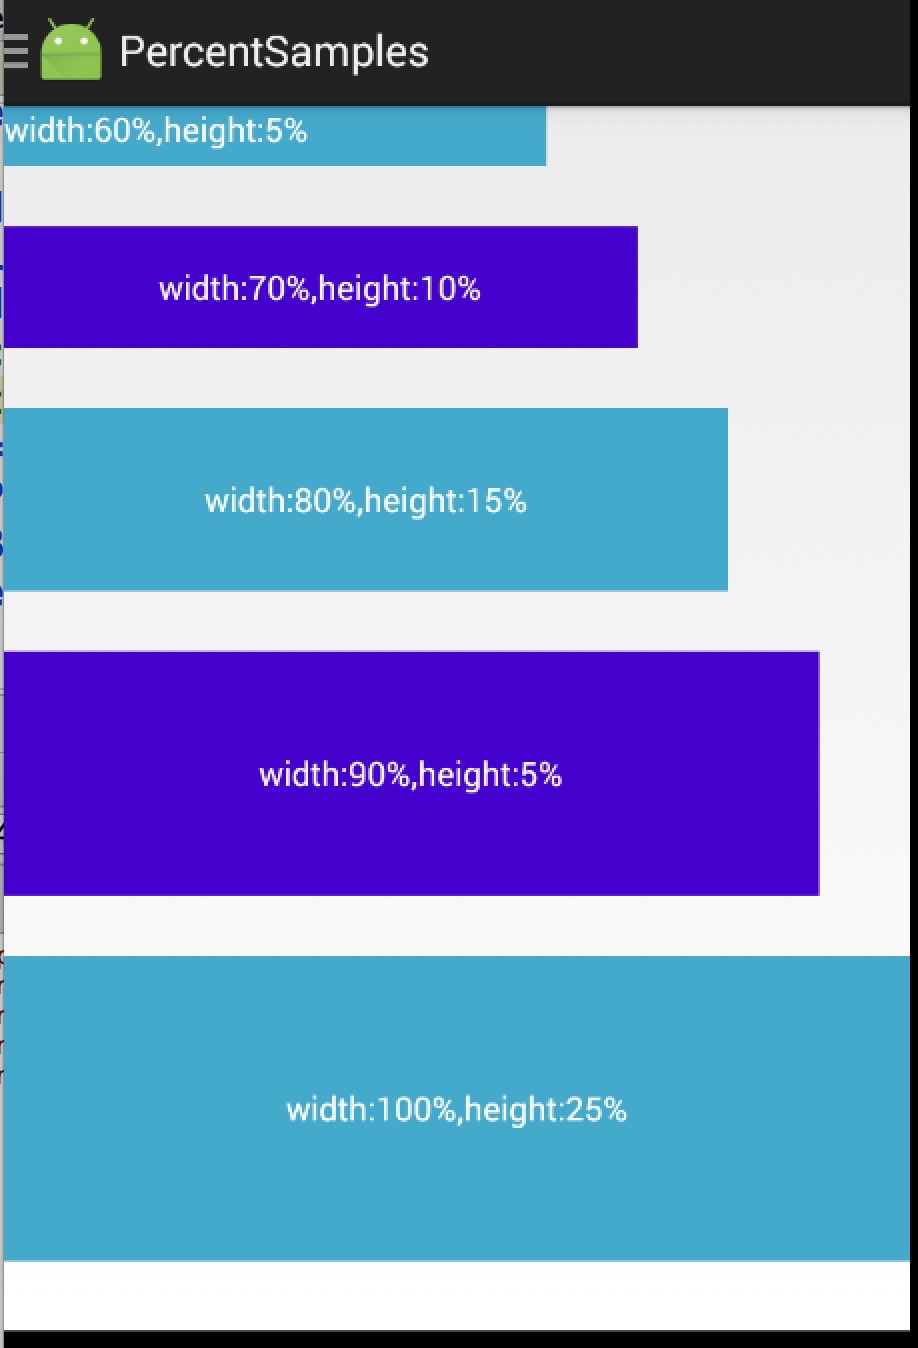
(二)测试布局
<?xml version="1.0" encoding="utf-8"?>
<com.juliengenoud.percentsamples.PercentLinearLayout
    xmlns:android="http://schemas.android.com/apk/res/android"
    xmlns:app="http://schemas.android.com/apk/res-auto"
    android:layout_width="match_parent"
    android:layout_height="match_parent"
    android:orientation="vertical">
    <TextView
        android:layout_width="0dp"
        android:layout_height="0dp"
        android:background="#ff44aacc"
        android:text="width:60%,height:5%"
        android:textColor="#ffffff"
        app:layout_heightPercent="5%"
        app:layout_marginBottomPercent="5%"
        app:layout_widthPercent="60%"/>
    <TextView
        android:layout_width="0dp"
        android:layout_height="0dp"
        android:background="#ff4400cc"
        android:gravity="center"
        android:textColor="#ffffff"
        android:text="width:70%,height:10%"
        app:layout_heightPercent="10%"
        app:layout_marginBottomPercent="5%"
        app:layout_widthPercent="70%"/>
    <TextView
        android:layout_width="0dp"
        android:layout_height="0dp"
        android:background="#ff44aacc"
        android:gravity="center"
        android:text="width:80%,height:15%"
        android:textColor="#ffffff"
        app:layout_heightPercent="15%"
        app:layout_marginBottomPercent="5%"
        app:layout_widthPercent="80%"/>
    <TextView
        android:layout_width="0dp"
        android:layout_height="0dp"
        android:background="#ff4400cc"
        android:gravity="center"
        android:text="width:90%,height:5%"
        android:textColor="#ffffff"
        app:layout_heightPercent="20%"
        app:layout_marginBottomPercent="10%"
        app:layout_widthPercent="90%"/>
    <TextView
        android:layout_width="match_parent"
        android:layout_height="0dp"
        android:background="#ff44aacc"
        android:gravity="center"
        android:text="width:100%,height:25%"
        android:textColor="#ffffff"
        app:layout_heightPercent="25%"
        app:layout_marginBottomPercent="5%"
        />
</com.juliengenoud.percentsamples.PercentLinearLayout>
我们纵向排列的几个TextView,分别设置宽/高都为百分比,且之间的间隔为5%p。
(三)效果图
ok,到此,我们使用、源码分析、扩展PercentLinearLayout就结束了。
添加PercentLinearLayout后的地址:点击查看
扩展下载:android-percent-support-extend 包含android studio, eclipse项目,以及上述源码。
原文出处:Android 增强版百分比布局库 为了适配而扩展
一 概述
上周一我们发布了Android 百分比布局库(percent-support-lib)
解析与扩展中对percent-support这个库进行了解析和添加了PercentLinearLayout的支持。
那么为什么本篇博客的存在的意义是什么呢?
首先我们回顾下百分比布局库的用法,提供了PercentRelativeLayout、PercentFrameLayout供大家在编写的时候,对于以下属性:
layout_widthPercent、layout_heightPercent、
layout_marginPercent、layout_marginLeftPercent、
layout_marginTopPercent、layout_marginRightPercent、
layout_marginBottomPercent、layout_marginStartPercent、layout_marginEndPercent。
可以使用百分比进行设置宽、高、边距,的确给我们在适配上提供了极大的便利,但是在使用过程中,觉得存在一些场景无法得到满足。什么场景呢?下面我举几个例子。
- 当使用图片时,无法设置宽高的比例
比如我们的图片宽高是200*100的,我们在使用过程中我们设置宽高为20%、10%,这样会造成图片的比例失调。为什么呢?因为20%参考的是屏幕的宽度,而10%参考的是屏幕的高度。
- 很难使用百分比定义一个正方形的控件
比如,我现在界面的右下角有一个FloatingActionButton,我希望其宽度和高度都为屏幕宽度的10%,很难做到。
- 一个控件的margin四个方向值一致
有些时候,我设置margin,我希望四边的边距一致的,但是如果目前设置5%,会造成,上下为高度的5%,左右边距为宽度的5%。
综合上述这些问题,可以发现目前的percent-support-lib并不能完全满足我们的需求,所以我们考虑对其进行扩展。说白了,我们就希望在布局的时候可以自己设定参考看度还是高度,比如上述2,我们对于宽高可以写成10%w,10%w。也就是在不改变原库的用法的前提下,添加一些额外的支持。
二 扩展的功能
目前我初步对该库进行了改写,github地址:android-percent-support- extend,对于官方库,做了如下的改变:
- 不改变原有库的用法
- 添加了
PercentLinearLayout - 支持百分比指定特定的参考值,比如宽度或者高度。
例如:app:layout_heightPercent="50%w", app:layout_marginPercent="15%w",
app:layout_marginBottomPercent="20%h".
- 支持通过app:layout_textSizePercent设置textView的textSize
- 对于外层套ScrollView的问题,目前可以在
PercentLinearLayout的外层使用ScrollView,不过对于宽度的百分比参考的就是android.R.id.content的高度(因为,无法参考父控件的高度,父控件的高度理论上依赖于子View高度,且模式为UNSPECIFIED)。
对于如何导入,也是相当的简单,android studio的用户,直接:
dependencies {
    //...
    compile 'com.zhy:percent-support-extends:1.0.1'
}
不需要导入官方的percent-support-lib了。
对于的三个类分别为:
com.zhy.android.percent.support.PercentLinearLayout
com.zhy.android.percent.support.PercentRelativeLayout
com.zhy.android.percent.support.PercentFrameLayout
对于eclipse的用户:github上自行下载源码,就几个类和一个attrs.xml,也可以在bintray.com/percent-support-extends 下载相关文件。
下面看几个具体的示例。
三 具体的示例
Demo 1
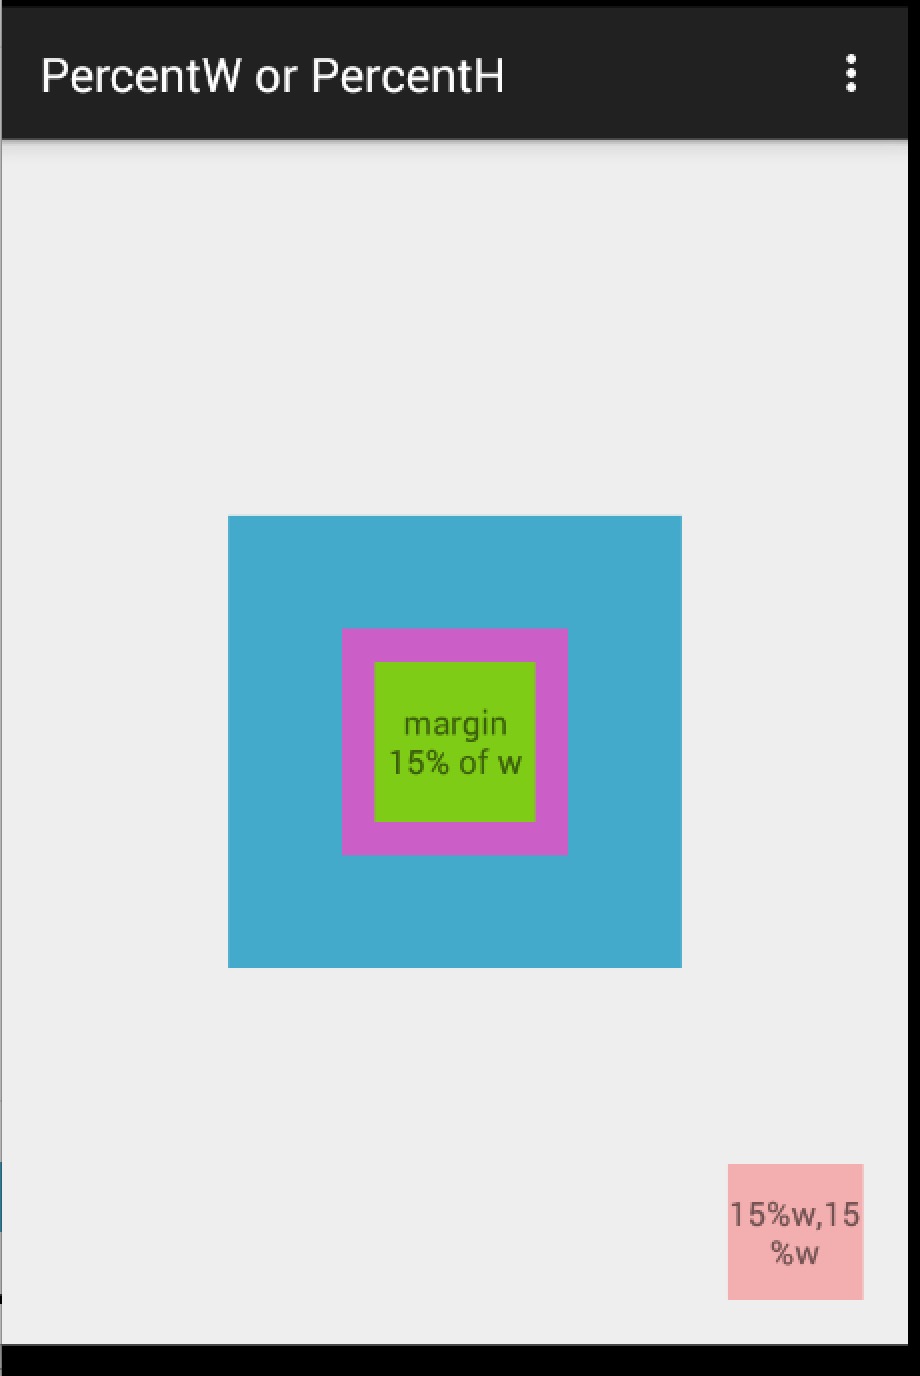
xml:
<?xml version="1.0" encoding="utf-8"?>
<com.zhy.android.percent.support.PercentFrameLayout
    xmlns:android="http://schemas.android.com/apk/res/android"
    xmlns:app="http://schemas.android.com/apk/res-auto"
    android:layout_width="match_parent"
    android:layout_height="match_parent"
    android:orientation="vertical">
    <com.zhy.android.percent.support.PercentFrameLayout
        android:layout_width="0dp"
        android:layout_height="0dp"
        android:layout_gravity="center"
        android:background="#ff44aacc"
        app:layout_heightPercent="50%w"
        app:layout_widthPercent="50%w">
        <com.zhy.android.percent.support.PercentFrameLayout
            android:layout_width="0dp"
            android:layout_height="0dp"
            android:layout_gravity="center"
            android:background="#ffcc5ec7"
            app:layout_heightPercent="50%w"
            app:layout_widthPercent="50%w">
            <TextView
                android:layout_width="match_parent"
                android:layout_height="match_parent"
                android:layout_gravity="center"
                android:background="#ff7ecc16"
                android:gravity="center"
                android:text="margin 15% of w"
                app:layout_marginPercent="15%w"
                />
        </com.zhy.android.percent.support.PercentFrameLayout>
    </com.zhy.android.percent.support.PercentFrameLayout>
    <TextView android:layout_width="0dp"
              android:layout_height="0dp"
              android:layout_gravity="bottom|right"
              android:background="#44ff0000"
              android:gravity="center"
              android:text="15%w,15%w"
              app:layout_heightPercent="15%w"
              app:layout_marginPercent="5%w"
              app:layout_widthPercent="15%w"/>
</com.zhy.android.percent.support.PercentFrameLayout>
Demo 2
xml:
<?xml version="1.0" encoding="utf-8"?>
<com.zhy.android.percent.support.PercentRelativeLayout
    xmlns:android="http://schemas.android.com/apk/res/android"
    xmlns:app="http://schemas.android.com/apk/res-auto"
    android:layout_width="match_parent"
    android:layout_height="match_parent"
    android:clickable="true">
    <TextView
        android:id="@+id/row_one_item_one"
        android:layout_width="0dp"
        android:layout_height="0dp"
        android:layout_alignParentTop="true"
        android:background="#7700ff00"
        android:text="w:70%,h:20%"
        android:gravity="center"
        app:layout_heightPercent="20%"
        app:layout_widthPercent="70%"/>
    <TextView
        android:id="@+id/row_one_item_two"
        android:layout_width="0dp"
        android:layout_height="0dp"
        android:layout_toRightOf="@+id/row_one_item_one"
        android:background="#396190"
        android:text="w:30%,h:20%"
        app:layout_heightPercent="20%"
        android:gravity="center"
        app:layout_widthPercent="30%"/>
    <ImageView
        android:id="@+id/row_two_item_one"
        android:layout_width="match_parent"
        android:layout_height="0dp"
        android:src="@drawable/tangyan"
        android:scaleType="centerCrop"
        android:layout_below="@+id/row_one_item_one"
        android:background="#d89695"
        app:layout_heightPercent="70%"/>
    <TextView
        android:layout_width="0dp"
        android:layout_height="0dp"
        android:layout_below="@id/row_two_item_one"
        android:background="#770000ff"
        android:gravity="center"
        android:text="width:100%,height:10%"
        app:layout_heightPercent="10%"
        app:layout_widthPercent="100%"/>
</com.zhy.android.percent.support.PercentRelativeLayout>
ok,例子都比较简单,主要就一个布局文件,可以看出上述我们可以给宽度、高度,边距等指定参考值为宽度或者高度。这样的话,在保证图片宽、高比例、控件设置为正方形等需求就没问题了。
接下来还有个例子,功能主要是设置TextView对于textSize的百分比设置;以及对于ScrollView的支持。当然了,对于ScrollView的支持,这个理论上是不支持的,因为大家都清楚,如果PercentLinearLayout在ScrollView中,那么高度的模式肯定是UNSPECIFIED,那么理论上来说高度是无限制的,也就是依赖于子View的高度,而百分比布局的高度是依赖于父View的高度的,所有是互斥的。而我们支持是:考虑到编写代码的时候,大多参考的是屏幕高度(android.R.id.content)的高度,所以如果在ScrollView中,编写10%h,这个百分比是依赖于屏幕高度的(不包括ActionBar的高度)。
Demo 3
xml:
<?xml version="1.0" encoding="utf-8"?>
<ScrollView
    xmlns:android="http://schemas.android.com/apk/res/android"
    xmlns:app="http://schemas.android.com/apk/res-auto"
    android:layout_width="match_parent"
    android:layout_height="match_parent">
    <com.zhy.android.percent.support.PercentLinearLayout
        xmlns:android="http://schemas.android.com/apk/res/android"
        xmlns:app="http://schemas.android.com/apk/res-auto"
        android:layout_width="match_parent"
        android:layout_height="wrap_content"
        android:orientation="vertical">
        <TextView
            android:layout_width="0dp"
            android:layout_height="0dp"
            android:background="#ff44aacc"
            android:gravity="center"
            android:text="width:60%,height:5%,ts:3%"
            android:textColor="#ffffff"
            app:layout_heightPercent="5%"
            app:layout_marginBottomPercent="5%"
            app:layout_textSizePercent="3%"
            app:layout_widthPercent="60%"/>
        <TextView
            android:layout_width="0dp"
            android:layout_height="0dp"
            android:background="#ff4400cc"
            android:gravity="center"
            android:text="width:70%,height:10%"
            android:textColor="#ffffff"
            app:layout_heightPercent="10%"
            app:layout_marginBottomPercent="5%"
            app:layout_widthPercent="70%"/>
        <TextView
            android:layout_width="0dp"
            android:layout_height="0dp"
            android:background="#ff44aacc"
            android:gravity="center"
            android:text="w:80%,h:15%,textSize:5%"
            android:textColor="#ffffff"
            app:layout_heightPercent="15%"
            app:layout_marginBottomPercent="5%"
            app:layout_textSizePercent="5%"
            app:layout_widthPercent="80%"/>
        <TextView
            android:layout_width="0dp"
            android:layout_height="0dp"
            android:background="#ff4400cc"
            android:gravity="center"
            android:text="width:90%,height:5%"
            android:textColor="#ffffff"
            app:layout_heightPercent="20%"
            app:layout_marginBottomPercent="5%"
            app:layout_widthPercent="90%"/>
        <TextView
            android:layout_width="match_parent"
            android:layout_height="0dp"
            android:background="#ff44aacc"
            android:gravity="center"
            android:text="width:100%,height:25%"
            android:textColor="#ffffff"
            app:layout_heightPercent="25%"
            app:layout_marginBottomPercent="5%"
            />
        <TextView
            android:layout_width="match_parent"
            android:layout_height="0dp"
            android:background="#ff44aacc"
            android:gravity="center"
            android:text="width:100%,height:30%"
            android:textColor="#ffffff"
            app:layout_heightPercent="30%"
            app:layout_marginBottomPercent="5%"
            />
    </com.zhy.android.percent.support.PercentLinearLayout>
</ScrollView>
上面的第三个TextView的字体设置的就是5%(默认参考容器高度)。整个PercentLinearLayout在ScrollView中。ok~姑且这样,由于源码比较简单,大家可以根据自己的实际需求去修改,前提尽可能不要改变原有的功能。
四 扩展的相关源码
(一) 关于attrs.xml
原库中所有的属性的format为fraction,但是由于我期望的写法有10%w,10%h,10%,没有找到合适的format,就直接定义为string了~string我可以自己去解析~
<?xml version="1.0" encoding="utf-8"?>
<resources>
    <declare-styleable name="PercentLayout_Layout">
        <attr name="layout_widthPercent" format="string"/>
        <attr name="layout_heightPercent" format="string"/>
        <attr name="layout_marginPercent" format="string"/>
        <attr name="layout_marginLeftPercent" format="string"/>
        <attr name="layout_marginTopPercent" format="string"/>
        <attr name="layout_marginRightPercent" format="string"/>
        <attr name="layout_marginBottomPercent" format="string"/>
        <attr name="layout_marginStartPercent" format="string"/>
        <attr name="layout_marginEndPercent" format="string"/>
        <attr name="layout_textSizePercent" format="string"/>
    </declare-styleable>
</resources>
(二) 获取自定义属性的值及使用
如果看了上篇博文的话,应该清楚,对于自定义属性的值是在PercentLayoutHelper.getPercentLayoutInfo(c,attrs)中获取的。
简单看下修改后的代码:
public static PercentLayoutInfo getPercentLayoutInfo(Context context,                                                    AttributeSet attrs)
    {
        PercentLayoutInfo info = null;
        TypedArray array = context.obtainStyledAttributes(attrs, R.styleable.PercentLayout_Layout);
        String sizeStr = array.getString(R.styleable.PercentLayout_Layout_layout_widthPercent);
        PercentLayoutInfo.PercentVal percentVal = getPercentVal(sizeStr, true);
        if (percentVal != null)
        {
            if (Log.isLoggable(TAG, Log.VERBOSE))
            {
                Log.v(TAG, "percent width: " + percentVal.percent);
            }
            info = info != null ? info : new PercentLayoutInfo();
            info.widthPercent = percentVal;
        }
        //省略了获取其他的类似属性
        array.recycle();
        return info;
    }
    private static final String REGEX_PERCENT = "^(([0-9]+)([.]([0-9]+))?|([.]([0-9]+))?)%([wh]?)$";
    /**
     * widthStr to PercentVal
     * <br/>
     * eg: 35%w => new PercentVal(35, true)
     *
     * @param percentStr
     * @param isOnWidth
     * @return
     */
    private static PercentLayoutInfo.PercentVal getPercentVal(String percentStr, boolean isOnWidth)
    {
        //valid param
        if (percentStr == null)
        {
            return null;
        }
        Pattern p = Pattern.compile(REGEX_PERCENT);
        Matcher matcher = p.matcher(percentStr);
        if (!matcher.matches())
        {
            throw new RuntimeException("the value of layout_xxxPercent invalid! ==>" + percentStr);
        }
        int len = percentStr.length();
        //extract the float value
        String floatVal = matcher.group(1);
        String lastAlpha = percentStr.substring(len - 1);
        float percent = Float.parseFloat(floatVal) / 100f;
        boolean isBasedWidth = (isOnWidth && !lastAlpha.equals("h")) || lastAlpha.equals("w");
        return new PercentLayoutInfo.PercentVal(percent, isBasedWidth);
    }
首先我们获取自定义属性的填写的值,通过getPercentVal方法,在该方法内部通过正则校验其合法性,如果合法,则将其拆解封装成PercentVal对象,该对象中记录百分比值,已经知否参考宽度的布尔值(如果参考宽度则为true,否则为false)。对于没有后缀w|h的,和原库的解析方式相同。
PercentVal对象如下:
public static class PercentVal
{
     public float percent = -1;
     public boolean isBaseWidth;
     public PercentVal(float percent, boolean isBaseWidth)
     {
          this.percent = percent;
          this.isBaseWidth = isBaseWidth;
     }
}
对于定义的自定义属性获取完成之后,剩下的无非是测量时候对于原本的LayoutParams中的宽度和高度的赋值做简单的修改。参考上一篇的源码,我们直接看
PercentLayoutInfo.fillLayoutParams(params, widthHint, heightHint);方法:
public void fillLayoutParams(ViewGroup.LayoutParams params, int widthHint,
                                     int heightHint)
        {
            // Preserve the original layout params, so we can restore them after the measure step.
            mPreservedParams.width = params.width;
            mPreservedParams.height = params.height;
            /*
            if (widthPercent >= 0) {
                params.width = (int) (widthHint * widthPercent);
            }
            if (heightPercent >= 0) {
                params.height = (int) (heightHint * heightPercent);
            }*/
            if (widthPercent != null)
            {
                int base = widthPercent.isBaseWidth ? widthHint : heightHint;
                params.width = (int) (base * widthPercent.percent);
            }
            if (heightPercent != null)
            {
                int base = heightPercent.isBaseWidth ? widthHint : heightHint;
                params.height = (int) (base * heightPercent.percent);
            }
            if (Log.isLoggable(TAG, Log.DEBUG))
            {
                Log.d(TAG, "after fillLayoutParams: (" + params.width + ", " + params.height + ")");
            }
        }
原本的源码比较简单,只需要将widthHint/heightHint乘以百分比即可(见上代码注释),而我们修改的也比较容易,首先判断参考宽度还是高度,然后乘以百分比(根据我们的对象PercentVal的属性)。
ok,大概的源码修改就是上述的内容,有兴趣的可以直接查看源码。
当然了,上述库中肯定还存在或多或少的问题,大家可以fork完善下,或者直接留言提意见都可以。
github地址:android-percent-support-extend ,用法参考上文,或者README。欢迎star and fork 。
原文出处:Android AutoLayout全新的适配方式 堪称适配终结者
一、概述
相信Android的开发者对于设配问题都比较苦恼,Google官方虽然给出了一系列的建议,但是想要单纯使用这些建议将设备很轻松的做好,还是相当困难的。个人也比较关注适配的问题,之前也发了几篇关于适配的文章,大致有:
ok,我大致说一下,没看过的先看完这篇,再考虑看不看以上几篇,本篇的灵感是来自以上几篇,但是适配的方便程度、以及效果远比上面几篇效果要好。
既然灵感来源于上述几篇,就大体介绍下:
第一篇:主要是根据设计图的尺寸,然后将设计图上标识的px尺寸,转化为百分比,为所有的主流屏幕去生成对应百分比的值,每个尺寸都会有一个values文件夹。存在一些问题:产生大量的文件夹,适配不了特殊的尺寸(必须建立默认的文件夹)
第二篇和第三篇:这两篇属于一样的了,主要是基于Google推出的百分比布局,已经很大程度解决了适配的问题。存在一些问题:使用起来比较反人类,因为设计图上标识的都是px,所以需要去计算百分比,然后这个百分比还是依赖父容器的,设计图可能并不会将每个父容器的尺寸都标识出来,所有很难使用(当然,有人已经采用自动化的工具去计算了)。还有个问题就是,因为依赖于父容器,导致ScrollView,ListView等容器内高度无法使用百分比。
可以看到都存在一些问题,或多或少都需要进行一些额外的工作,然而我希望适配是这样的:
- 拿到设计图,meta信息中填入设计图的尺寸,然后不需要额外计算,布局直接抄设计图上的尺寸,不产生任何多余的资源文件,完成各种分辨率的适配!
二、直观的体验
假设我们拿到一张设计图:
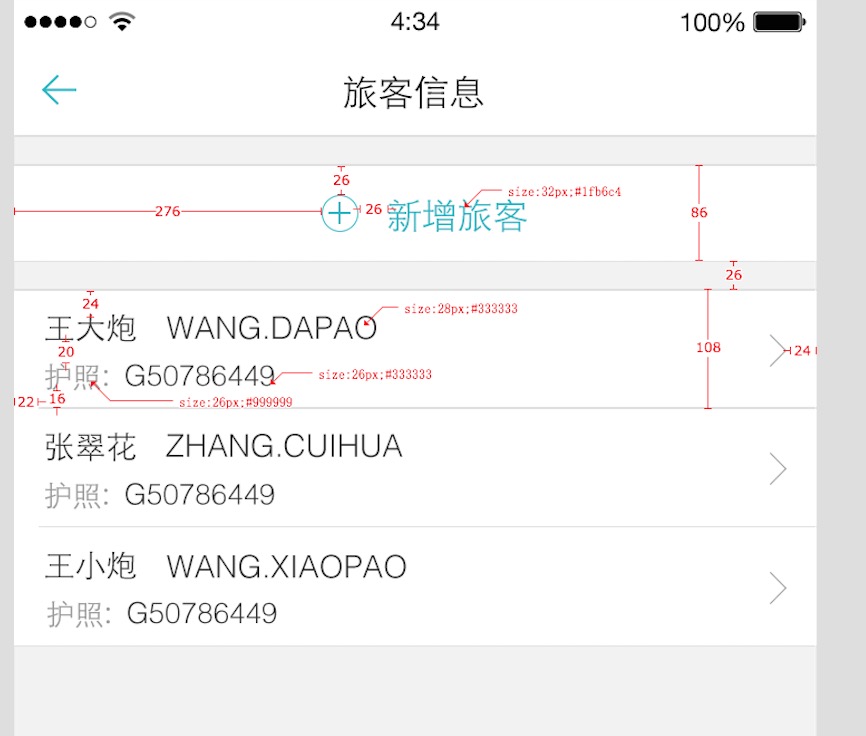
这样的设计图开发中很常见吧,有些公司可能需要自己去测量。
按照我们的思想:
布局直接抄设计图上的尺寸
对于,新增旅客我们的布局文库应该这么写:
<RelativeLayout
android:layout_width="match_parent"
android:layout_height="86px"
android:layout_marginTop="26px"
android:background="#ffffffff">
<ImageView
    android:id="@+id/id_tv_add"
    android:layout_width="34px"
    android:layout_height="34px"
    android:layout_gravity="center_vertical"
    android:layout_marginLeft="276px"
    android:layout_marginTop="26px"
    android:src="@mipmap/add"
    />
<TextView
    android:layout_width="wrap_content"
    android:layout_height="wrap_content"
    android:layout_centerVertical="true"
    android:layout_marginLeft="26px"
    android:layout_toRightOf="@id/id_tv_add"
    android:text="新增旅客"
    android:textColor="#1fb6c4"
    android:textSize="32px"
    />
</RelativeLayout>
来张组合图,感受一下:
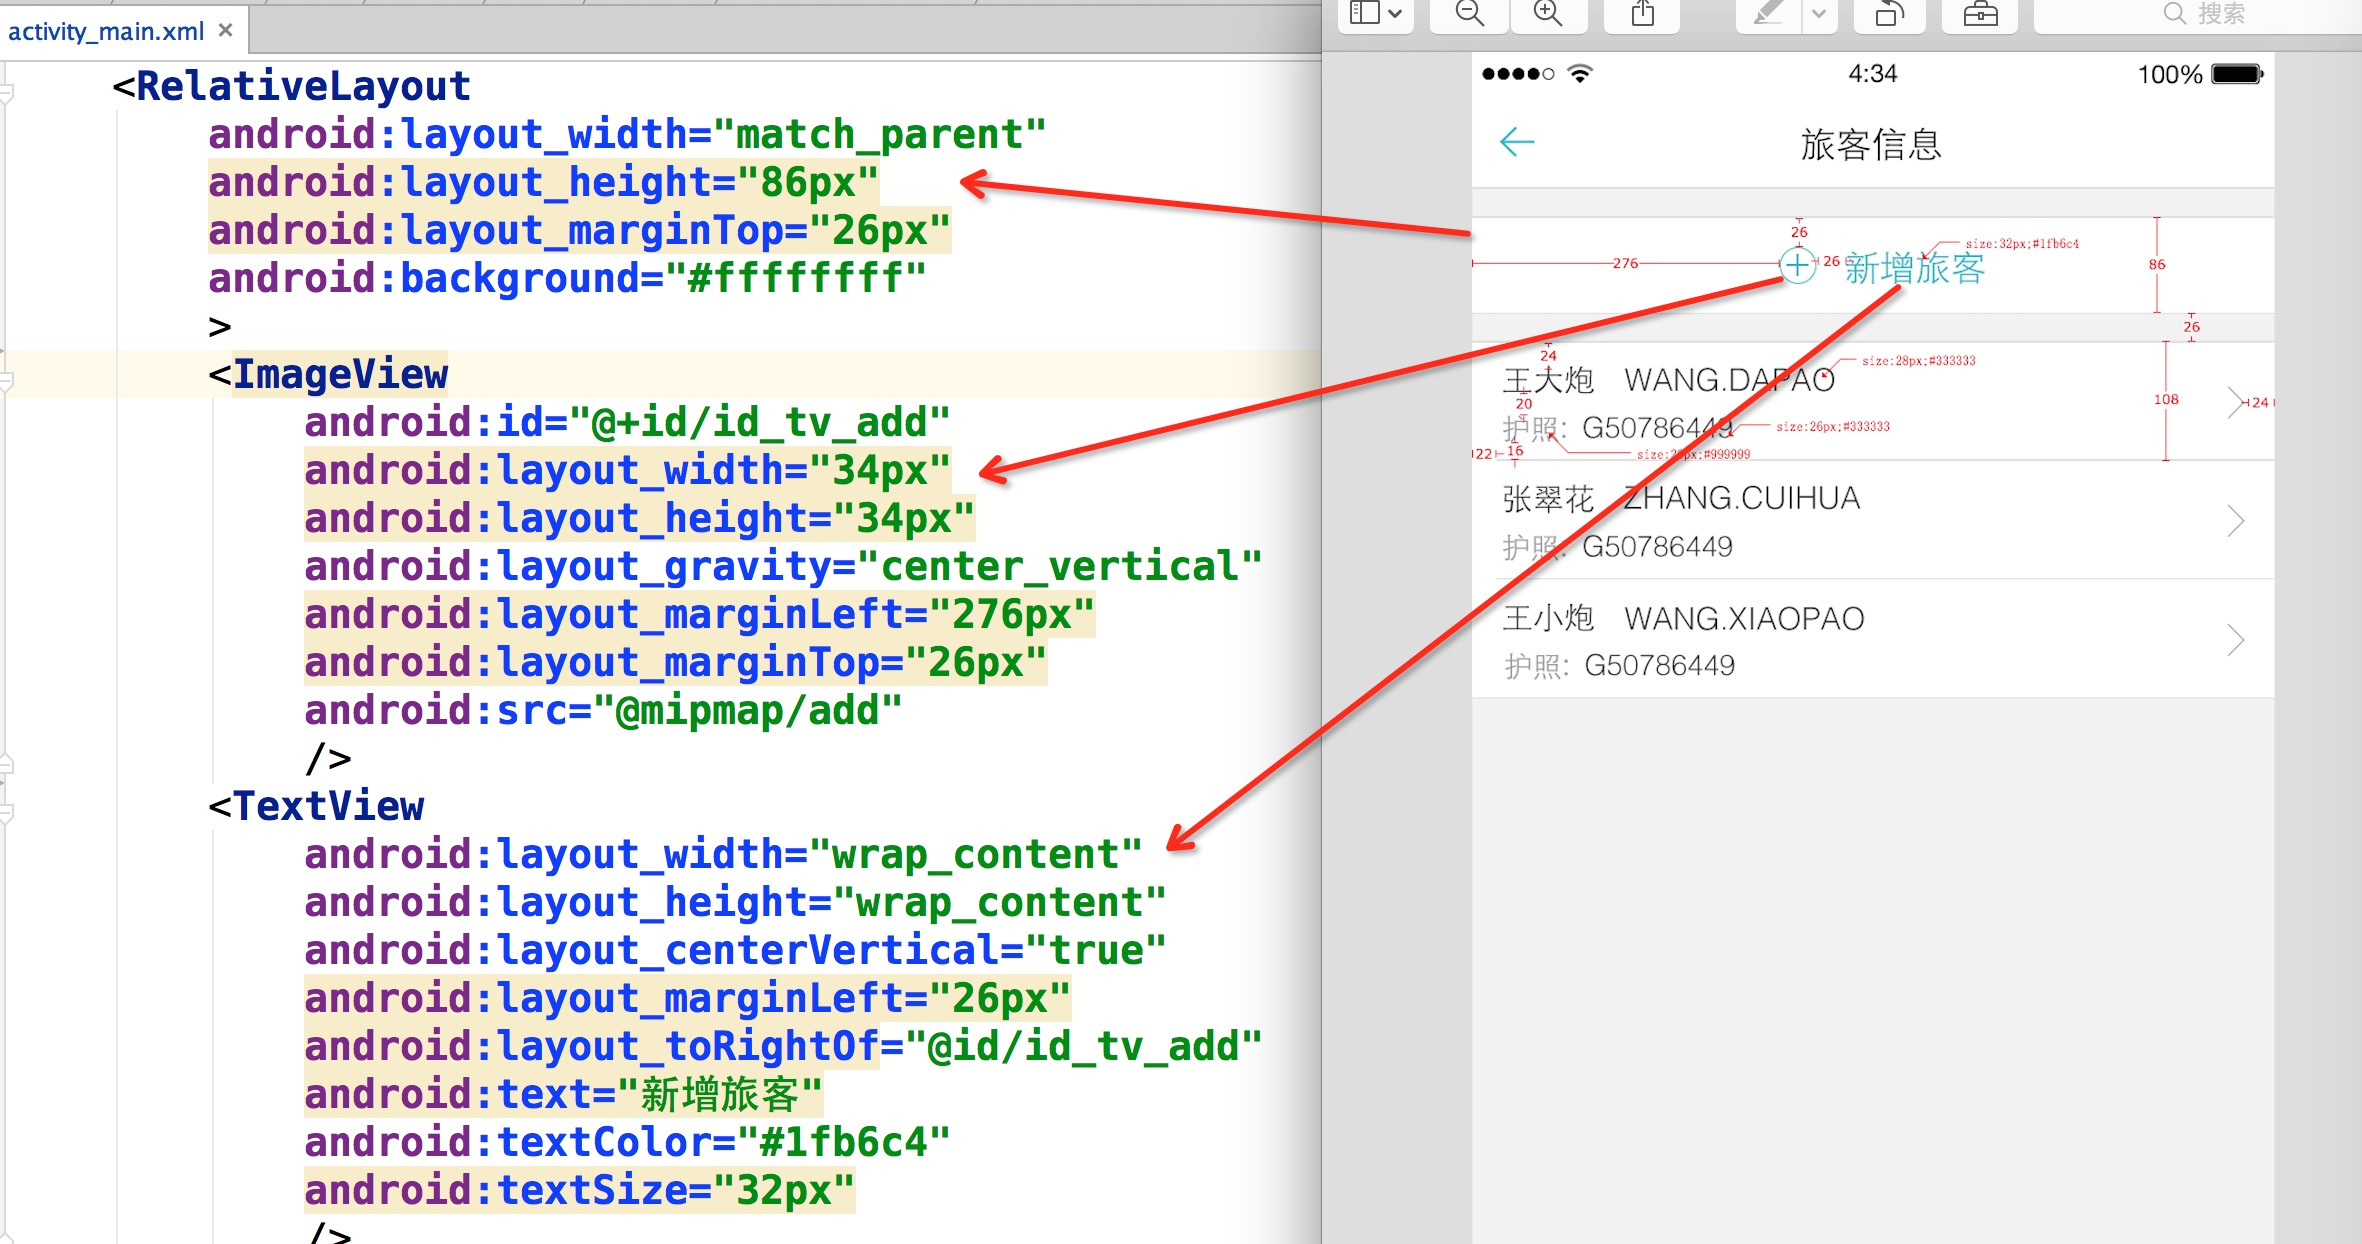
感受完了,想一想,按照这种方式去写布局你说爽不爽。
ok,那么对于Item的布局文件,就是这么写:
<RelativeLayout
    android:layout_width="match_parent"
    android:layout_height="108px"
    android:layout_marginTop="26px"
    android:background="#ffffffff"
    >
    <TextView
        android:layout_width="wrap_content"
        android:layout_height="wrap_content"
        android:layout_marginLeft="22px"
        android:layout_marginTop="16px"
        android:text="王大炮 WANG.DAPAO"
        android:textColor="#333"
        android:textSize="28px"
        />
    <TextView
        android:layout_width="wrap_content"
        android:layout_height="wrap_content"
        android:layout_alignParentBottom="true"
        android:layout_marginBottom="16px"
        android:layout_marginLeft="22px"
        android:text="护照:G50786449"
        android:textColor="#999"
        android:textSize="26px"
        />
</RelativeLayout>
看到这,我相信,你现在最大的疑问就是:你用的px,px能完成适配?搞笑吧?
那么首先说一下:这个px并不代表1像素,我在内部会进行百分比化处理,也就是说:720px高度的屏幕,你这里填写72px,占据10%;当这个布局文件运行在任何 分辨率的手机上,这个72px都代表10%的高度,这就是本库适配的原理。
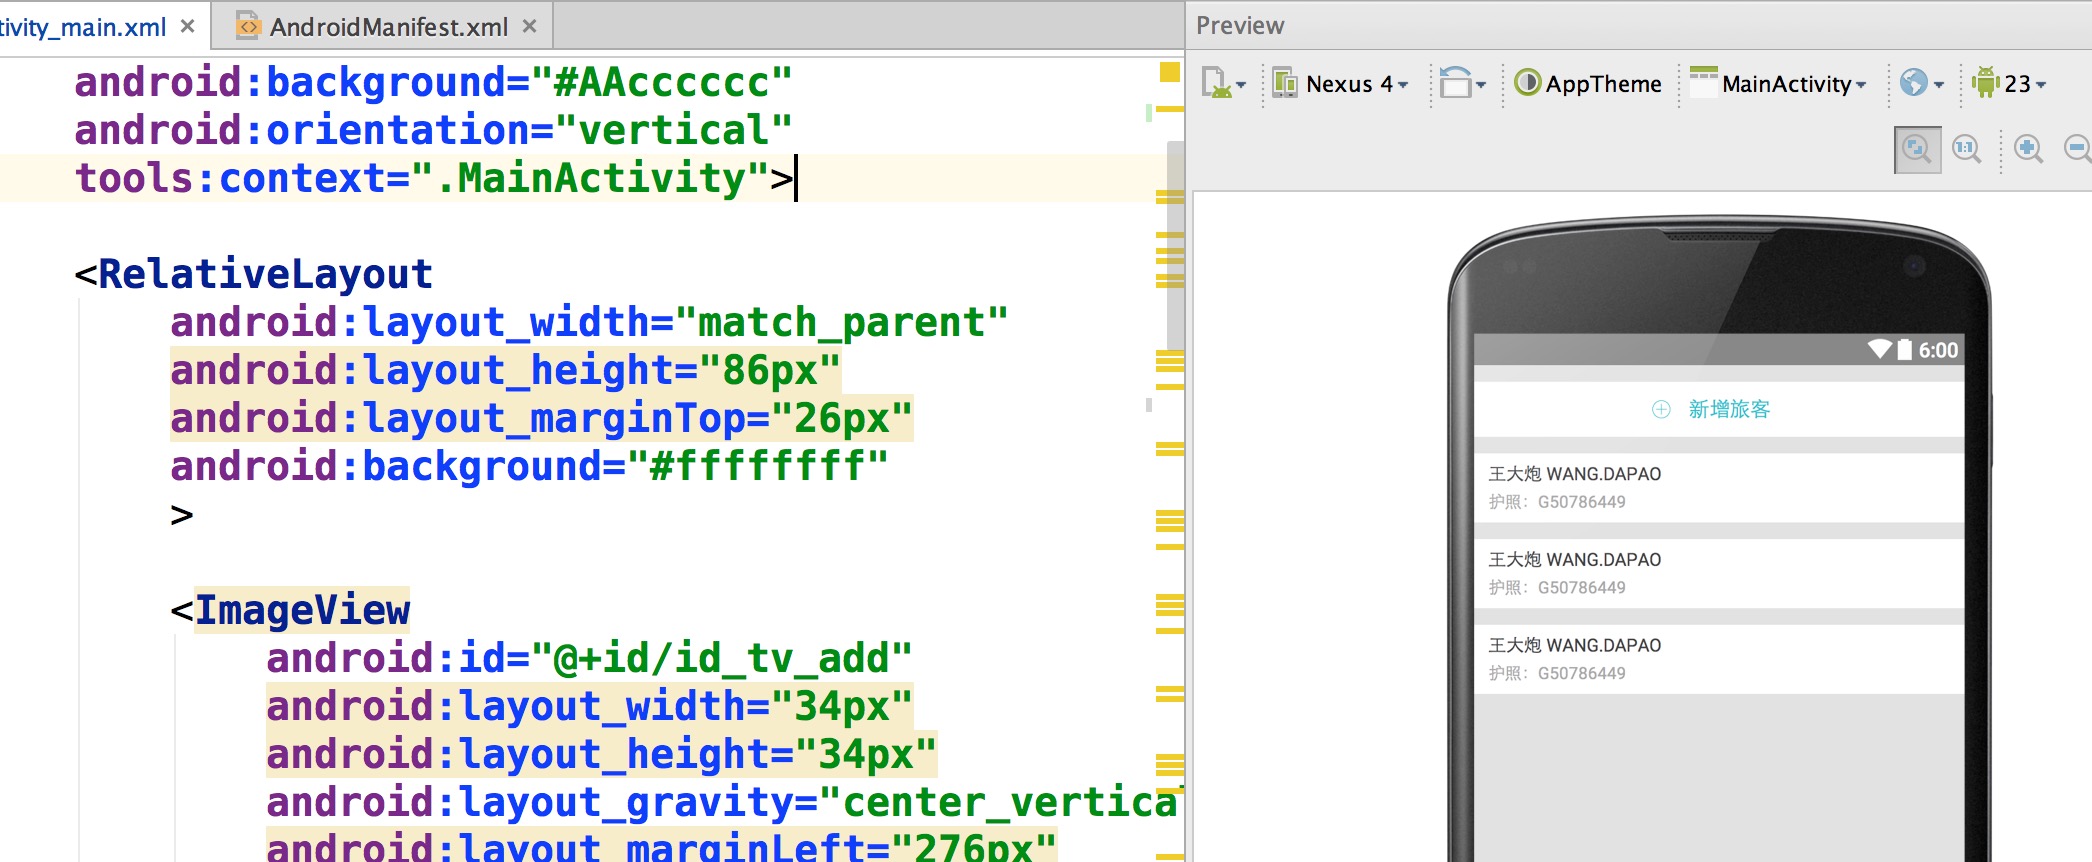
接下来:看下不同分辨率下的效果:
768*1280,Andriod 4.4.4

480*800,Android 2.3.7
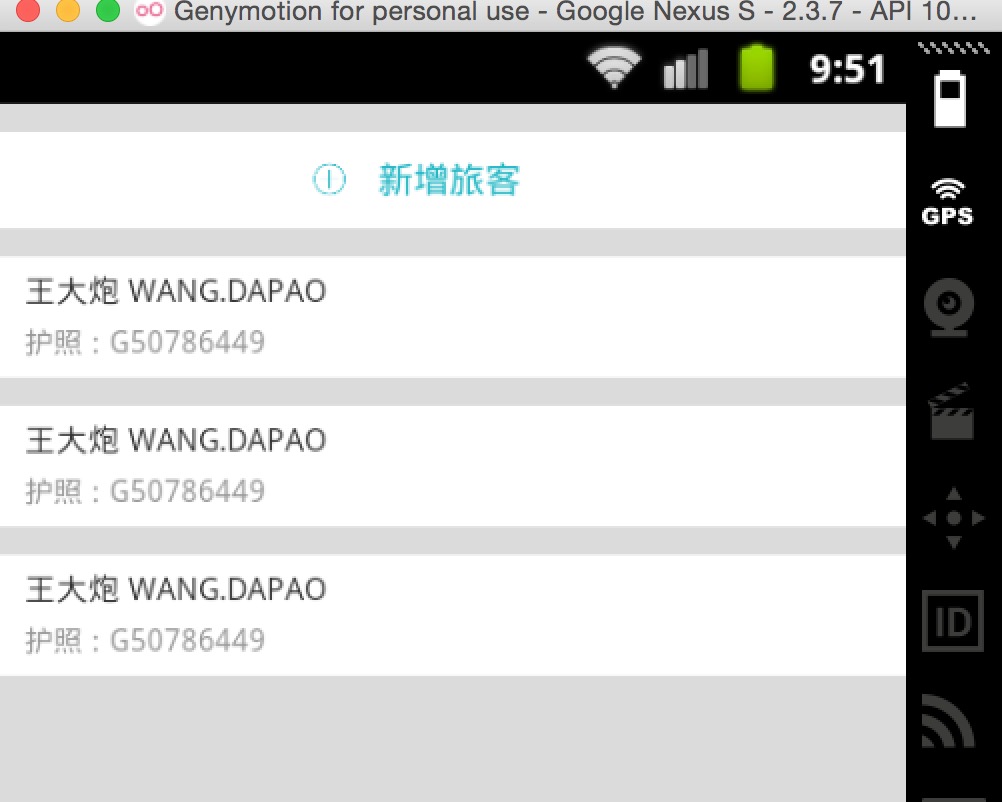
上述两个机器的分辨率差距相当大了,按照百分比的规则,完美实现了适配,最为重要的是:
- 再也不用拿着设计稿去想这控件的宽高到底取多少dp
- 再也不用去为多个屏幕去写多个dimens
- 再也不用去计算百分比了(如果使用百分比控件完成适配)
- 再也不用去跟UI MM去解释什么是dp了
接下来说下用法。
本库的地址:https://github.com/hongyangAndroid/AndroidAutoLayout
三、用法
用法
(1)注册设计图尺寸
将autolayout引入
dependencies {
    compile project(':autolayout')
}
对于eclipse的伙伴,只有去copy源码了~~
在你的项目的AndroidManifest中注明你的设计稿的尺寸。
<meta-data android:name="design_width" android:value="768"></meta-data>
<meta-data android:name="design_height" android:value="1280"></meta-data>
(2)Activity中开启设配
- 让你的Activity去继承
AutoLayoutActivity
ok,非常简单的两部即可引入项目,然后,然后干嘛?
然后就按照上个章节的编写方式开始玩耍吧~
ok,上面是最简单的用法,当然你也可以不去继承AutoLayoutActivity来使用。
AutoLayoutActivity的用法实际上是完成了一件事:
- LinearLayout -> AutoLinearLayout
- RelativeLayout -> AutoRelativeLayout
- FrameLayout -> AutoFrameLayout
如果你不想继承AutoLayoutActivity,那么你就得像Google的百分比库一样,去用AutoXXXLayout代替系统原有的XXXLayout。当然,你可以放心的是,所有的系统属性原有的属性都会支持,不过根布局上就不支持px的自动百分比化了,但是一般根布局都是MATCH_PARENT,而上述的方式,根布局也是可以直接px的百分比化的。
四、注意事项
(1)如何开启PreView
大家都知道,写布局文件的时候,不能实时的去预览效果,那么体验真的是非常的不好,也在很大程度上降低开发效率,所以下面教大家如何用好,用对PreView(针对该 库)。
首先,你要记得你设计稿的尺寸,比如 768 * 1280
然后在你的PreView面板,选择分辨率一致的设备:
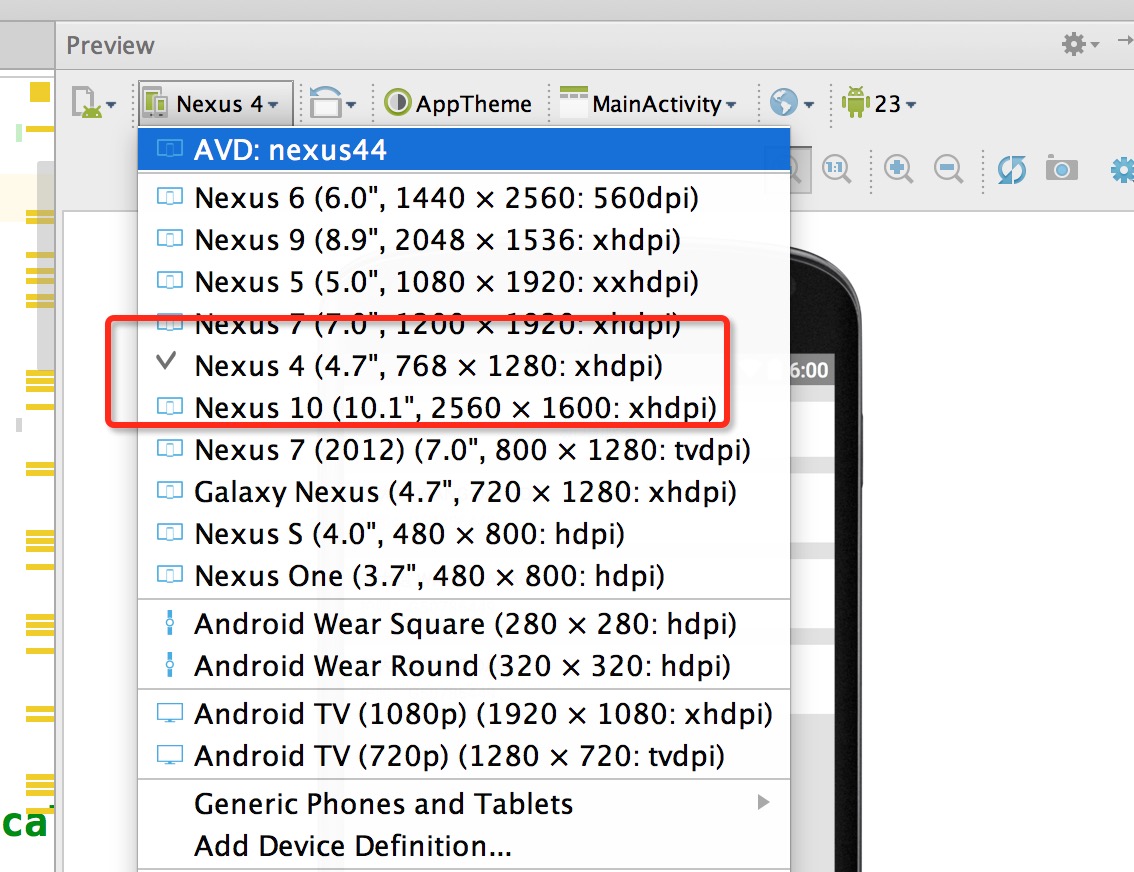
然后你就可以看到最为精确的预览了:
两个注意事项:
- 你们UI给的设计图的尺寸并非是主流的设计图,该尺寸没找到,你可以
拿显示器砸他自己去新建一个设备。 - 不要在PreView中去查看所有分辨率下的显示,是看不出来适配效果的,因为有些计算是动态的。
(2)关于TextView
TextView这个控件呢,可能和设计稿上会有一些出入,并非是此库的原因,而是与生俱来的特性。
比如:
<TextView
 textSize="32px"
 layout_height="wrap_contnt"
 />
你去运行肯定不是32px的高度,文字的上下方都会有一定的空隙。如何你将高度写死,也会发现文字显示不全。
恩,所以呢,灵活应对这个问题,对于存在字体标识很精确的值,你可以选择:对于TextView与其他控件的上下边距呢,尽可能的稍微写小一点。
其实我上面的例子,几乎都是TextView,所有我在编写Item里面的时候,也有意缩小了一下marginTop值等。不过,对于其他控件是不存在这样的问题的。
ps:因为TextView的上述问题:所以对于居中,虽然可以使用本库通过编写margin_left,margin_top等很轻松的完成居中。但是为了
精确起见,还是建议使用gravity,centerInXXX等属性完成。
(3) 指定设置的值参考宽度或者高度
由于该库的特点,布局文件中宽高上的1px是不相等的,于是如果需要宽高保持一致的情况,布局中使用属性:
app:layout_auto_basewidth="height",代表height上编写的像素值参考宽度。
app:layout_auto_baseheight="width",代表width上编写的像素值参考高度。
如果需要指定多个值参考宽度即:
app:layout_auto_basewidth="height|padding"
用|隔开,类似gravity的用法,取值为:
- width,height
- margin,marginLeft,marginTop,marginRight,marginBottom
- padding,paddingLeft,paddingTop,paddingRight,paddingBottom
- textSize.
(4)将状态栏区域作为内容区域
如果某个Activity需要将状态栏区域作为实际的内容区域时,那么可用高度会变大,你所要做的只有一件事:让这个Activity实现UseStatusBar接口(仅仅作为标识左右,不需要实现任何方法),当然你肯定要自己开启windowTranslucentStatus或者设置FLAG_TRANSLUCENT_STATUS。
注意:仅仅是改变状态栏颜色,并不需要实现此接口,因为并没有实际上增加可用高度。
五、其他
目前支持属性
- layout_width
- layout_height
- layout_margin(left,top,right,bottom)
- pading(left,top,right,bottom)
- textSize
- 不会影响系统所有的其他属性,以及不会影响dp,sp的使用
性能的提升
通过本库的方式去编写代码,可以在很大程序上使用margin,也就是说,对于View的位置非常好控制,从而能够减少非常多的嵌套,甚至任何一个复杂的界面做到无嵌套。
以及,几乎不需要去使用RelativeLayout的规则了,比如rightOf,完全可以由marginLeft完成,其他的rule同理。
对于LinearLayout的weight,几乎也不需要使用了,比如屏幕宽度720px,想要四个控件横向均分,完全可以写layout_width="180px"
我相信通过上述的介绍,你已经了解的本库适配的做法,而且可以说是我见过的最方便的适配方案,最大化的减轻了适配的负担,甚至比你不适配时编写UI都方便。目前本库,已经尝试用于项目中,尽可能去发现一些潜在的问题。
本库的地址:https://github.com/hongyangAndroid/AndroidAutoLayout,欢迎各位一起完善,让适配
问题消失在我们的痛苦中。
ok,最后,只有去体验了,才能发现优点和缺点~~